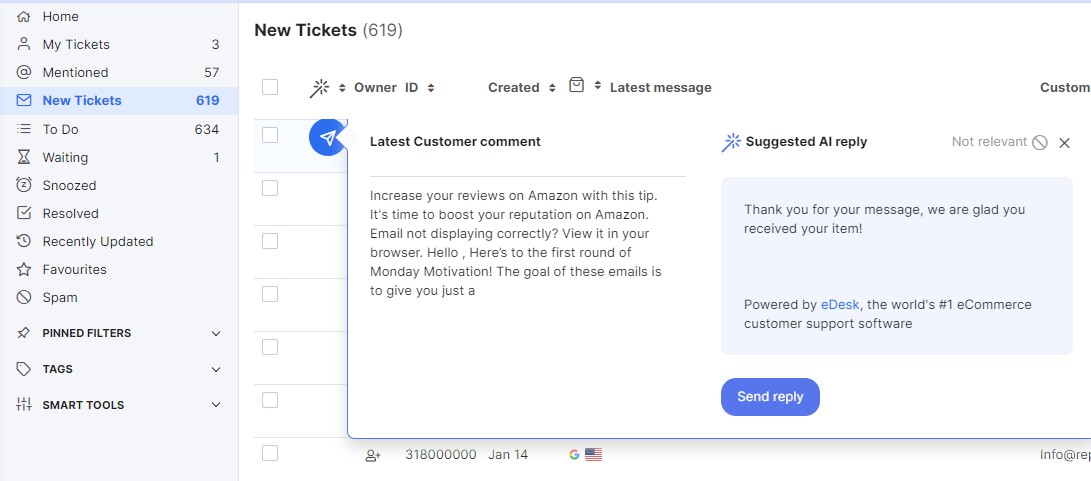
Rather than having customer messages spread across different inboxes and message centres without easy access to order information, eDesk Mailbox centralizes all your customer queries in one place, along with order details and conversation history.
This help file will guide you on how to make your team and customers happier with this simple 5-step eDesk setup guide.
Before you start
- You’ll need an Admin login to eDesk. If you don’t have an Admin login, you can request one from an Admin user within your business.
01 Get Connected.
The advantage of using an eCommerce helpdesk like eDesk is that it connects to all your sales and support channels, giving you quick access to customer data, which can be automatically added to your messages for faster replies (for more on this see our guide to Snippets, here).
To find out more about the Apps available with eDesk, click here.
When you're ready to connect a channel, click on the Settings→Channels→Add Channel. Just click on the channel you want to connect to and follow the instructions.
You can find more detailed instructions in the channel-specific guides here.
02 Solve tickets faster and better.
Tickets is simply another term for messages from your customers.
Now that you have connected a channel to your Mailbox, why don’t you try replying to a ticket? Psst! Try using this snippet to solve the ticket faster - ‘Hi, #consumer#’
Pretty cool right? But wait, there's more! The features below will boost your customer support and collaboration powers.
- Assign tickets
- Ticket statuses
- Add a note
- @mention a colleague
- Snooze a conversation
- Use smart snippets
Pro Tip: Invite your teammates to really see these features shine!
03 Organize your Mailbox.
Tags are just like labels, they group similar tickets together. While Tags help you to organize and structure your Mailbox, they’re also a useful starting point for automating tasks with eDesk.
So, rather than wasting hours repeatedly assigning all 'Return requests' to your colleague Phil, you can automatically tag and assign these tickets to him instead.
You’ll need to use Tags to do this, but you’ll also need to use Rules. Rules tell your Mailbox to automatically perform actions such as tagging and routing based on the conditions you decide.
1. First, you need to create a Tag. Go to Settings → Smart Tools → Tags
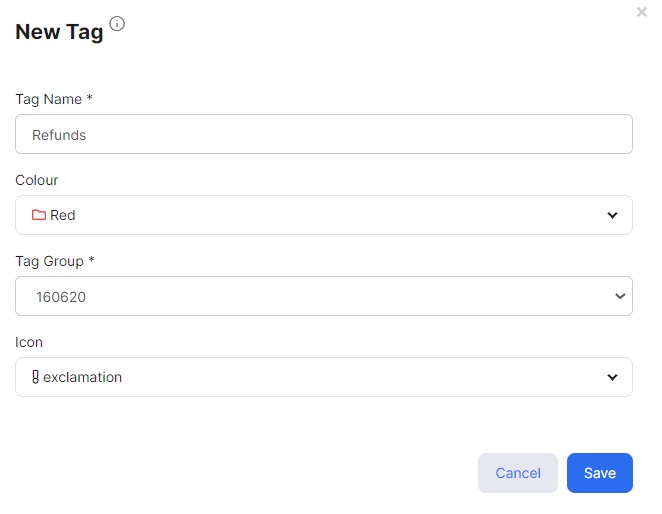 2. Name the tag (Make it descriptive enough that someone can quickly understand its purpose), and give it a color and icon to distinguish it.
Pro Tip: It’s worth taking a few minutes to come up with some naming, color, and icon best practices for your business.
3. Next, you need to create a rule. Go to Settings → Smart Tools → Message Rules
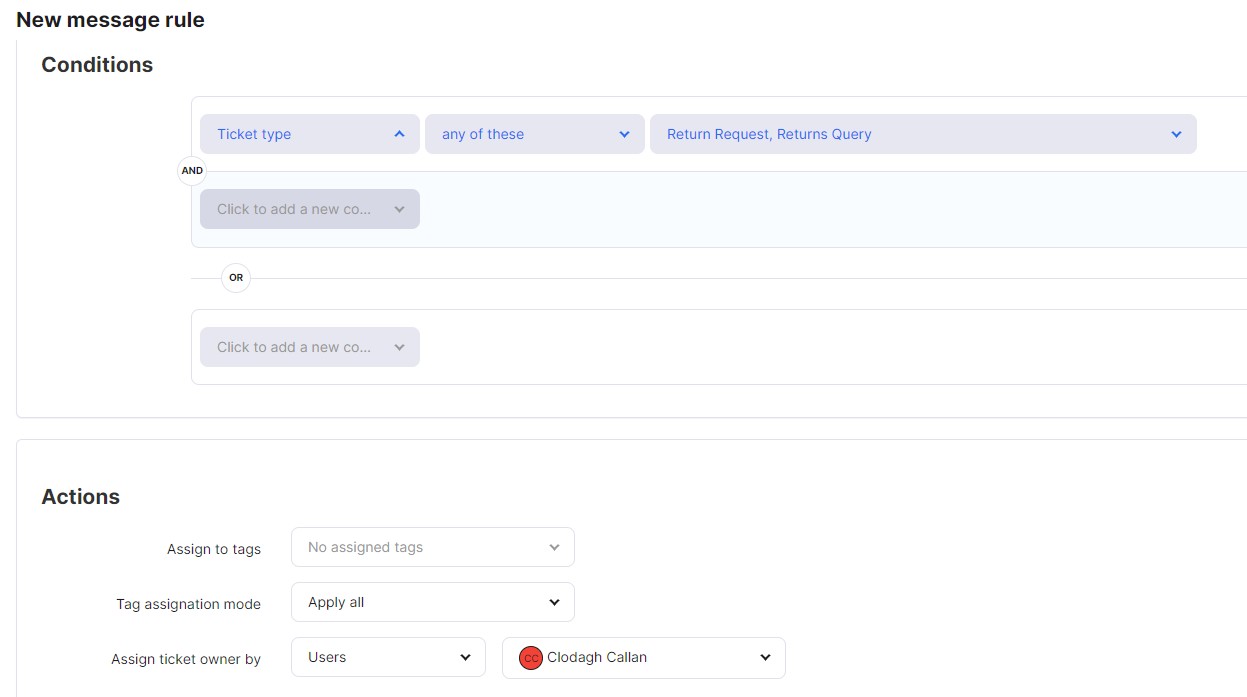
4. Create a rule to automatically tag tickets as they arrive in your Mailbox. If you’d like to automatically assign tickets with this tag, you can do so in this rule too.
Pro Tip: You can also pin your tags to your Dashboard and these will act like folders. Once you get the hang of them, they’ll save you and your team countless hours in organizing and triaging tickets. To find out more about Tags, click here.

.png)
04 Hello Automation, goodbye repetitive work!
eDesk can eliminate several hours of repetitive tasks, leaving you to concentrate on the important stuff that actually needs your attention.
- Automation trick number 1: Manual templates
I’m sure there are questions that customers ask you again and again, to the point where answering them has become mind-numbing. Manual templates can save you from typing that same response for the 100th (or 1000th) time.
To create a template, go to Settings → Smart Tools → Templates → Add template→ Manual Usage
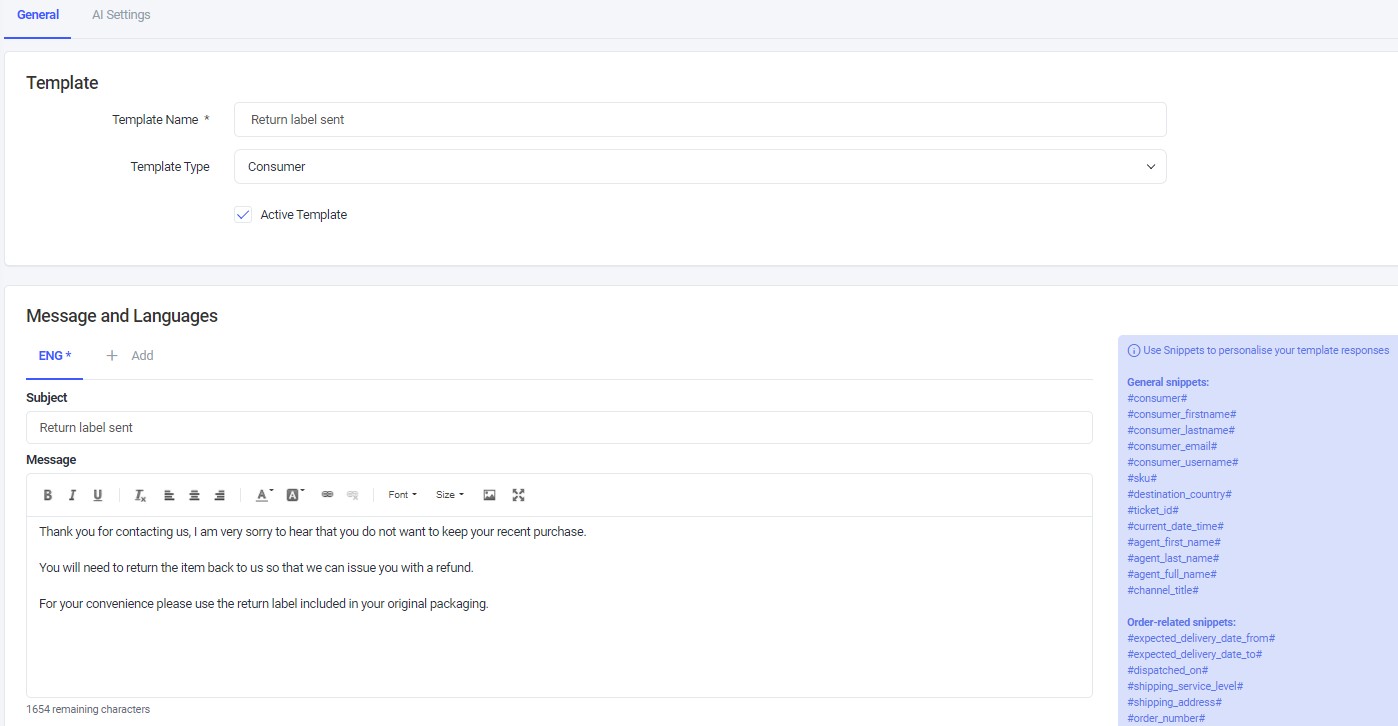
- Create your template here and choose the conditions under which it should be available in the inbox.
- When you get one of those questions that you’ve answered a thousand times, just select the template in the reply box to deal with the ticket quickly. You can choose the template from the template icon or use the shortcut of the underscore key _ and start typing the template name to quickly access it.
-
Automation trick number two: Automatically assign, change status or even reply to tickets
As mentioned earlier, Rules tell the inbox to automatically perform actions such as tagging and routing messages based on the conditions you decide.
In actual words, you can think about them as if-then instructions that you're giving eDesk:
If [condition] then [perform this action].

Here are just some of the ways that you can use rules:
- If [ticket type is return] then [assign to agent x].
- If [message subject contains ‘out of office’] then [set status to closed].
- If [order value is greater than x] then [assign tags VIP].
There are endless ways to up-level your inbox efficiency with rules once you get the hang of it.
If you are in your account and want to create a Rule right now, click here.
If you want to read more about Message Rules, click here.
05 Next-level automation: AI templates
This is where automation gets really fun.
AI templates are like normal manual templates except you can use them without even opening a ticket.
No. It’s not witchcraft. Here’s how it’s done:
When you create a manual template (outlined above) you can click on AI settings to make it available in your inbox as a 1-click response.
So say you regularly get tracking code requests, firstly you can create a template with a snippet auto-filling the tracking code. Next, go to the AI settings, and in the AI category select the ‘Tracking code request’ option and then create the template. Then, any time eDesk receives a message that it identifies as a tracking request, you’ll be able to answer the message in a single click.
To find out more about AI templates, click here.
Further Readings
If you would like to find out more about responding faster with Snippets, click here.
If you would be interested in learning more about Message Rules with eDesk, click here.