This help file will guide you through how to automate your workflow and keep your inbox tidy by creating Message Rules that will automatically trigger actions on your eDesk tickets.
Before you start
- You’ll need to have access to Message Rules in your Settings in order to view, create and edit rules. If you don’t have access, you can request it from an Admin user within your business.
01 What is a Message Rule?
Message Rules in eDesk trigger automatic actions that are applied to a ticket based on the unique characteristics that you choose.
In actual words, you can think about them as if-then instructions that you're giving eDesk:
If [condition] then [perform this action] on the ticket.
The options are many, and the Message Rules can be personalized to suit your business.
Note: the Message rules will trigger based on message actions and not because of the ticket state.
02 How do I add a Message Rule in eDesk?
Go to Settings → Smart Tools → Message Rules, and click + Add Message Rule to add a new rule from scratch.

OR
Click the three dots beside + Add Rule and select Create Rules from our Samples to choose some of our pre-designed Message Rules.
 Need help understanding some Message Rule terms? Skip ahead to the Glossary
03 How do I use Message Rules in eDesk?
There are endless ways to level up your inbox efficiency with Message Rules once you get the hang of it.
Some customers use Message Rules to automatically apply tags to tickets, or assign them directly to agents based on a variety of conditions (what marketplace the ticket comes from or what the associated product/customer/order value is).
Here are a few examples of how real businesses use Message Rules on eDesk:
- Tag tickets based on the marketplace: Use a Message Rule to automatically tag all tickets that come through Amazon, so that you can find them all in one place in your eDesk account.
Note: You would need to create personalized tags in eDesk to achieve this, click here to find out how.
- Auto-assign tickets based on the language used: If you sell on international marketplaces, use a Rule in eDesk to automatically assign any ticket in a foreign language to my multilingual support agents, so they can help these customers in their native language.
Steps to follow to apply it in eDesk:
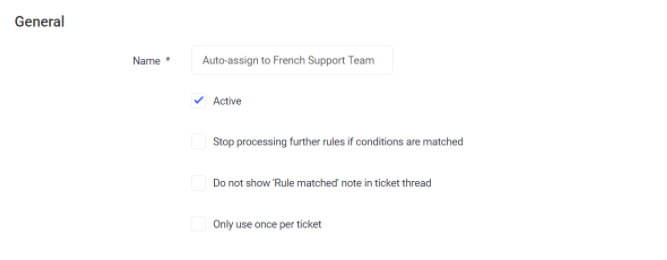
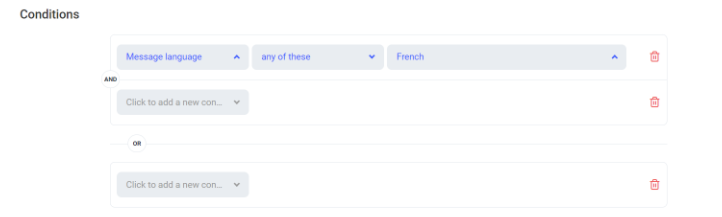
- Create a Message Rule named ‘Auto-assign to French Support Team’
- In the Conditions section specify that any ticket whose language is in French should trigger the Rule to apply:
- In the Actions section, you can then assign the ticket owner to be your ‘French Support Team’.

And that’s it! From now on, every ticket in French would be automatically assigned to the French Support Team so they can help your customers in their native language.
- Automatically close ‘Out of Office’ replies: If you receive multiple ‘Out of office’ tickets each day and they always end up cluttering your mailbox, set up a Message Rule to automatically Resolve any ticket that has ‘Out of Office’ in its subject in my eDesk account.
- Automatically flag VIP clients and assign them to a Team Leader: Set up eDesk to automatically flag all tickets related to an order > £500 with a ‘VIP’ tag so they’re easier to spot. You could also decide to automatically assign these ‘high value’ tickets to your Team Leaders, using a Rule.
Note: To find out how to create personalized tags in eDesk, click here. And to find out how to create custom roles within your organization in eDesk, click here.
04 Other customers use rules to assign incoming tickets evenly between customer service members in a ‘round robin’ format.
- Auto-assign tickets across all members of the Support Team: Set up a Message Rule to evenly auto-assign new tickets to all my staff. That way the workload is shared equally between them and they can focus on what they do best: assisting clients. To find out more about Round Robin and how to set it up, click here.
Automatically tagging messages as they come into your mailbox is a great way to keep your workflow organized and all the examples above show you just how powerful the Message Rules are in eDesk.
05 Options in Message Rules
5.1 General
- Name: Give the Message Rule a name. This is to reference the rule when it is applied in your account.
Pro Tip: Describe the conditions that trigger your Message Rule in the title, like ‘Auto-assign to French Support Team’ for instance. That way, other members of your team will understand what it does just by looking at it.
- Active: Tick to activate/deactivate the Message Rule.
- Stop processing further rules if conditions are matched: If ticked no further Message Rules in the sequence will be processed once this one is applied.
- Do not show 'Rule matched' note in ticket thread: A log will not be made when this Message Rule has applied to your ticket.
- Only use once per ticket: When a ticket matches the rule, the same Message Rule will not be applied again.
5.2 Conditions
Select the conditions that need to apply to trigger your Message Rule.
Note: all AND conditions must be met to trigger the Rule whereas with OR conditions, only one of them must apply.
Note: To have more precise and effective Message Rules in eDesk, we recommend using a combination of both AND & OR conditions. But be careful! If you want to automatically close Amazon UK system messages for example and choose the conditions Ticket type > any of these > System messages OR ticket channel > any of these > Amazon.co.uk, then ALL of your Amazon messages (regardless of ticket type) will be automatically resolved. The correct conditions to only resolve Amazon.co.uk system messages would be to use an AND condition - Ticket type > any of these > System messages AND ticket channel > any of these > Amazon.co.uk. The choice between using AND or OR is an important one!
5.3 Actions
Configure and select the action taken when the Rule has been matched:
- Assign Tags: Select the tag to be automatically assigned by the Message Rule.
Note: To find out how to create personalised tags in eDesk, click here.
- Tag assignation mode: If you have chosen several tags above, you can choose to assign all of them to the ticket or in a ‘round robin’ format where it will assign one tag to a ticket at a time, each time this Message Rule is matched. To find out more about the round robin format, click here.
- Assign ticket owner by:
Roles: Select the Role you want those tickets assigned. They will be assigned following round robin.
Users: Select the individual user you want the tickets assigned to. If you select more than one user, they will be assigned following round robin.
- Mention by:
Roles: Select the Role you want to be mentioned on those tickets.
Users: Select the user(s) you want mentioned on the tickets.
- Mention user mode: If you have chosen agents above you can choose to mention all of the agents you have selected or in a ‘round robin’ format where it will mention one agent at a time each time this Rule is triggered.
- Change Ticket Status: Select this option, if you would like the ticket status to change once the Rule has been applied.
- Webhook URL: This setting is a developer tool that can be used to deliver data to another location. Using the webhook URL function is straightforward - users simply need to enter a webhook URL (e.g.,
https://myapp.com/myupdates). However, technical expertise is required on your side to process the information that we POST in the payload. Please note, the system only posts the message thread information when a message rule is triggered - it doesn’t post the actual message. Eg. of a payload sent from eDesk:
$data = array(
'email' => $consumer ? $consumer->email : null,
'name' => $consumer ? $consumer->name : null,
'channel_id' => $channel->id,
'channel_title' => $channel->title,
'ticket_id' => $channelMessageThread->id,
'message_id' => $channelMessageItem ? $channelMessageItem->id : null,
'subject' => $channelMessageThread->getRootSubject(),
'sales_order_id' => $salesOrder ? $salesOrder->getChannelSpecificOrderId() : null,
); - Bind an Autoresponder: Select the Rule-Only template to be sent when using the Message Rule.
- Define a SLA: If you want the tickets triggered by the Rule to be assigned a different SLA to that in the Channel's settings, enter the new SLA here.
The options are many, and rules can be personalised to suit your business.
Further Reading
If you would like to find out more about creating personalised tags in eDesk, click here.
If you would be interested in learning how to set up auto-replies in your account, click here.