Did you know that you can customize the information that's shown in your Mailbox and also control the way information is displayed?
This help file will guide you through customizing the appearance of your Mailbox to meet your own requirements.
Before you start
- You'll need an eDesk account. To find out how to create one, click here.
01 Customizing the information in your Mailbox
eDesk's Mailbox presents the messages you receive from and send to your buyers. By default, these messages are organized into 'Tickets' in the Mailbox under status categories, which are My Tickets, Mentioned, Pre-Sales,New Tickets, To Do, Waiting, Snoozed, Resolved, Recently Updated, Favourites, Spam and Negative Feedback. To learn about what each category does, click here for a tour.When you open a category, the tickets are listed in a table, with one row per ticket and a variety of columns that each present a different piece of information related to the message. By default, these columns are Quick reply, Channel, Customer, AI classification, Latest update, Owner, Time left, Sales order and Tags.
Note: The quick reply and AI classification columns will only show on accounts that have the relevant AI enabled.

eDesk's Mailbox is a really flexible tool, so if you need more than the default categories and columns that we've described, that's no problem!
You can:
- choose different columns to show in your Mailbox.
- use Pinned filters to organize messages into your own custom filters/folders.
- change the way the information is arranged on screen.
02 Customizing the columns in your Mailbox
All Mailbox categories share the same columns, so your customizations will apply throughout your Mailbox.
1. Open your Mailbox and click on any category in the menu on the left, e.g., To Do.2. Click the Customize Table Layout button.

3. In the Customize table columns popup, the currently-used columns in the Mailbox categories are listed.
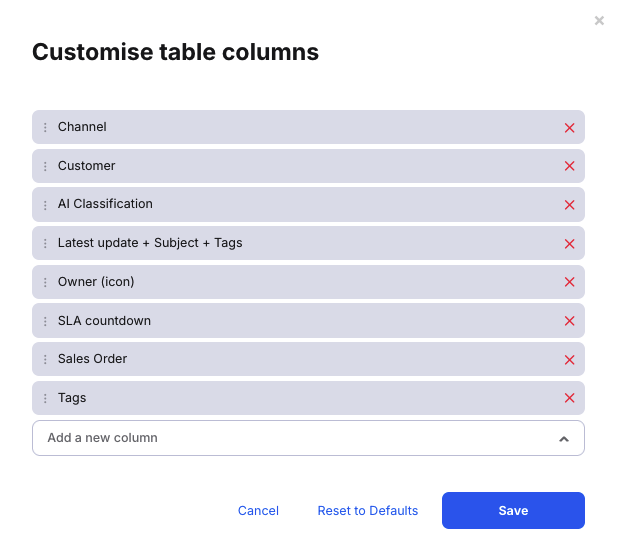
- To remove a column from the Mailbox categories, click the X in the gray box for that column.
- To reorder the columns in the Mailbox categories, drag each gray box up or down to reposition it.
The order that the columns are listed in from top to bottom in the popup indicates the order they will be displayed in from left to right in the Mailbox.
- Click a field to add the column. The Add a new column popup will be closed and the new column is added in a gray box to the list in the Customize table columns popup.
- Repeat this step to add further columns.
Note: Don't forget that adding columns may mean that you will need to scroll sideways to see all the columns in your Mailbox views.
Default columns:
- Channel
The icon for the channel, e.g., Amazon.com - Customer
Buyer name. - AI Classification (if AI is enabled on the account)
The AI classification that has been assigned to the ticket - Latest update + Subject +Tags
The latest ticket update (or a truncated message if it is long), the ticket subject and any assigned Tags. To learn about Tags, click here. - Owner (icon)
The icon/avatar of the assigned ticket owner. - SLA countdown
(Time left column) The Service Level Agreement timer. To learn about SLA timers, click here. - Sales Order
Order total, e.g., $43.05 with an info icon that displays the order information in a tooltip - Tags
Any tags associated with the ticket.
System Fields:
- Created
The date on which the ticket was created. - Latest update + Tags
The latest update (or a truncated message if it is long) and any assigned Tags. To learn more about Tags, click here. - Ticket type
Type of ticket, e.g., Query, Invoice Request etc. - Status
An icon of the status of the ticket in eDesk eg. Unread, To Do, Waiting, Resolved, Snoozed etc. - Unread Status
Whether the user has read the message in eDesk, e.g., READ, NEW. - Ticket type + icon
Type of ticket, e.g., Query, Invoice Request, and an icon to denote the type. - Sequence
The sequence number of the ticket, e.g., 1. - ID
Ticket number, e.g., 145743 - Channel name
Long name of the channel, e.g., Amazon.com - Joe's Bikes. - Subject
The email subject. - Latest message
The most recent message (or a truncated message if it is long) in the thread. - Latest message + Subject
The email subject and message (or a truncated message if it is long) for the most recent message in the thread. - Customer name
Full buyer name - Customer phone number
Buyer phone number. - Sentiment
The sentiment of the ticket - ie. positive, neutral, negative (for those accounts with AI enabled) - Customer email
Buyer email address. - Customer ID
Buyer ID. - Replies
Number of replies to the customer from users in your organization. - Total message count
Total number of messages from both the buyer and users in your organization. - Last update created at
Time/date of last update to the ticket. - Ticket age
How long the ticket has been open, e.g., 19 hours. - Priority
The priority of the message. - Reference
Any references in the message. - Sequence
The order the ticket appears in on your list of tickets. - Subject
The email subject. - Subject (color-coded)
The email subject color-coded depending on the read status of the ticket, e.g., subject will be red when the ticket is unread and subject will be blue when the ticket has been read. - Mentioned agents (icons)
The avatars for any mentioned Support Agents. - Mentioned agents (names)
The names of any mentioned Support Agents. - Owner (name)
The name of the ticket owner. - Sales Order ID
Order ID. - eBay username
The eBay username of the buyer. - Language
The language of the message, e.g., French. - Labels
The default tag group 'Labels' will also show as a column choice.
Custom Fields:
Any custom field you have created will show as a column option. To find out about creating and using custom fields, click here.
5. Once you have added, removed or reordered the columns in the Customize table columns popup, you must click Save to complete the customizations and return to your Mailbox, where you will see the new column arrangement.
Pro Tip: You can restore the default columns by opening the Customize table columns popup and clicking Reset to Defaults. This immediately resets the table to show only the default columns.
03 Using Pinned Filters to add new Mailbox views
You can create a filter search - based on Tags, or brands or assigned Users for example - and pin it to the sidebar of your Mailbox. This will create new folders for your tickets. To find out all about Pinned Filters, click here.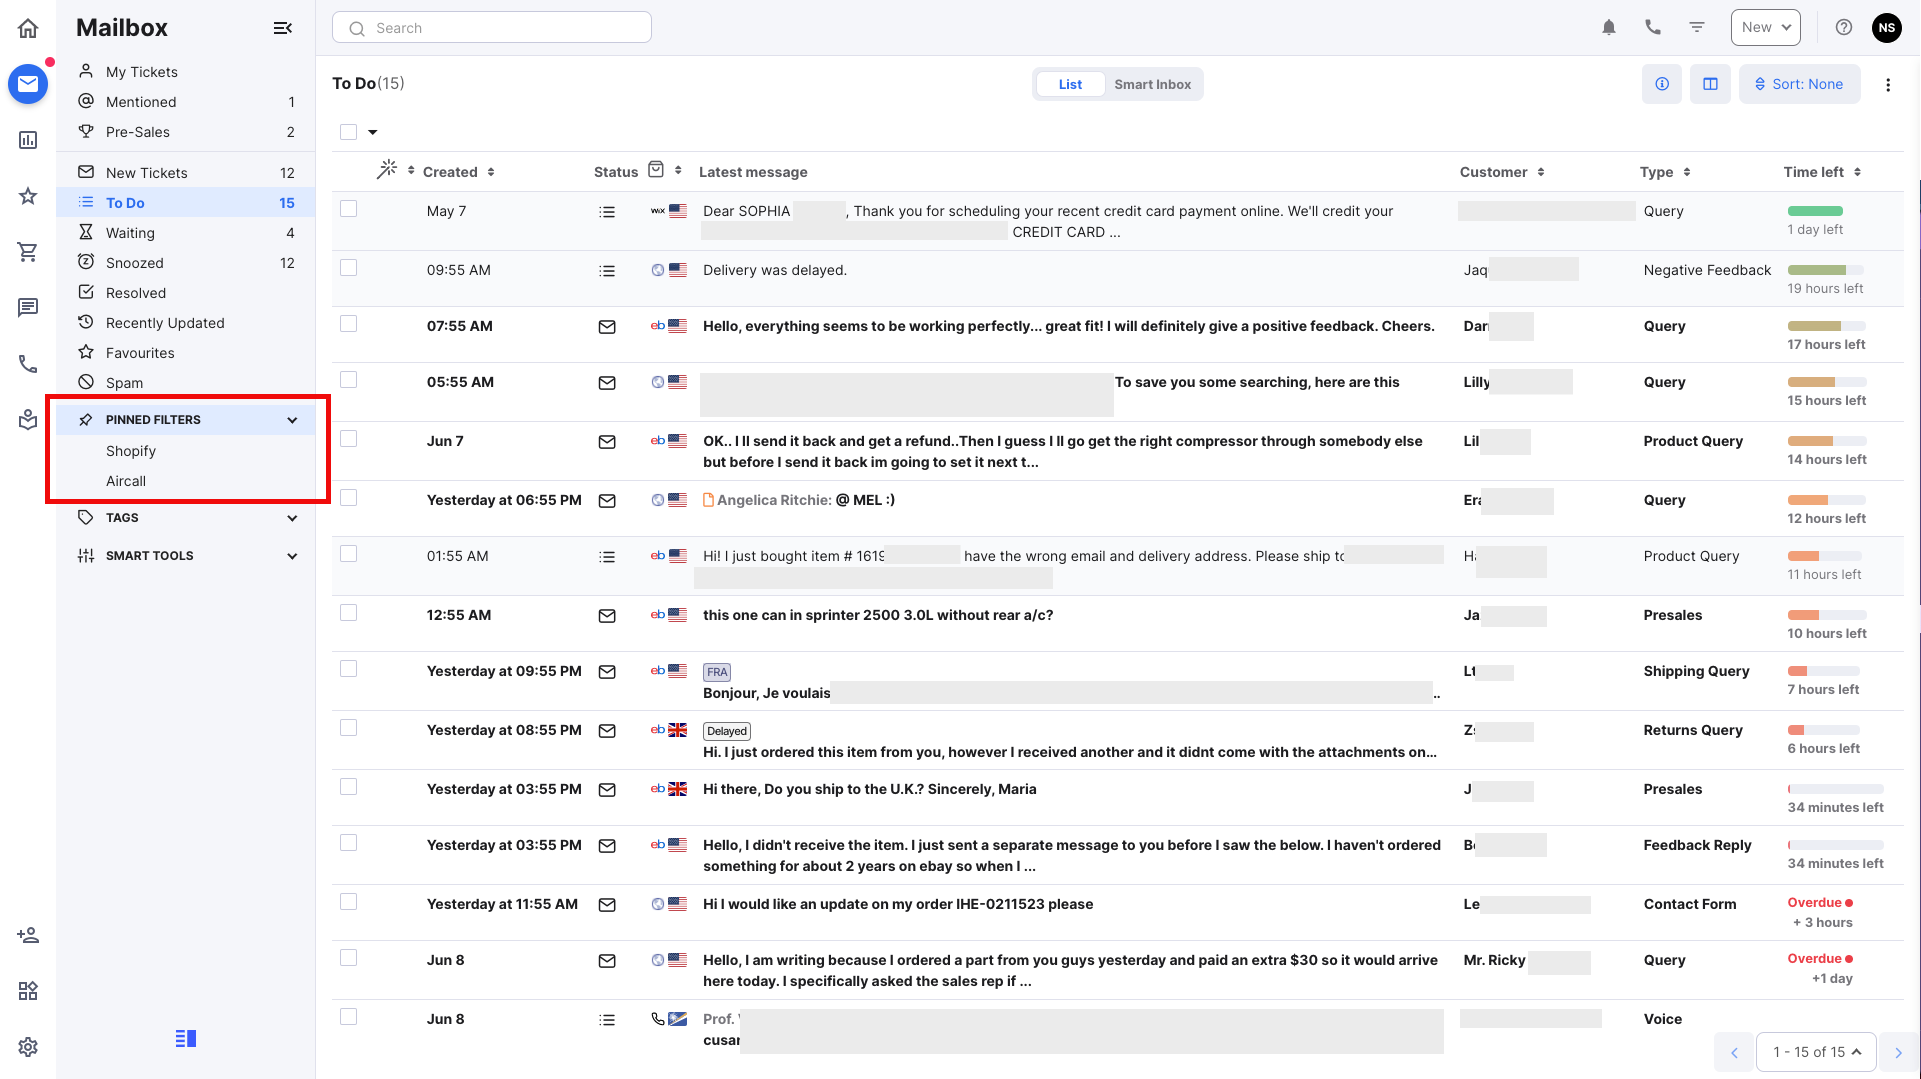
04 Using Split Mode to display a split-screen
Another way to change how information is presented in your Mailbox is to use Split Mode. By default, when you click on a message in the listing, the message listing is replaced by the open message. But you can use Split Mode to to show both the message listing in the view and the open message.1. The image below shows the default Non-Split Mode. To switch to Split Mode, click the Toggle Split Mode button.
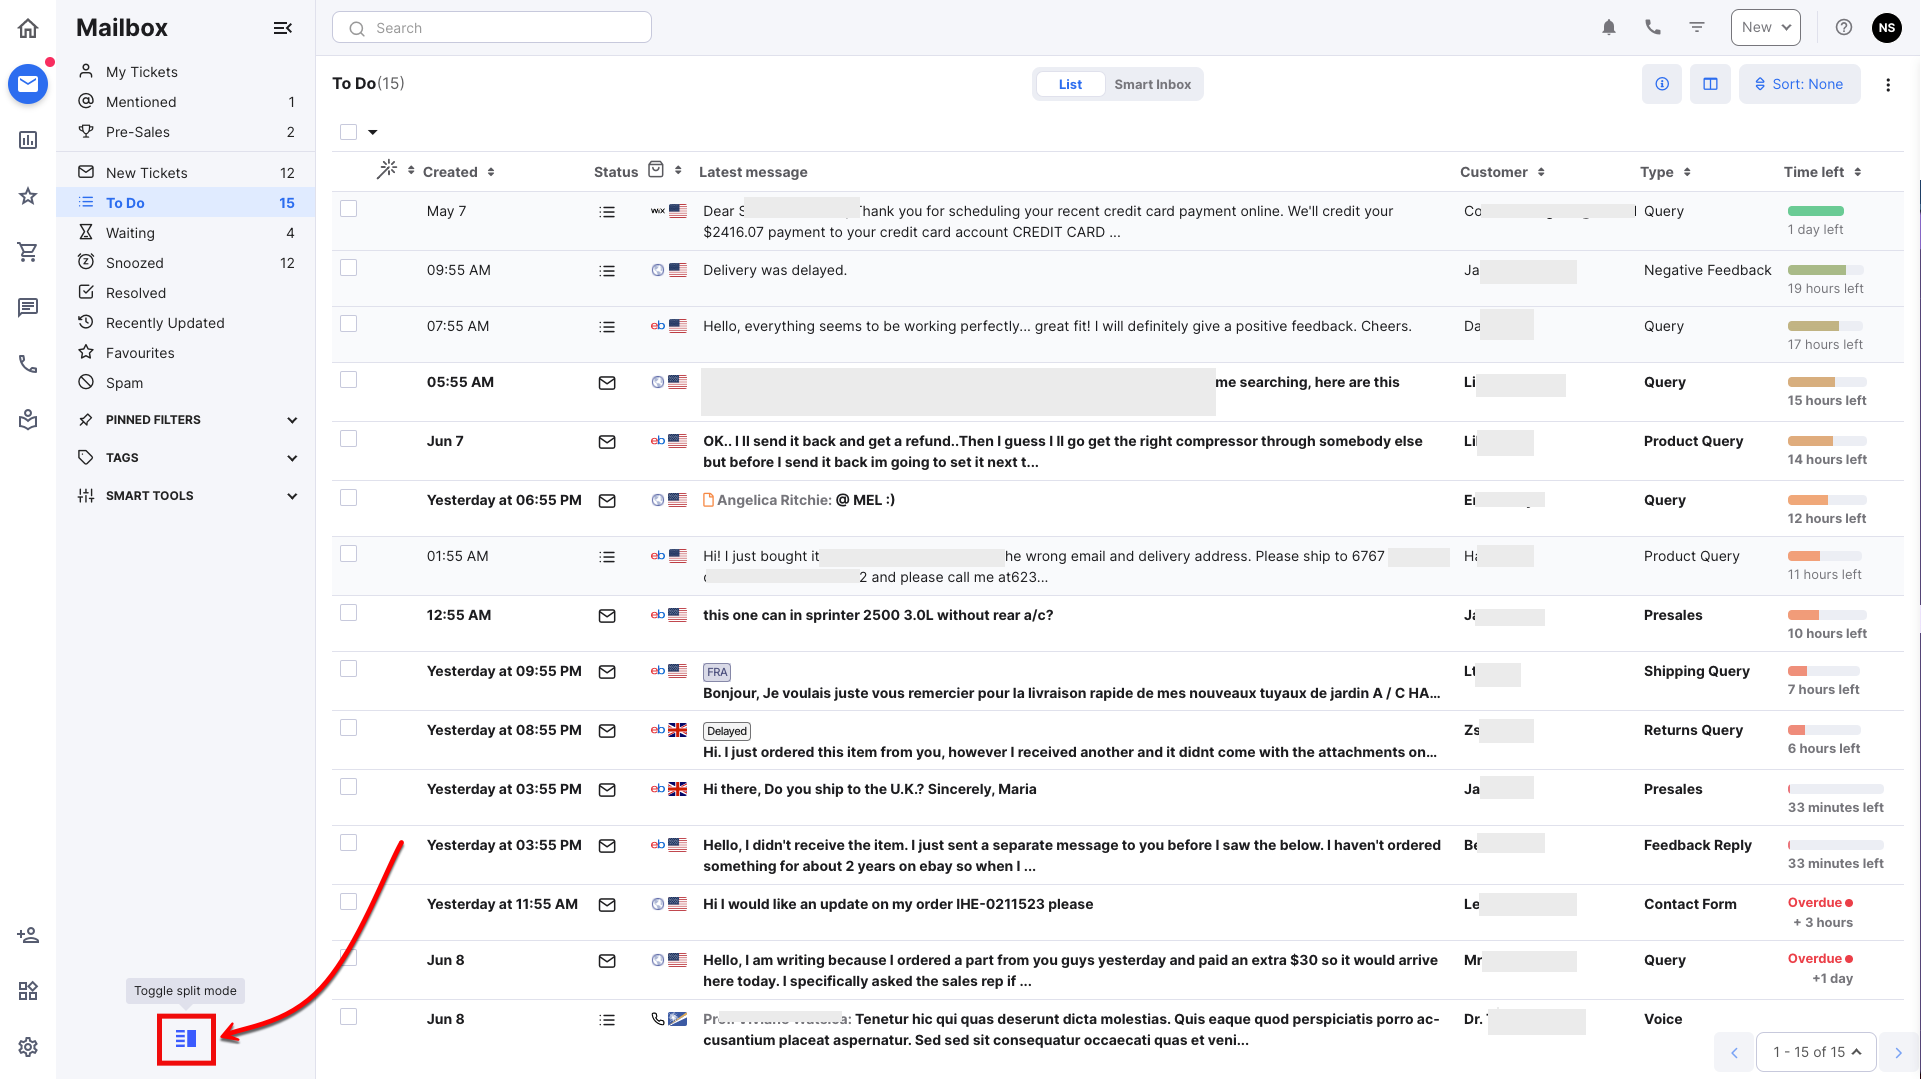
The display is changed to Split Mode.
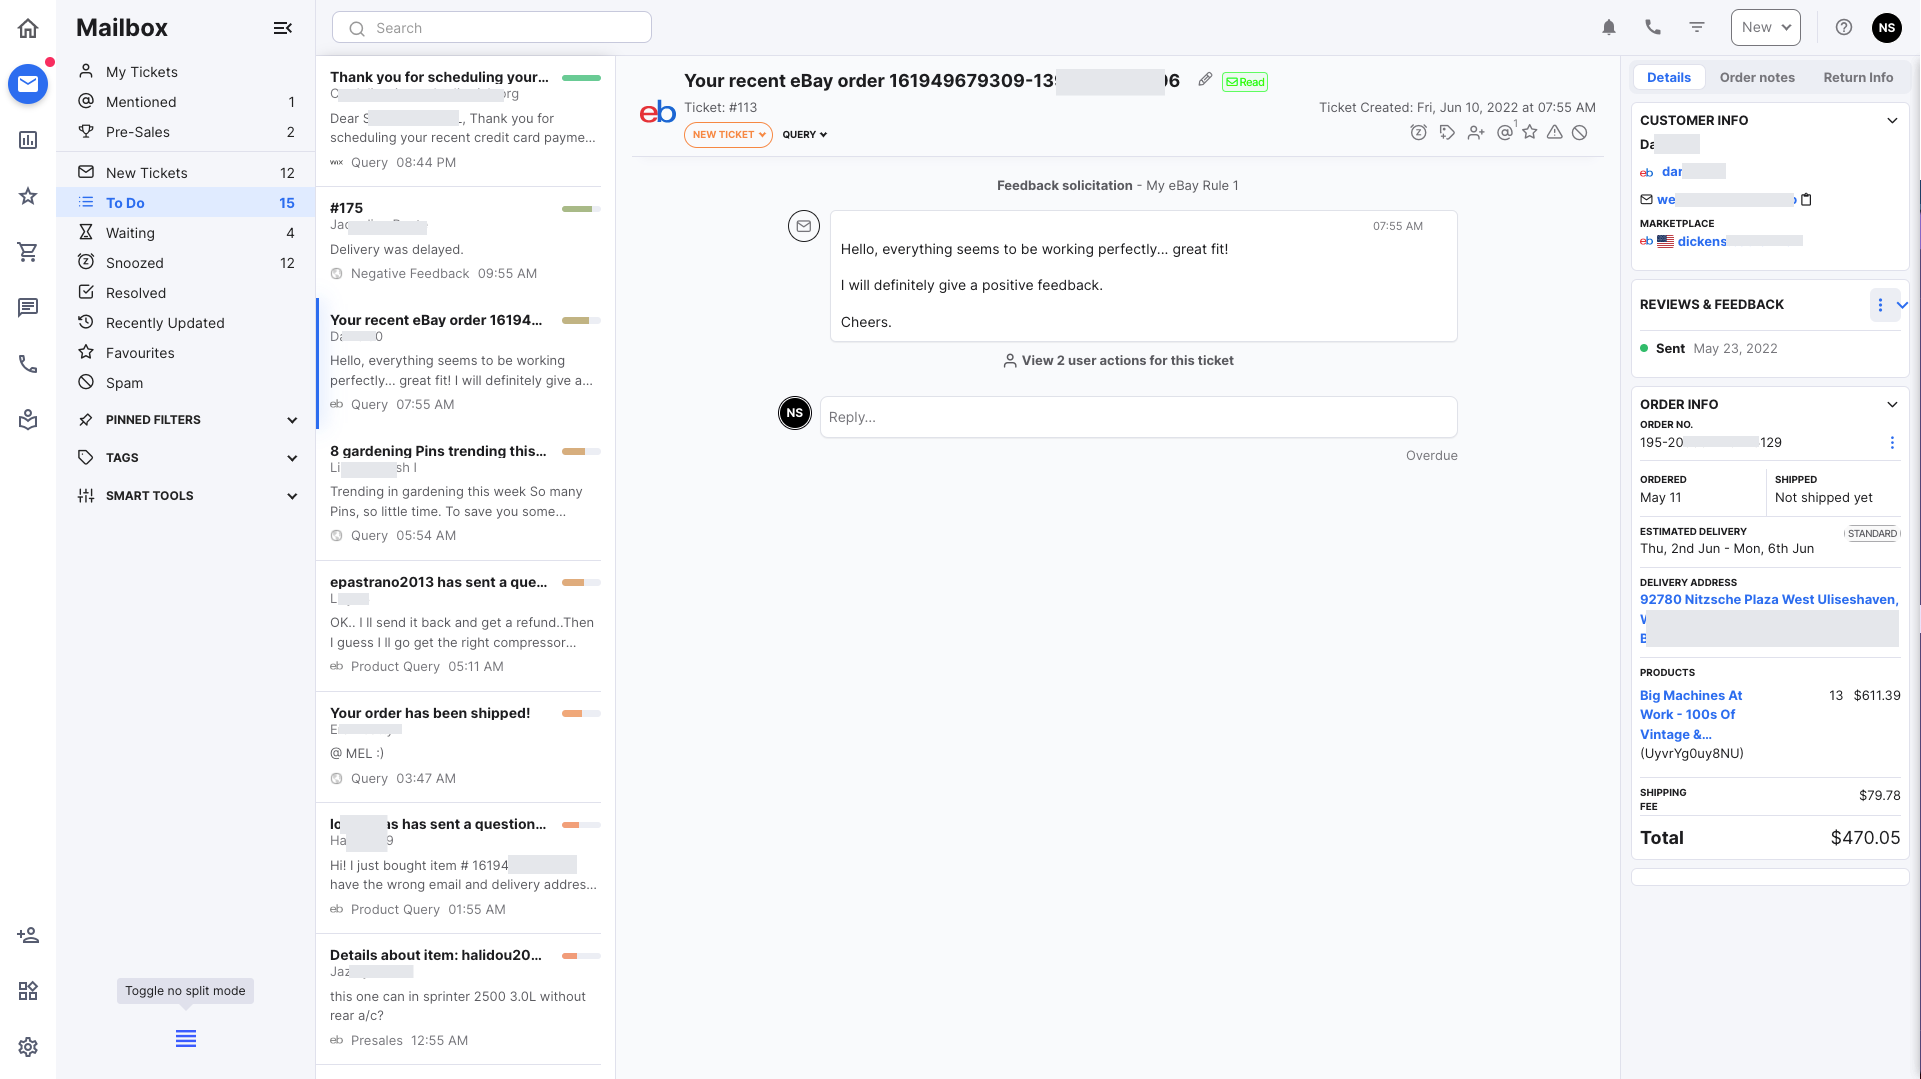
2. To switch back to Non-Split Mode, click the Toggle Split Mode button again.
Further Readings
To learn about how you can configure the behavior of your Mailbox, click here.
To watch a tour of the Mailbox, click here.