ChannelAdvisor is a multichannel e-Commerce platform that supports over 300 channels, most of which are popular online marketplaces.
Connecting ChannelAdvisor to eDesk will equip you with all the context you need to achieve positive outcomes for your customers.
Returns and cancellations your customers have made will be available alongside customer messages in the ticket view of your eDesk inbox.
You can also use the eDesk Channel Advisor integration to connect 1 additional channel that eDesk doesn’t support natively.
Before you start
- You’ll need an Admin login to eDesk. If you don’t have an Admin login, you can request one from an Admin user within your business.
- You must have a ChannelAdvisor account.
01 How do I connect eDesk to ChannelAdvisor?
- Go to the App Store and select the ChannelAdvisor tile in the Automation and Management category.
- The App page for ChannelAdvisor provides an Overview of how ChannelAdvisor works with eDesk. Select Install App to go ahead and install your ChannelAdvisor account.
- Select Authorize eDesk.
- Next, you'll be redirected to ChannelAdvisor, where you will complete the process. Select Next.
02 Connecting your ChannelAdvisor account
- Login to ChannelAdvisor.
- Select the client(s) that you want to connect.

- Grant access to eDesk.

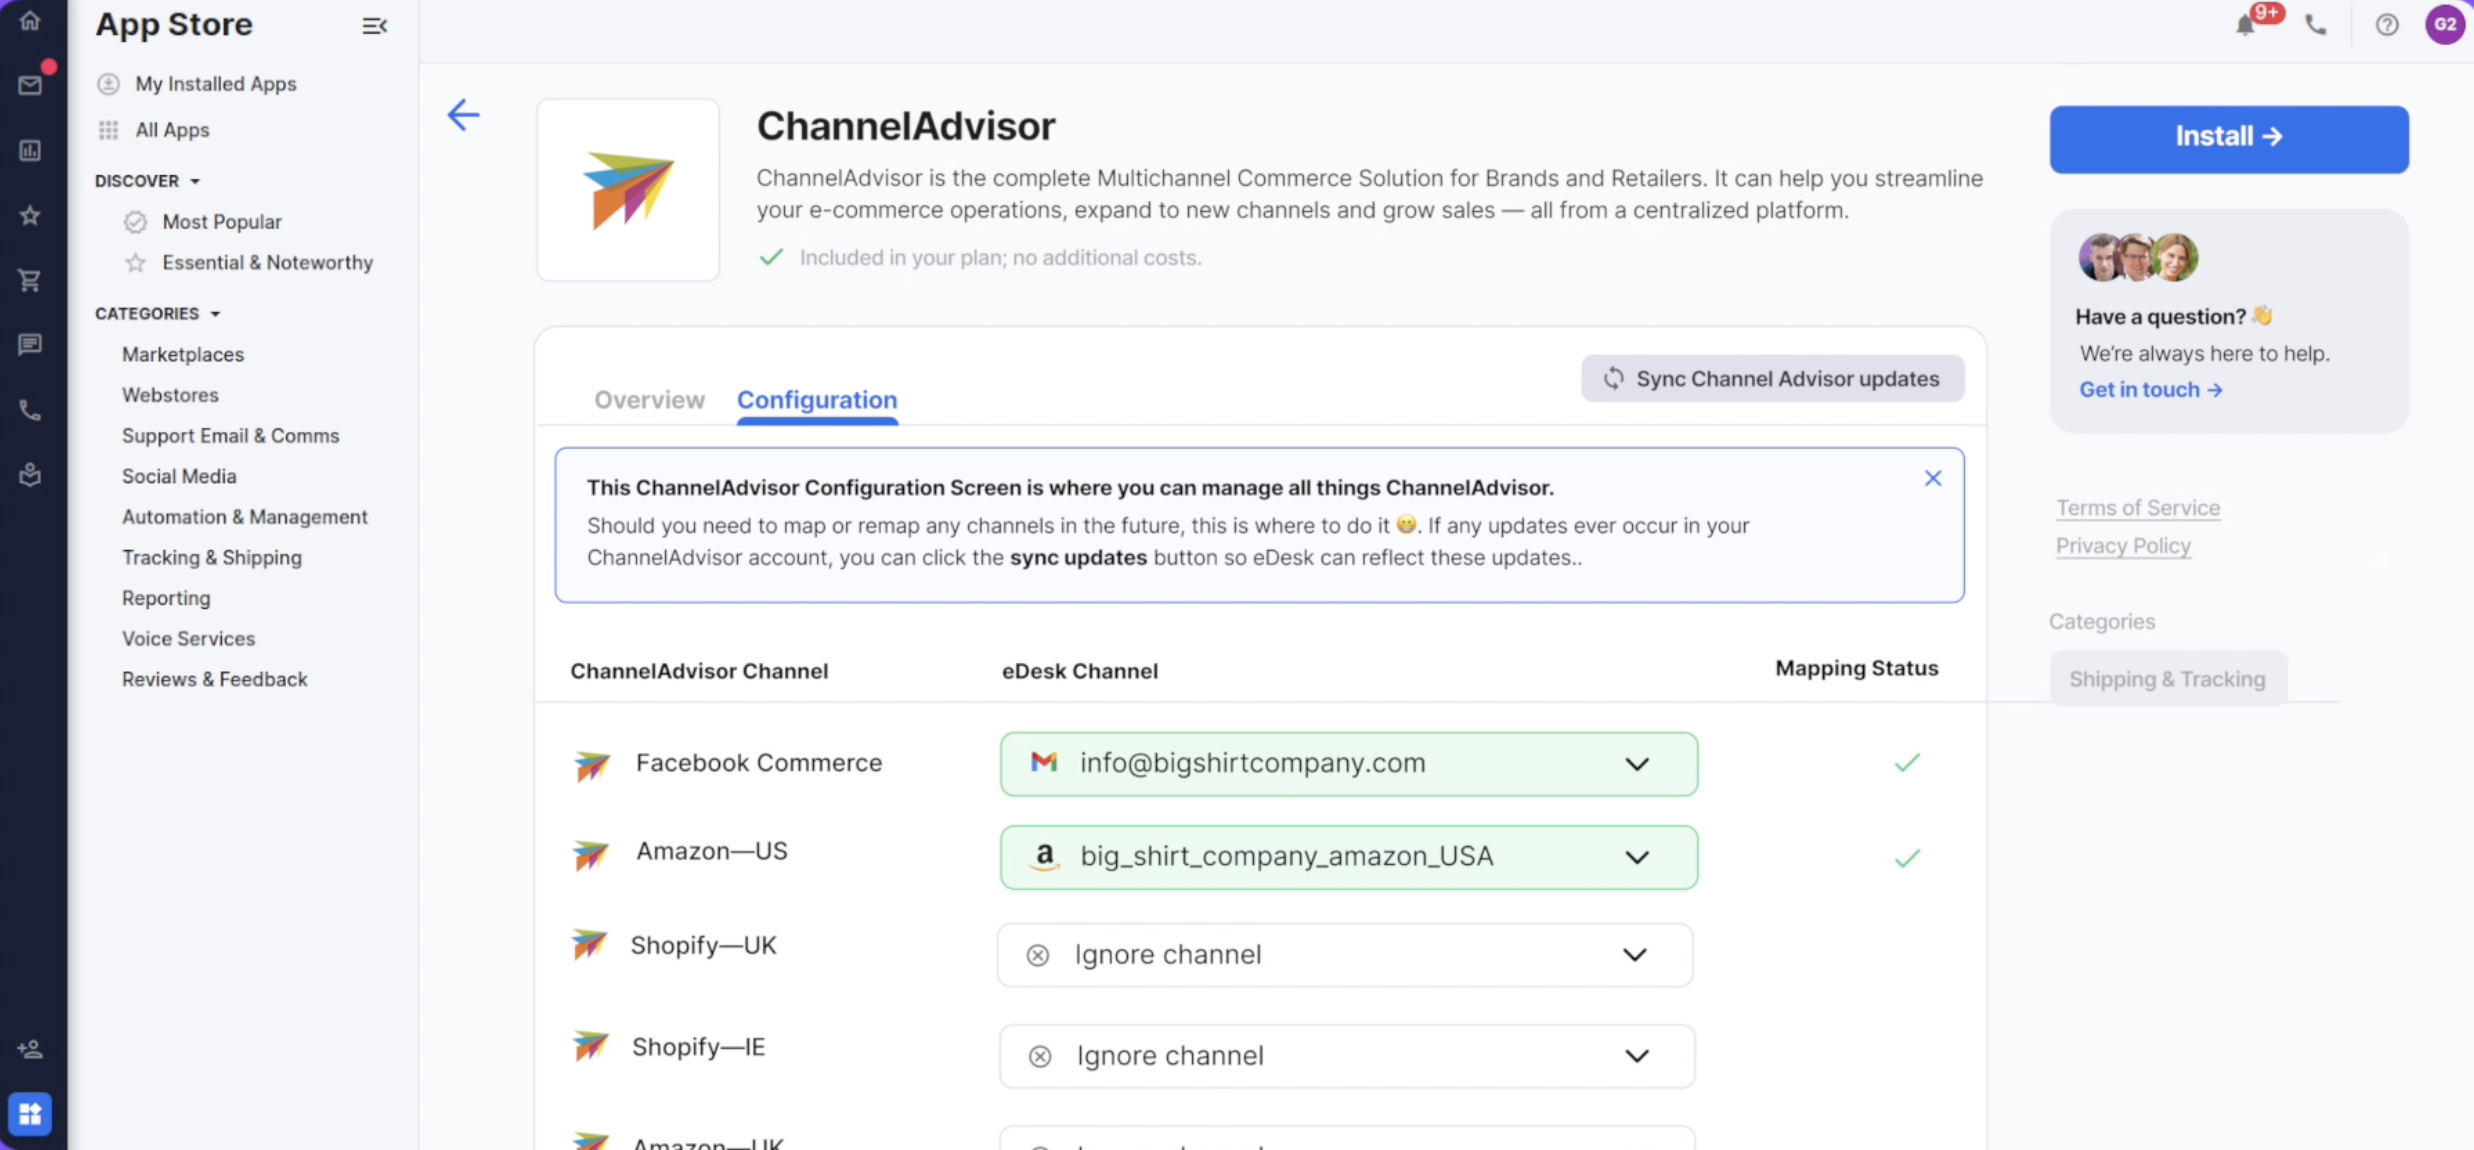
03 Mapping your channels
Now, you’ll be taken back to eDesk. You’ll see a list of all your ChannelAdvisor channels, and for each one, you’ll need to select one of the following 3 options. Ignore Channel, Select a corresponding eDesk Channel, or Create new eDesk Channel.
This will link up your ChannelAdvisor channels with eDesk channels in a process called mapping. Read on to find out more about the mapping options.
.png)
1. Ignore Channel
The first and default option is to Ignore Channel: You can leave this option if you want eDesk to do nothing for that channel. We recommend this option for channels that aren’t available in our app store or channels you might not want to connect to in eDesk. However, if you do want to map this ChannelAdvisor channel to a channel that you plan to natively connect to eDesk, but haven’t gotten around to it yet, then I suggest that you choose Ignore Channel for now.
Note: You can always go back to the App Store to connect the channel to eDesk, and once you’ve done that, you can come back and do this step again in the configuration section of the ChannelAdvisor app listing.
2. Select corresponding eDesk Channel from list
.png)
The second option is to select the corresponding eDesk channel that you have natively installed in eDesk. Doing this will allow you to see order adjustments such as returns and cancellations information associated with the existing eDesk channel that you selected, and provide you with a link directly to the order in ChannelAdvisor should you need to take action there - so that your team will have even greater context when they’re interacting with customers.
- In the eDesk Channel column, select the channel you use for ChannelAdvisor.
- You’ll see a green tick in the Mapping Status column if the mapping is successful.
Note:
- If you want to go with this option, you’ll need to have already connected the channel you want to select in eDesk.
- If you haven’t connected the channel yet, you can either complete this step before proceeding or do it later (by choosing Ignore Channel - for now) and then visit the ChannelAdvisor configuration page when you're ready (see section 04).
Pro Tip: You can see the channels you’ve connected by going to the App Store and selecting My Installed Apps.
3. Create a new eDesk Channel
.png)
Create new eDesk Channel means that eDesk will pull orders via ChannelAdvisor from additional channels that eDesk doesn’t natively support.
If this channel already exists in the App Store then we don’t advise connecting this way. Instead, you should connect the channel directly in the App store.
Important: You can only connect a single extra channel to eDesk via ChannelAdvisor. This Channel will be called ‘ChannelAdvisor’. If you choose the Create a new eDesk Channel option for more than one of your ChannelAdvisor Channels, they will be combined into a single Channel.
Note: For non-native channels that you’ve chosen to create a new channel for, you’ll need to go through the normal mail forwarding steps. If you want to learn more about Mail forwarding in eDesk, click here. %20(1)-1.png)
Keep in mind that if the channel doesn’t support Mail Forwarding, then you won’t be able to manage tickets for that ChannelAdvisor channel in eDesk. However, all is not lost! You can request that eDesk support the channel by creating a Feature Request. Find out how here.
04 The ChannelAdvisor configuration page
Once you’ve connected your ChannelAdvisor account and completed your channel mapping, you’ll be able to manage any changes you want to make to your mapping from the ChannelAdvisor configuration page in the app store.
Go to App Store → My Installed Apps → ChannelAdvisor and select the Configuration tab.
05 Where do I see messages from my ChannelAdvisor channels in eDesk?
Now that you’ve connected ChannelAdvisor and mapped the channels, you’ll see a new ticket in the Mailbox for each new customer message.
Order Adjustments
If a customer places an order and then requests to cancel or return the item, eDesk includes this information in the ticket so that Support Agents have full visibility without having to log into ChannelAdvisor.
You’ll see order adjustment information in the following places in eDesk tickets:
- In the message thread in the body of the ticket:
.png)
- In the Adjustments tab in the right-hand panel (this tab is shown only if there has been an adjustment): Note: The Save button will only be displayed if you’ve edited the Shipping label or Tracking number.
06 Editing Shipping label or Tracking number in an adjustment
These are optional fields.
- To add a Shipping label, select the Shipping label field and upload a file.
- To add a Tracking number, paste or type the number into the Tracking Number (of available field).
- Select Save.
07 How do I reply to my customers in eDesk?
To reply to a customer’s message, simply type your response in the Reply Box in the eDesk ticket, and they’ll receive your response in an email. Your response will also show in the ChannelAdvisor channel.
Further Readings
If you’re interested in connecting eBay with eDesk, click here.
If you would be interested in learning more about connecting Shipstation with eDesk, click here.