This guide will explain how to set up a Chatbot using our template - and what the flow of that Chatbot will look like.
Before you start
- eDesk's Chatbots are part of our AI Automation suite. Learn about AI Automation and how it's billed here.
- You’ll need to have access to Settings > AI > Chatbots in your permissions. If you don’t have access, you can request it from an Admin user within your account.
- You'll need to connect a Profile to your Chatbot. To learn more about Profiles, click here.
- You'll need to have Training Content set up and connected to a Profile. To learn how to build Training Content, click here.
- You'll need to have a Chat widget already set up and active. To learn more about widgets, click here.
01 Creating the Chatbot from our template
1. Creating a Chatbot template from a Profile is the simplest method as you will automatically attach the Profile and your Training Content library to the Chatbot in this way. To learn more about Profiles, click here.
The last step in creating a Profile is to Create chatbot. Click on this button and the system will automatically create a Chatbot for you, with the same name as you gave the Profile.

2. Go to Settings > AI > Chatbots > choose your newly created Chatbot (named the same as your Profile) from the list.
----
(If you haven't created a Profile and you want to create a Chatbot template from scratch, go to: Settings > AI > Chatbots > Add chatbot > choose Template from the pop-up).

3. Complete the fields:
- Chatbot name
Name your chatbot. - Profile
The Profile you used to create the Chatbot will be automatically connected.
If you have not created a Profile first, the Sample Smart Reply settings Profile that is pre-populated in your account will be selected by default.
You can change which Profile you want to be associated with the Chatbot from the dropdown here. - Show chatbot name in chat
The name entered here will be displayed as the sender of each message in the chat widget. - Test mode
When Test mode is enabled you will not be charged for any chats. However, Test mode must be switched off after testing is complete. Test mode allows you to see information about the answers the chatbot is sending. It will show a summary of the chat and a accuracy score of the link that is sent to the customer. It will also send a verification code in the chat window, instead of by email to the customer, when the Ask for Identity node is used. Learn more about Test mode here. - Current avatar
This is the image that currently accompanies the chatbot name when it sends a message in the chat widget. - New avatar
Select Browse to add your own image to the chatbot name when it sends a message in the chat widget.

3. Select Save changes to save any edits you have made.
02 Flows in the Chatbot template
Your chatbot's behaviour is determined by the flow(s) it contains. A flow is a sequence of nodes and a node is simply a ready-made action like “Send message to customer”, "Present options" or “Transfer to agent”. There are 4 flows in the chatbot template:- Opening Flow
- AI Flow
- Check my order
- Agent transfer
Pro Tip: If you want to add to or edit the Chatbot template, consider creating multiple shorter flows and connecting them. This makes them easier to edit and maintain, rather than building one longer, more complicated flow.
The Opening flow
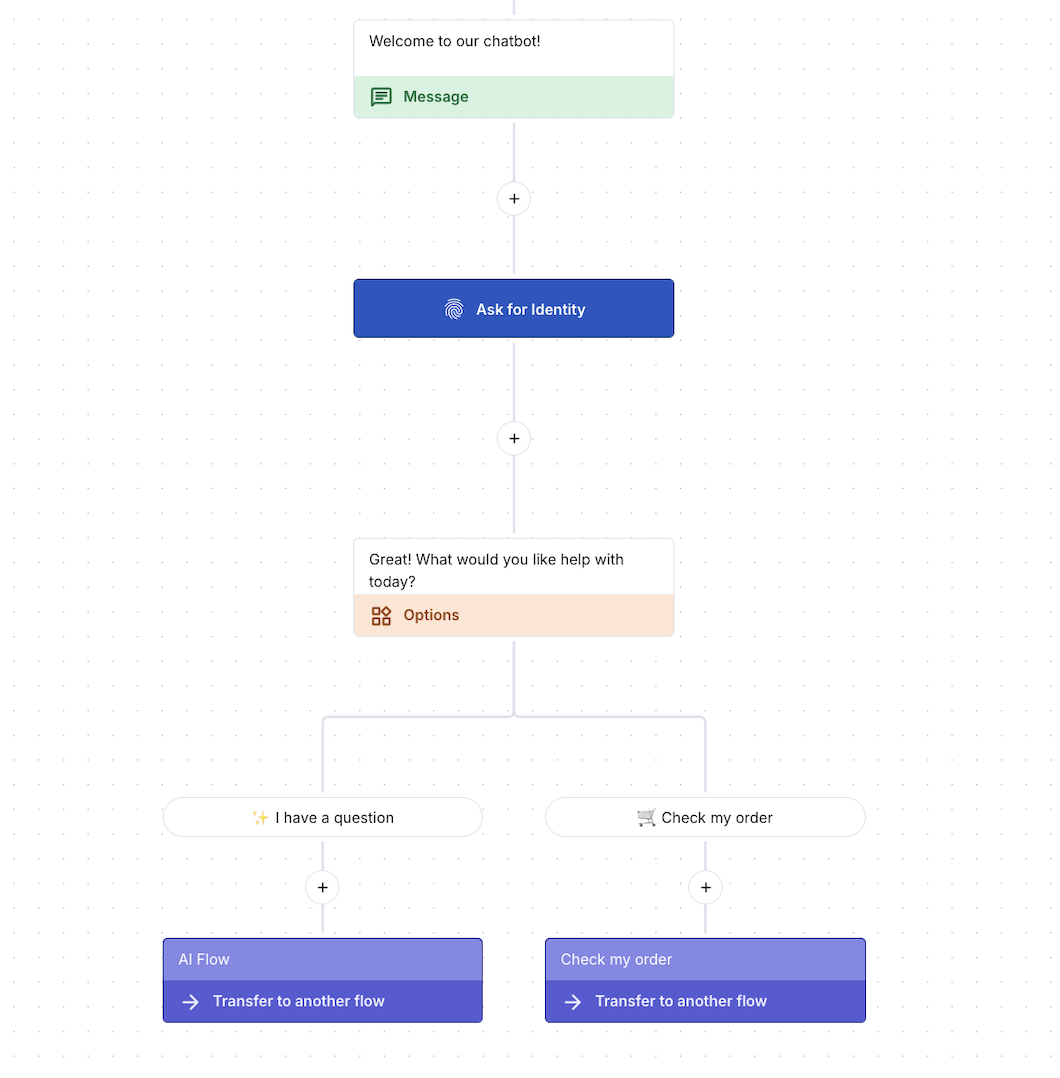
To inspect or edit the opening flow, click on it to show the nodes. The opening flow consists of:
- A Send message node ("Welcome to our chatbot")
- An Ask for Identity node ( "To help us assist you better, and follow up if needed, could we start by getting your email address?")
- An Options node (that states, in response to the customer entering their email, "Great! What would you like help with today?" and then there are 2 buttons 'I have a question' and 'Check my order')
- 2 Transfer to another flow nodes (One that will transfer the customer to an AI flow if they choose 'I have a question' and the other that will transfer the customer to the Check my order flow if they choose "Check my order").
Note 1: The 'Opening flow' button at the start is simply for flow naming purposes. It is not seen by the customer and is for your reference only. Note 2: You can click into any of the nodes to personalise the messages that your customer receives from the Chatbot.
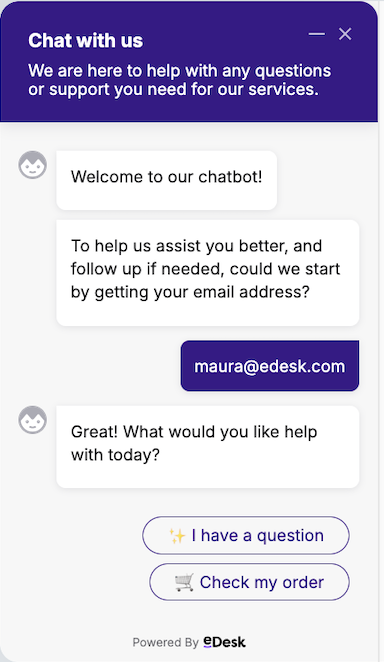
Here is what the customer will see as a result of the opening flow (colours can be changed in the Chat Widget itself to match your website):
The AI flow
The AI flow is the branch the customer is brought to if they have clicked the 'I have a question' option from the opening flow.
To edit or inspect the AI flow, click on it to show the nodes. The AI flow consists of:
- A Send message node ("Sure thing - ask away and I'll do my best to help")
- A Conversation with chatbot node (This is connected to the Sample Policies library by default. The AI will pull information from this library to try answer customer queries. You can click into this node and change which library from the Training Content you want it connected to. The Conversation with chatbot node also contains a Success branch ("That helped"), a Failure branch ("I need more help") and an Agent branch.
- A Send message node (under the Success branch "Great! If you need any further support, at any time, please start a new chat with us")
- 2 Transfer to another flow nodes (under the Failure and Agent branches that will transfer the customer to the Agent transfer flow).
If you haven't a Library selected or if it is not associated with the Profile selected for the Chatbot, you will see a red warning message.

To test what the 'AI' flow looks like for the customer, use the Open chat simulator in your chat widget. If the answer to the query the customer is asking is available in the Training Content library, then the AI will be able to send the information to the customer. If the AI, can't answer the query, the Chatbot will send the customer down the Transfer to agent flow.

To read more on testing your chatbot, click here.
The Check my order flow
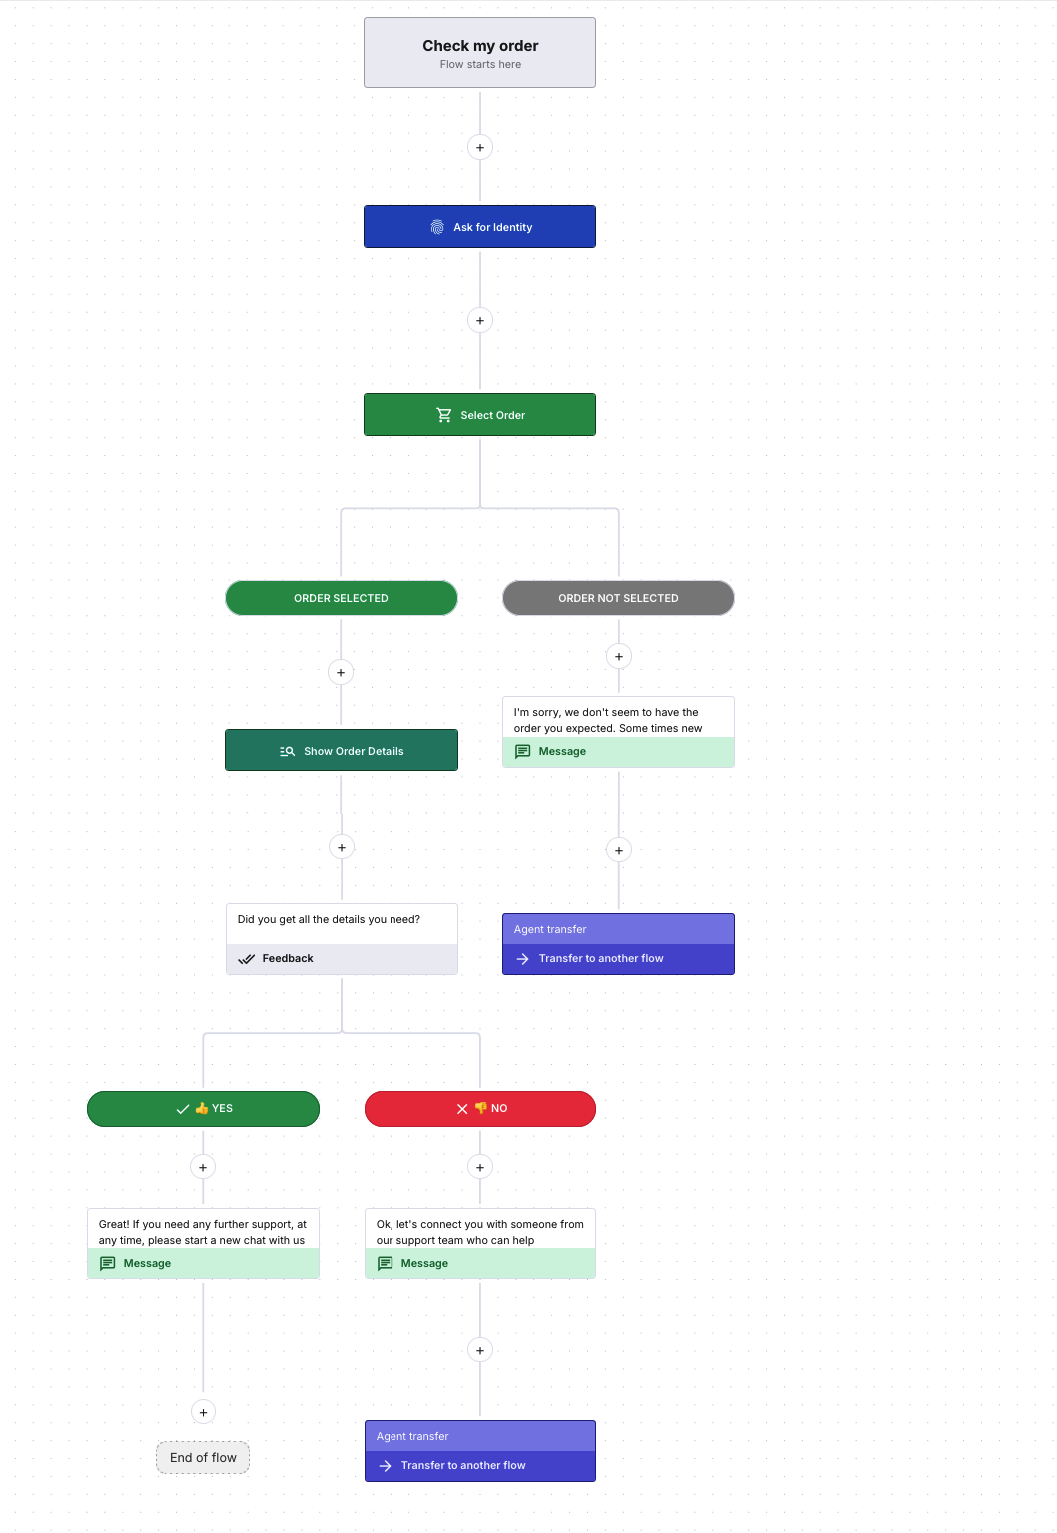
The Check my order flow is the branch the customer is brought to if they have clicked the 'Check my order' option from the opening flow.
To edit or inspect the check my order flow, click on it to show the nodes. The check my order flow is made up of:
- An Ask for Identity node (This asks the customer "Can you confirm the email address you used when you made your order with us?". If the email is invalid, the Chatbot will state "That email address is invalid, can you try again?" . Verification is switched on for this node, so if a valid email is entered, the customer is told "Thank you, please enter the verification code sent to your email". They will then need to check their email for the verification code. This is for security reasons so that only the purchaser of the product can view the details).
- A Select order node (with an Order selected and Order not selected/found branches. These branches bring the customer on a different journey, depending on what they choose).
- A Show order details node (under the Order selected branch. This node has no settings to change, it will simply show the customer their order once they have selected it).
- A Feedback node (that asks the customer "Did you get all the details you need?" and has 2 button options Yes and No).
- A Send message node (this shows if the customer chooses the Yes branch. This node states "Great! If you need any further support, at any time, please start a new chat with us" and then the customer reaches the End of flow and will need to start a new chat if they've further questions).
- A Send message node (under the Order not selected/found branch. It tells the customer "I'm sorry, we don't seem to have the order you expected. Some times new orders might take a while to appear on our system. Let me connect you to someone who can help"
- A Transfer to another flow node (also under the Order not selected/found branch. It will bring the customer down the Agent transfer flow).
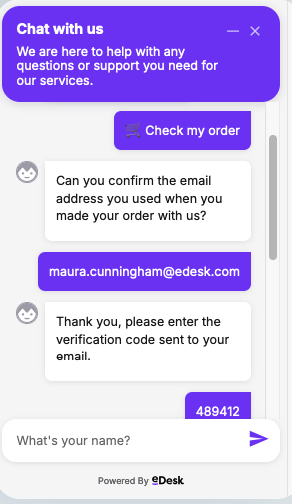
The screenshot below is what the customer will see for the Ask for identity node of this flow. To test what the rest of the Check my order flow looks like for the customer, use the Open chat simulator in your chat widget. To read more on testing your chatbot, click here.
The Agent transfer flow

The Agent transfer flow is the branch the customer is brought to if they have been transferred to an Agent via another flow, or if they have asked to speak to an Agent anytime during their chat.
To edit or inspect the Agent transfer flow, click on it to show the nodes. The Agent transfer flow is made up of:
- A Condition node (which is set to an Agents available branch and an Otherwise option.
- A Send message node (which is under the Agents available branch and states "I'll connect you to a support agent who can help").
- Another Condition node (under the Agents available branch which is set to a Provided identity branch and an Otherwise branch to see whether the customer has already provided their identity - they will not be asked twice).
- An Ask for identity node (under the Agents available branch for those who may not have already supplied their email. This will be skipped if the email has already been provided).
- A Transfer to agent node (which will then put the customer through to an online Agent via Live chat).
- A Send message node (under the Otherwise branch which states "I just need to get some additional details from you first").
- An Ask for identiy node (which states "Enter your email address". No verification setting is on for this node).
- A Transfer to agent node (which will then put the customer through to an online Agent via Live chat).
- A Condition node (under the Otherwise branch of Check if agents are available which is set to a Provided identity branch and an Otherwise branch)
- A Send message node (under the Provided identity branch which states "Our team’s currently offline, but no worries — I’ve created a ticket for you and shared all the details you’ve provided.")
- An Ask for identity node (which will be skipped if their identity has already been provided)
- A Create a ticket node (which will create a To do ticket in eDesk with the Subject "Follow up required" and an Internal note that states "This shopper was unable to resolve their question via the Chatbot and requires follow up". The transcript of the chat will also show in this ticket. The customer does not see anything happen with this node).
- A Send message node (that states "A support specialist will reach out to you by email within the next 24 to 48 hours").
- Another Send message node (that states "Appreciate your patience, and thanks again for reaching out. We’ll be in touch soon!". This branch of the flow ends here).
- A Send message node (under the Otherwise branch of the Already provided their details branch that states "Our team’s currently offline, but no worries — I can create a ticket for them to follow up with you directly").
- Another Send message node (that states "I just need to get some additional details from you first".)
- An Ask for identity node (verification is not on for this node)
- A Create a ticket node (which will create a To do ticket in eDesk with the Subject "Follow up required" and an Internal note that states "This shopper was unable to resolve their question via the Chatbot and requires follow up". The transcript of the chat will also show in this ticket. The customer does not see anything happen with this node).
- A Send message node (that states "Perfect, a support specialist will reach out to you by email within the next 24 to 48 hours").
- Another Send message node (that states "Appreciate your patience, and thanks again for reaching out. We’ll be in touch soon!". This branch of the flow ends here).
Note: The Create ticket node will create a ticket in your eDesk mailbox, including all the previous chat history with that customer. It will not give the customer further opportunity to send you a message.
The screenshot below shows what the Chatbot experience is like if there are no agents online and the customer has already entered their email address:

03 Attaching the chatbot to a widget
Once you are happy with the chatbot template, you must attach it to the widget you want to use it on.Go to: Settings > Smart Tools > Widgets > click on the widget name that you want to add the chatbot to > Behaviour tab > scroll down to the chatbot section and choose your desired chatbot from the dropdown there > Save changes.

Find out more about widget settings here.
You can test your chatbot to see what your customers will experience. Read how to test out your chatbot here. Ensure that test mode is off before your widget goes live!
As long as your widget is active on your store, your customers will now come through to this chatbot before they are routed to an Agent, thereby deflecting a large number of your chats.
Further Reading
For a full overview of the chatbot see here.
Learn more about manually creating and editing chatbots here.
Learn more about Training Content here.
To read more about some of the key nodes in chatbots, click here.