This guide will walk you through some of the more advanced nodes in your chatbot flows including:
01 Conversation with Chatbot
02 Ask for Identity
03 Order nodes
04 Business Hours node
05 Condition node
Before you start
- AI automations is added to your subscription once you set up HandsFree or add a Chatbot.
- You will be billed for the number of resolutions that result from Automations at the end of each month. See our pricing here.
- You’ll need to have access to Smart Tools > Chatbots in your permissions. Admin and Team Leader roles will have the Chatbot permission by default.
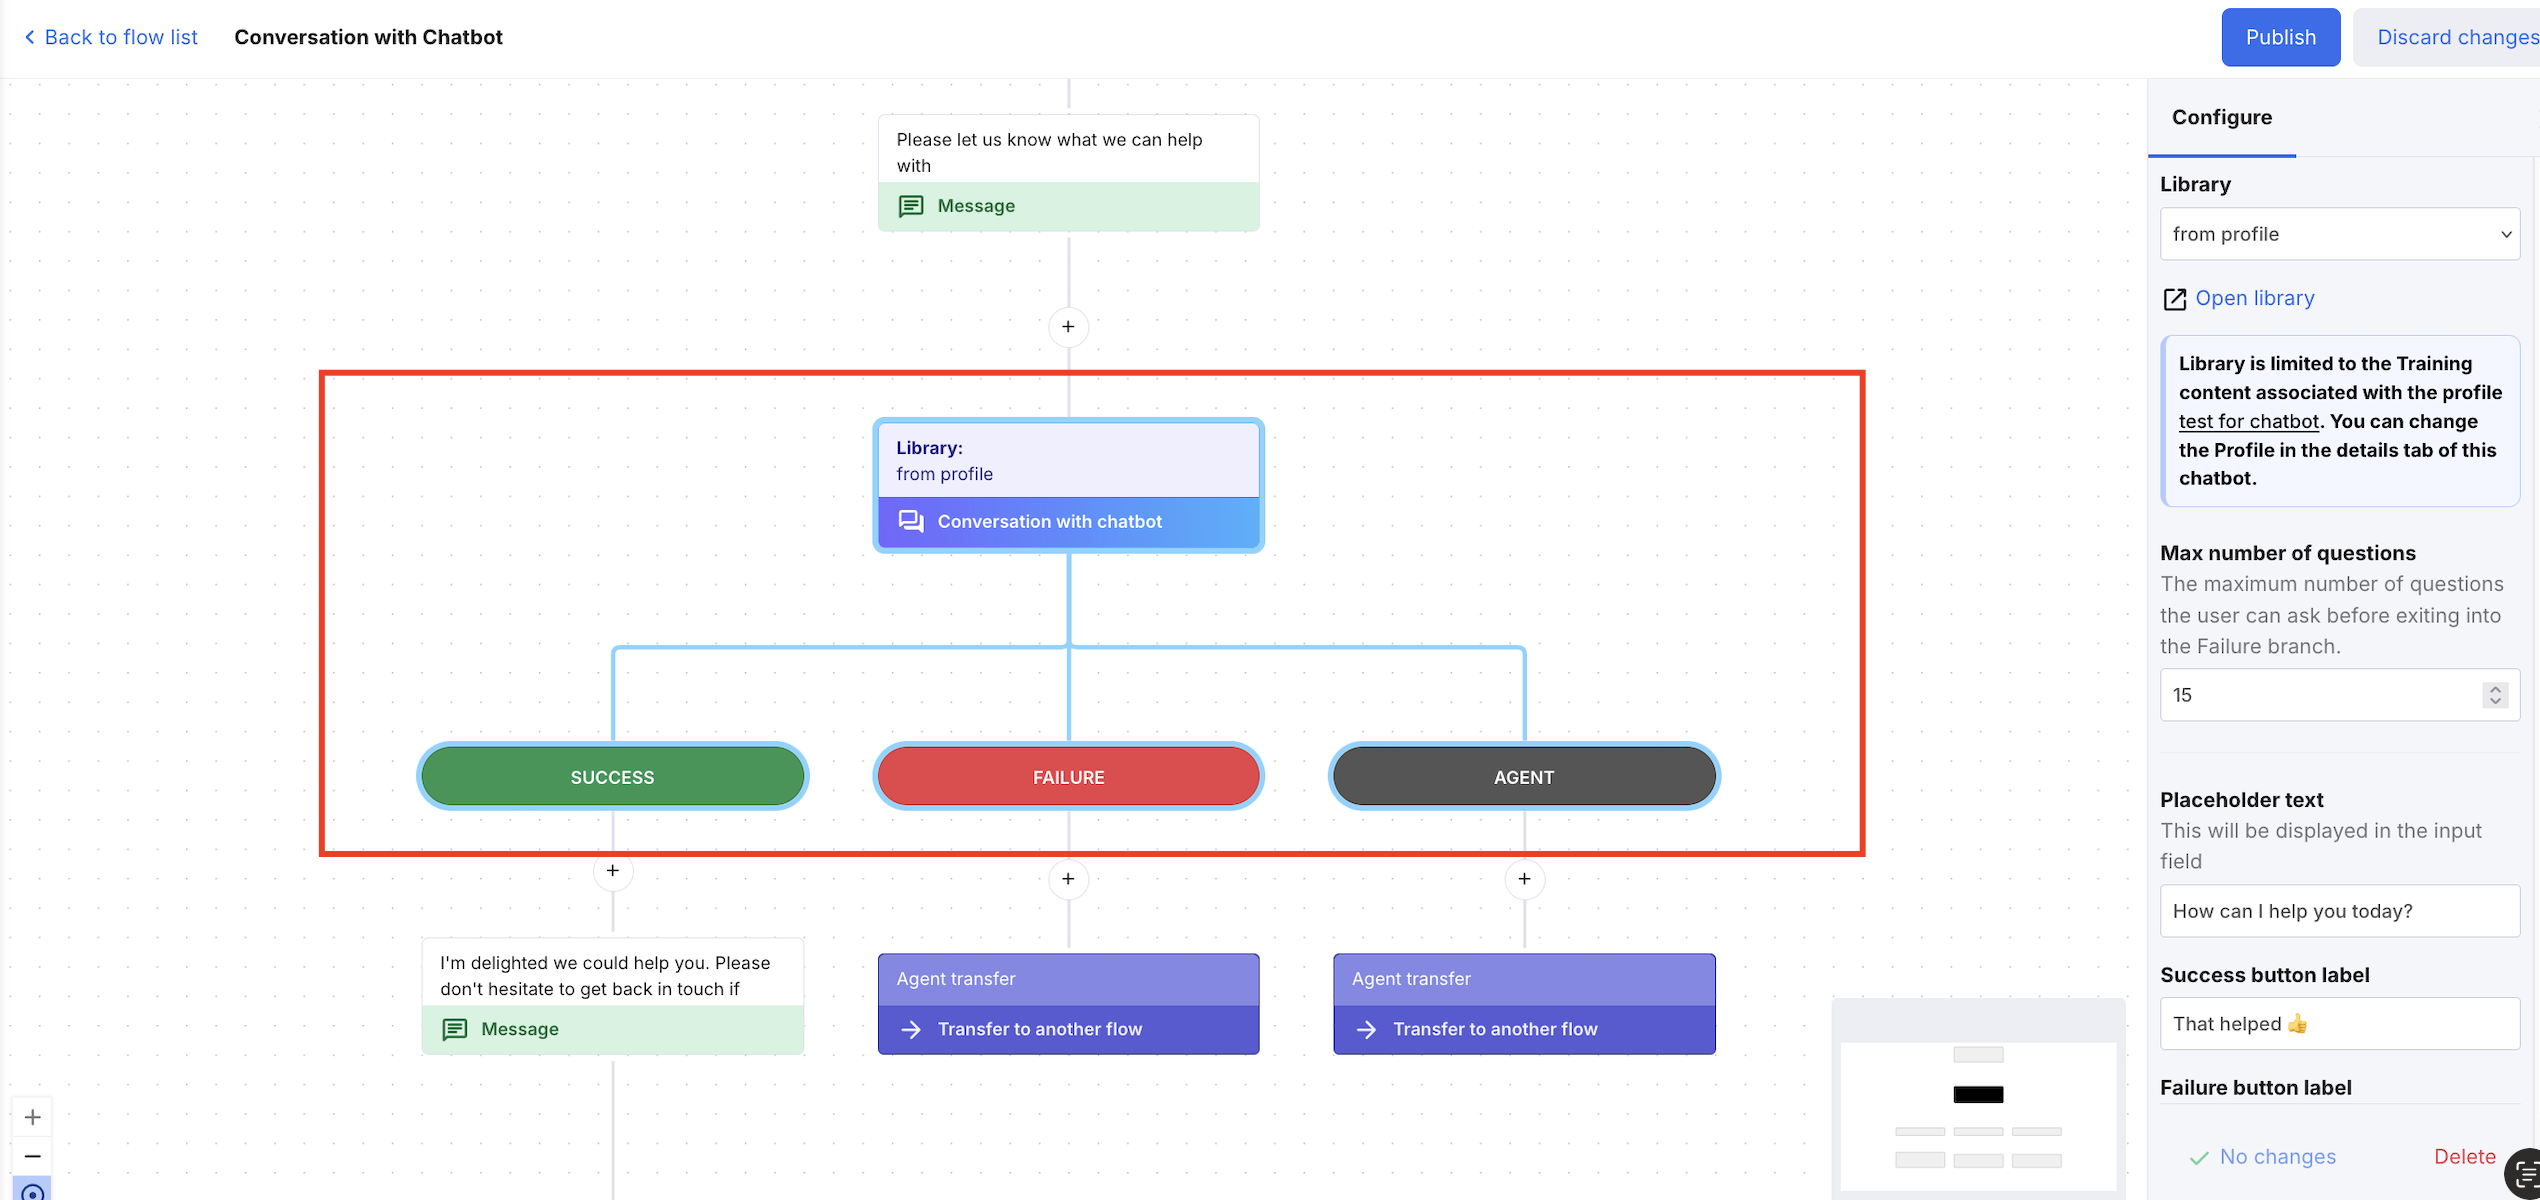
01 Conversation with Chatbot
This node allows the Chatbot to use content from your Training Content to answer customer questions in real time. Learn all about your AI Training Content here.
-
Library: Select the library to use.
-
Max number of questions: Set how many questions a customer can ask before moving to the ‘Failure’ branch.
-
Placeholder text: The input field shown to the customer (e.g. “Ask your question…”).
-
Success/Failure button labels: The buttons the customer sees based on whether the query is answered or not. The text can be edited (see screenshot below to see how the customer will view the buttons).

- For clarity for the customer, add a Send message node before the Conversation with Chatbot node to guide your customer into asking a question.
- Add a Send message node under the Success branch to close the conversation.
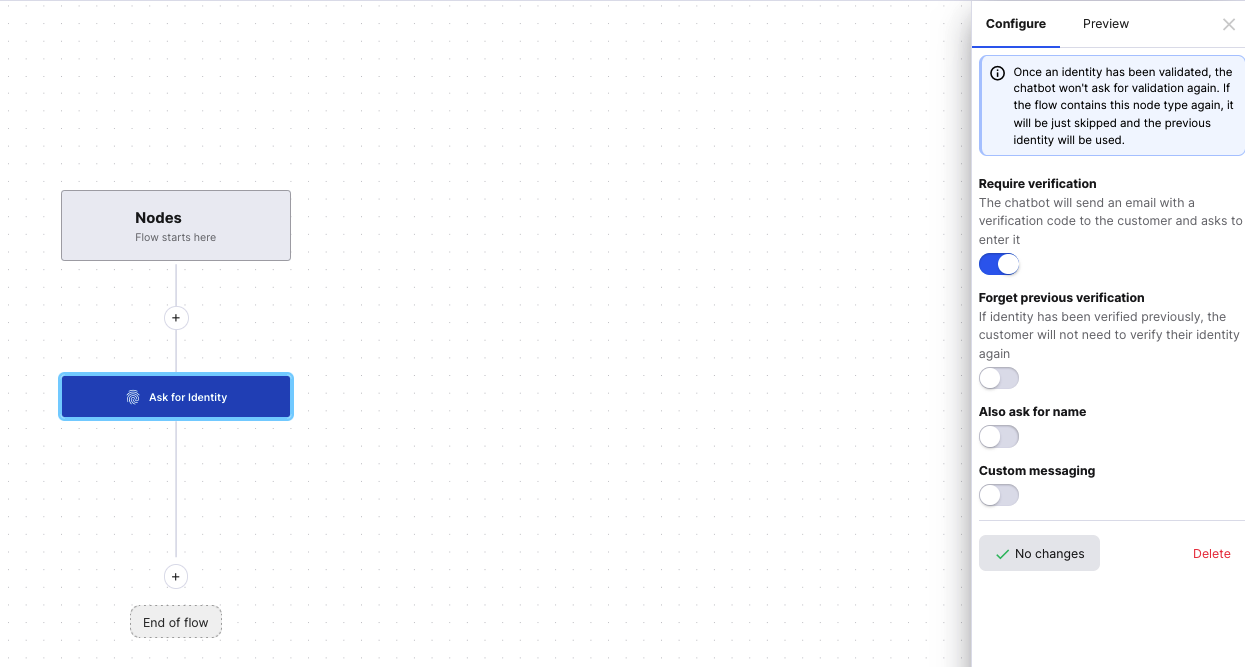
02 Ask for identity
The Ask for identity node is required before using any of the following nodes:• Select order
• Show order details
• Transfer to agent
• Create a ticket
-
Require verification: Highly recommended before the Select order node. Sends a code to verify the customer’s email.
-
Forget previous verification: Choose whether to re-verify customers on each flow. If enabled, a customer will be asked to enter a verification code each time they have to enter their email in the chat.
-
Also ask for name: Adds a name request step.
- Custom messaging: Optional. Add your own text for name, email and verification prompts and errors (required for all fields if enabled).
- If you don’t turn on custom messaging, the text shown to the customer in the chat widget is:
Message prompt: Please enter your email address.
Email prompt: john@gmail.com
Verification code prompt message: Please type in the verification code we just sent to your email.
Verification code prompt: eg. 12345
- If you don’t turn on custom messaging, the text shown to the customer in the chat widget is:
03 Order nodes
Select order
This node requires an Ask for Identity node first. If the customer verifies their email, then orders in the system related to that email will be shown. If no orders are found under that email, the customer will be led down the Order not selected/found branch of the Chatbot.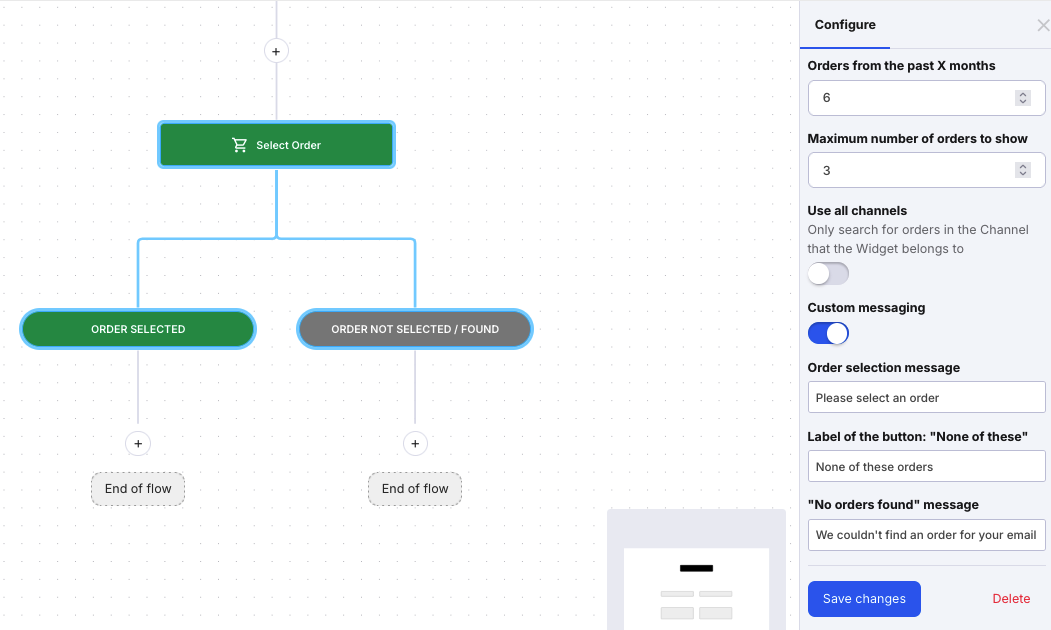
-
Orders from past X months: Set how far back eDesk should search for orders.
-
Maximum number of orders to show: Set the limit for how many orders will be displayed to the customer.
-
Use all channels: Enable to search across all connected channels. Disable to only search within the channel the Chat Widget is on.
-
Custom messaging: Enable to add your own text for the Order selection prompt, and the None of these button and No orders found message that the customer sees. All fields must be completed to save.
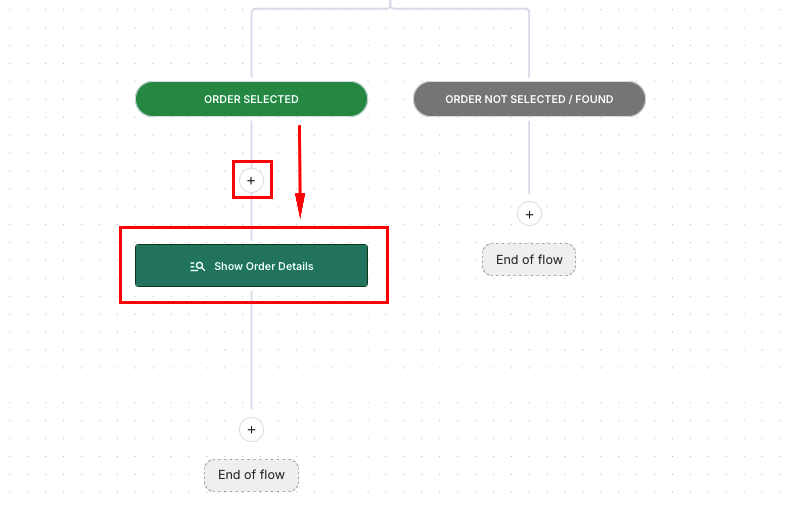
Show Order details
This node does not require any setup. It simply displays the details of the order the customer selected in the previous Select order node.
Important: Make sure to place this node under the Order selected branch. Otherwise, the customer won’t see their order details.
04 Business hours
With this node, you can set the flow based on whether agents are available or not.-
If within business hours → e.g. transfer to agent.
-
If out of hours → e.g. create ticket.
To learn more about setting up business hours in your Company Settings, click here.

05 Condition node
Condition nodes allow you to build logic into your flow using “if/otherwise” rules. These nodes can check specific criteria such as customer country, order status, or whether agents are online.
How it works:
-
The condition checks if certain variables are true or not true.
-
If the condition is met, the customer is directed down the "If" branch.
-
If not, they’re sent down the "Otherwise" branch.
Customers do not see any of the logic or node names - they are simply routed based on your settings.
Example: Checking if agents are online
-
Add a new Condition node to your flow.
-
Click into the Condition button and rename it Are Agents online? and rename the If this button to Agents online - giving these meaningful names will make it easier to understand and manage your flow later. Save your changes.

-
Click into the “If this” (now renamed Agents online) branch:

-
Name: Leave at Agents online
-
Operator: We're only using 1 condition in this example, so the Operator doesn't really matter here, you can leave on AND.
-
Variable: From the dropdowns choose Agents are available to chat, then is, then true.
-
-
Under the Agents online branch, add a ‘Send message’ node and a ‘Transfer to Agent’ node.
-
Under the Otherwise branch, add a message to say agents are unavailable and then a Create ticket node.

You can also add multiple conditions using AND/OR logic:
-
Use AND if you want all conditions to apply (e.g. agent is online and order shipped).
-
Use OR if any condition should apply (e.g. country is Australia or New Zealand).
Available condition variables include:
-
Agents are available to chat
-
It’s within business hours
-
Identity provided / verified
-
Customer country / name / email / segment
-
Order selected / status / shipped / cancelled
-
Shipping or billing country
-
Product SKU / name / marketplace ID
-
Order dispatch lateness or age
Add as many conditions as you need using the + Add condition button.
The Condition node helps you build smarter, more tailored chatbot flows by guiding customers down different paths based on set conditions.Further reading
Learn more about Training Content here.
Learn about connecting creating and editing chatbots here.
_____________________________________________________________________________________