This video and help file will explain how to set up a Chatbot using our template - and what the flow of that Chatbot will look like.
Before you start
- eDesk's Chatbots are part of our AI Automation feature. Learn about AI Automation and how it's billed here.
- You’ll need to have access to Settings > AI > Chatbots in your permissions. If you don’t have access, you can request it from an Admin user within your account.
- You'll need to have a Chat widget already set up and active. To learn more about widgets, click here.
- You'll need to have Training Content already set up. To learn how to build Training Content, click here.
- You'll also need to set Instructions for your Training Content. To learn how to set instructions, click here.
This video shows you the best way to set up your Training Content, Instructions and the Chatbot template. It assumes you already have a Live Chat widget set up. If you don't have a widget already set up, click here for instructions.
01 Creating the Chatbot from our template
1. Go to Settings > AI > Chatbots > Add chatbot > choose Template from the pop-up.
2. Complete the fields:
- Chatbot name
Name your chatbot. - Show chatbot name in chat
The name entered here will be displayed as the sender of each message in the chat widget. - Test mode
When Test mode is enabled you will not be charged for any chats. However, Test mode must be switched off after testing is complete. Test mode allows you to see information about the answers the chatbot is sending. It will show a summary of the chat and a accuracy score of the link that is sent to the customer. It will also send a verification code in the chat window, instead of by email to the customer, when the Ask for Identity node is used. Learn more about Test mode here. - Current avatar
This is the image that currently accompanies the chatbot name when it sends a message in the chat widget.
This field isn't displayed if you are adding an avatar for the first time to this chatbot. - New avatar
Select Choose file to add an image to accompany the chatbot name when it sends a message in the chat widget.

3. Select Save changes to save any edits you have made.
02 Flows in the Chatbot template
Your chatbot's behaviour is determined by the flow(s) it contains. A flow is a sequence of nodes and a node is simply a ready-made action like "Present options", “Send message to customer” or “Transfer to agent”. There are 4 flows in the chatbot template:- Opening Flow
- AI Flow
- Check my order
- Agent transfer
Pro Tip: If you want to add to or edit the Chatbot template, consider creating multiple shorter flows and connecting them. This makes them easier to edit and maintain, rather than building one longer, more complicated flow.
The Opening flow
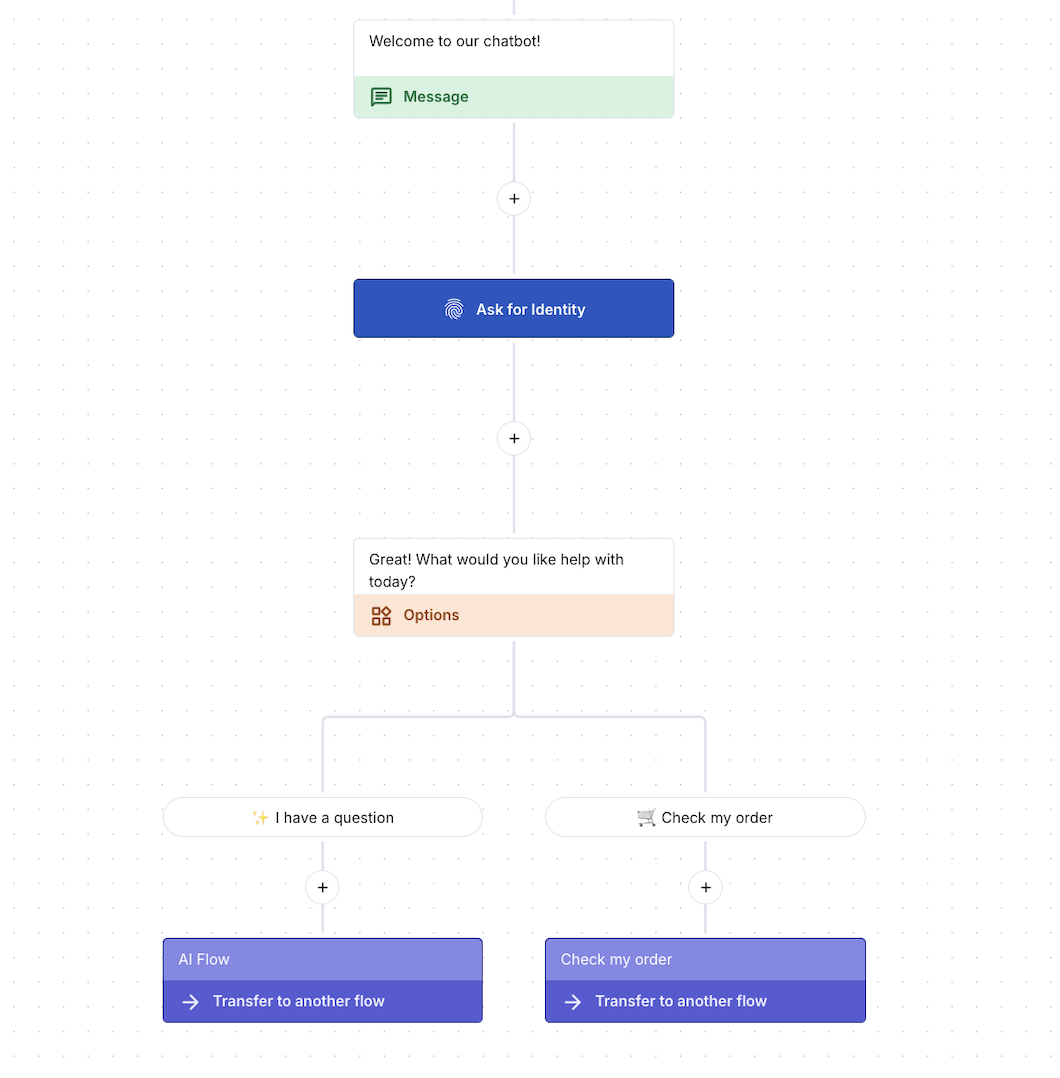
To inspect or edit the opening flow, click on it to show the nodes. The opening flow is made up of a Send message node ("Welcome to our Chatbot"), an Ask for Identity node ( "To help us assist you better, and follow up if needed, could we start by getting your email address?")and an Options node with 2 buttons ('I have a question' and 'Check my order') and 2 Transfer to another flow nodes.
You can click on any of the nodes to edit them or you can click on the + signs between the nodes to add extra nodes to the flow.
Note: The 'Opening flow' button at the start is simply for naming purposes. It is not seen by the customer and is for your reference only. You can click into the Send message node to personalise the welcome text "Welcome to our chatbot!"
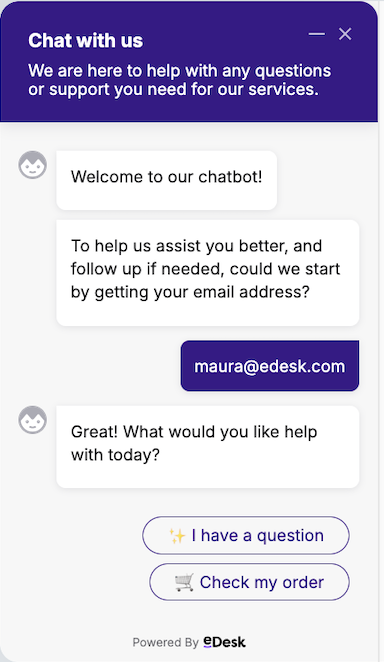
Here is what the customer will see as a result of the opening flow (colours can be changed in the Chat Widget itself to match your website):
The AI flow
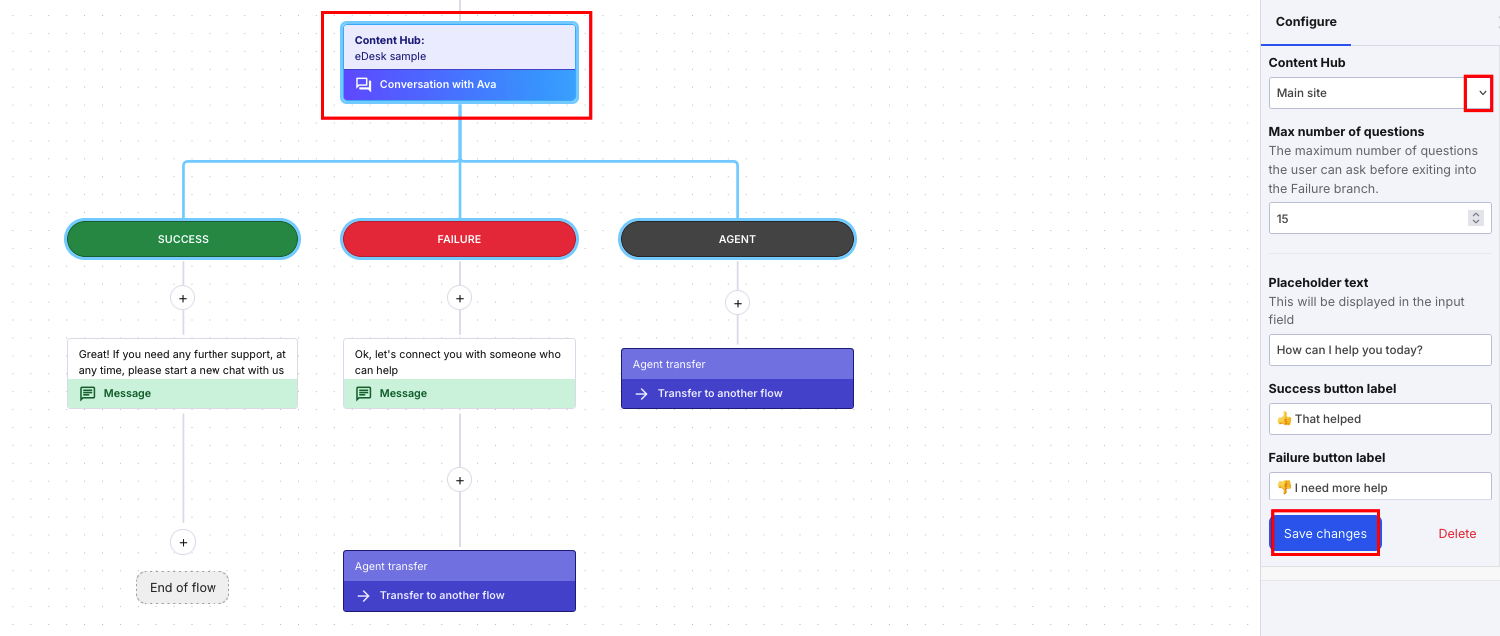
The AI flow is the branch the customer is brought to if they have clicked the 'I have a question' option from the opening flow.To edit or inspect the AI flow, click on it to show the nodes. The AI flow is made up of a Send message node, a Conversation with chatbot node, another Send message node (under the Success branch) a Send message and Transfer to another flow node (under the Failure branch) and a Transfer to another flow node (under the Agent branch)
Note: In order for the 'AI flow' to work, you need to have Training Content set up. To learn how to set up Training Content, click here.
If you already have Training Content set up, it will automatically connect to the AI flow when you create a template. If you have a number of libraries in your Training Content, you will need to ensure that the correct one has been chosen for this chatbot. To do this, select the AI flow. In the flow, click on the Conversation with chatbot node. Ensure the correct library from the Training Content is selected from the right-hand Training Content dropdown. Save your changes.
Note: If you do not select Training Content here, your customers will not experience a well-rounded flow and the chat will simply end abruptly.
The 'Have a conversation with Ava' is a key node. To learn more about key nodes, click here.
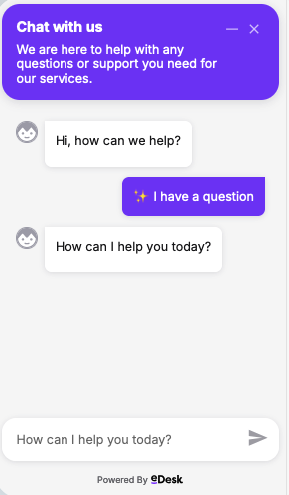
The screenshot below is what the customer will see at the start of the AI flow. Ava will use the information in your Training Content until the customer either says the chat was a success, asks for an agent, or the 'max number of questions' that you have set in the node is reached. If the max number of questions is reached, the customer will be routed down the 'Failure' branch and the chatbot will transfer them to the 'Agent transfer' flow.
To test what the 'AI' flow looks like for the customer, use the 'Open chat simulator' in your chat widget. To read more on testing your chatbot, click here.
The Check my order flow
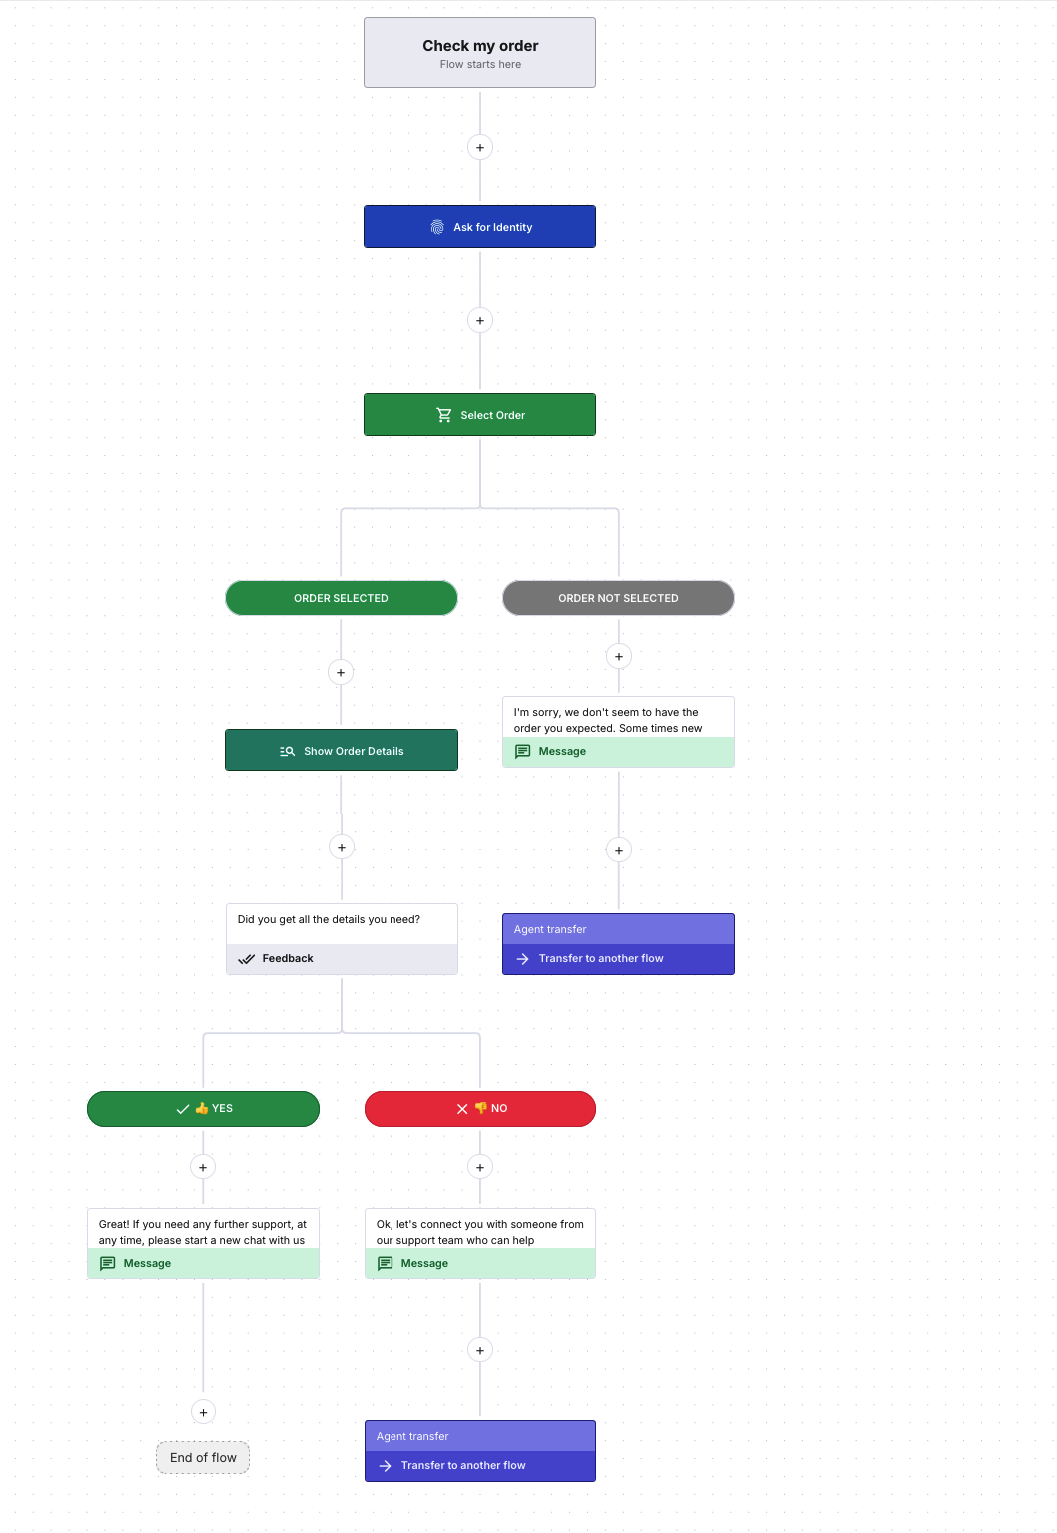
The Check my order flow is the branch the customer is brought to if they have clicked the 'Check my order' option from the opening flow.
To edit or inspect the check my order flow, click on it to show the nodes. The check my order flow is made up of an Ask for Identity node and a 'Select order' node with 'order selected' and 'order not selected/found' buttons. These buttons bring the customer on a different journey, depending on what they choose.
The 'order selected' option, brings the customer down a branch that contains a 'Show order details' node, an 'Ask if question resolved' node, 2 different 'Send message' nodes (depending on whether their question was resolved or not) and a 'Transfer to another flow' node.
The 'Order not selected/found' option, brings the customer down a branch that contains a 'Send message' node and a 'Transfer to another flow' node.
Note: If the customer's email does not match an order in eDesk, they will automatically be brought down the 'Order not selected/found' branch.
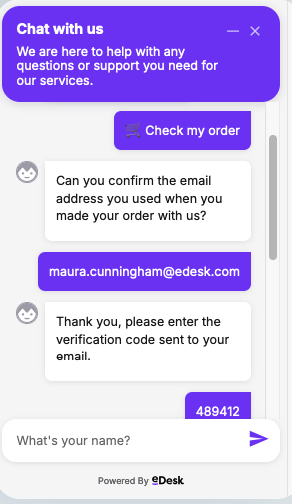
The screenshot below is what the customer will see for the 'Ask for identity' node of this flow. To test what the rest of the 'Check my order' flow looks like for the customer, use the 'Open chat simulator' in your chat widget. To read more on testing your chatbot, click here.
The Agent transfer flow
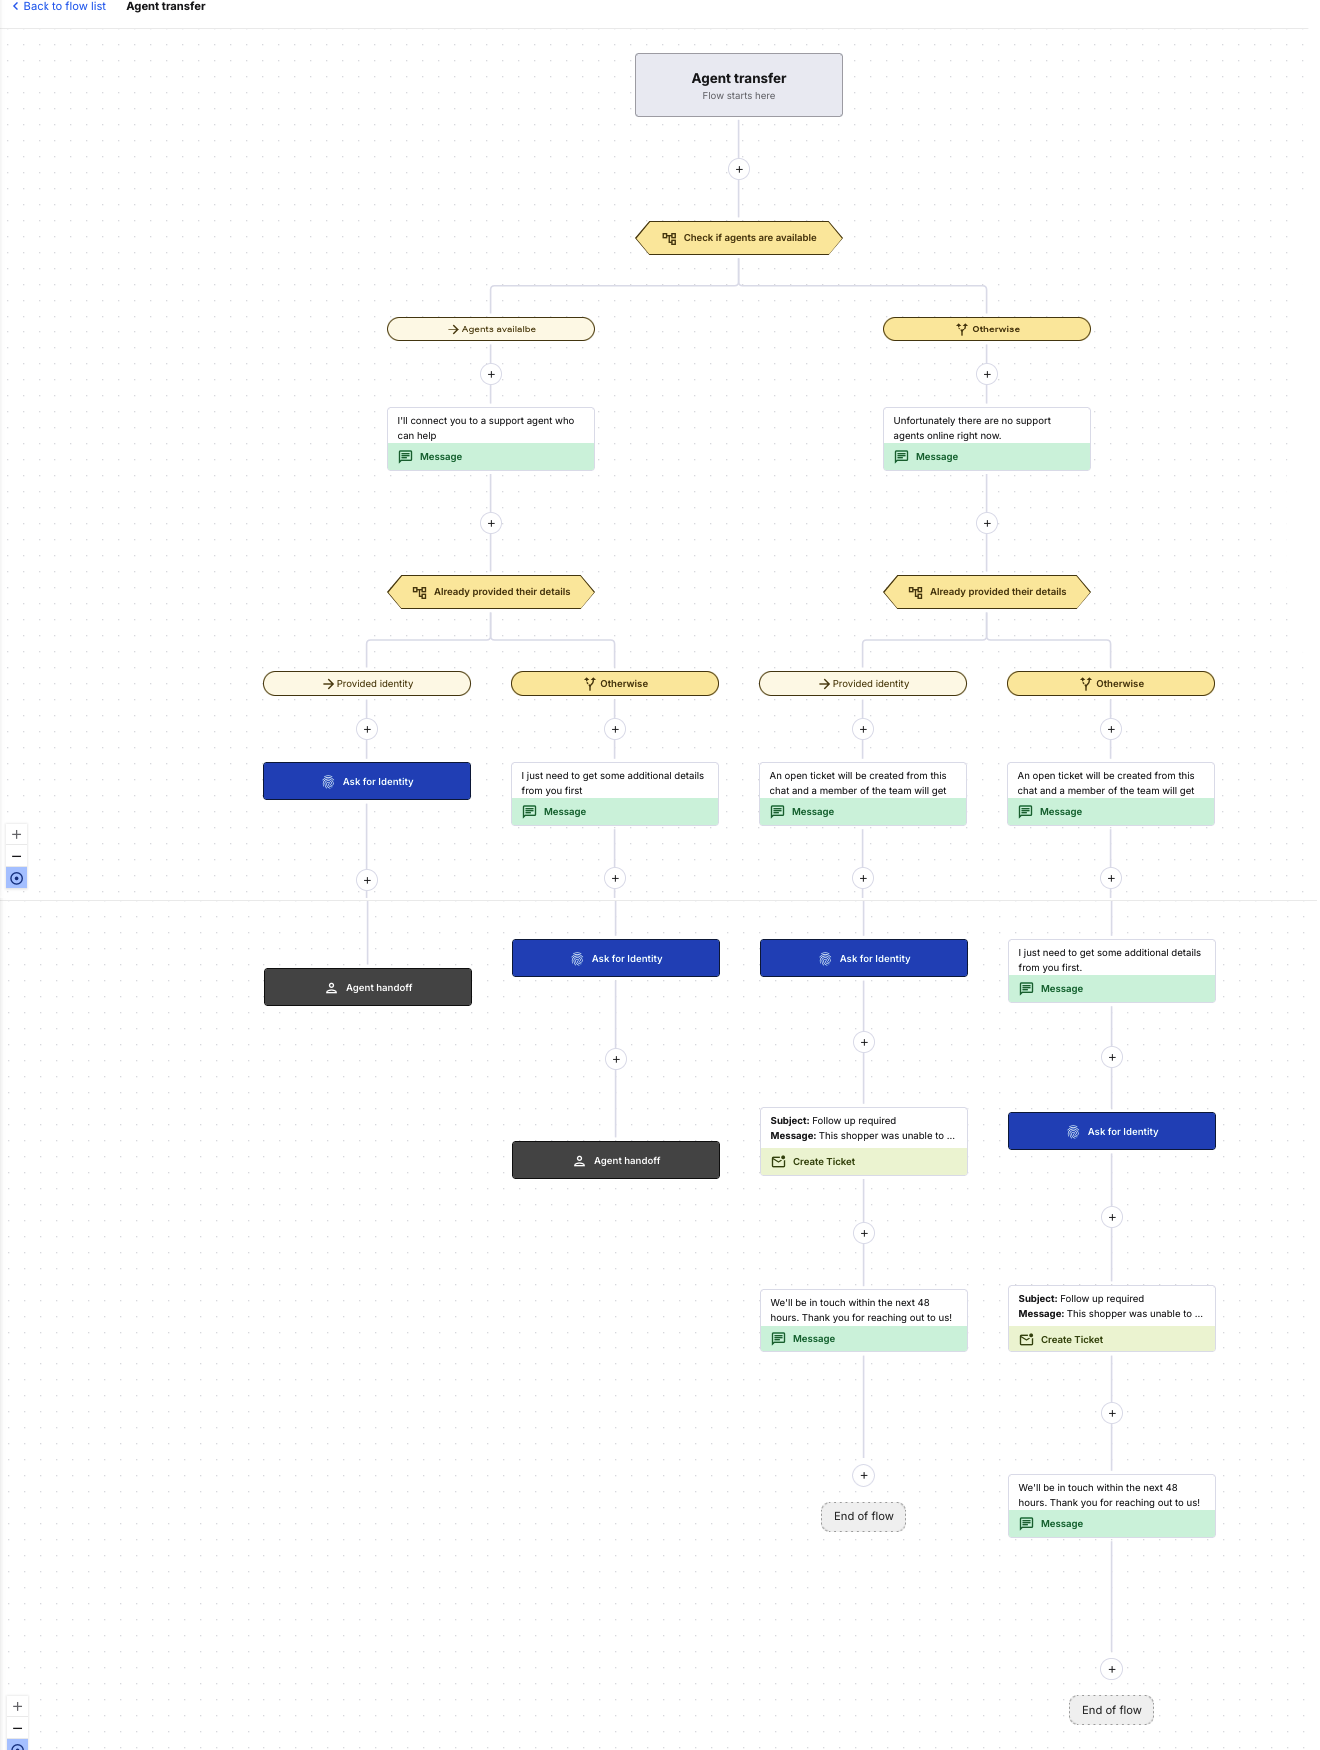
The 'Agent transfer' flow is the branch the customer is brought to if they have been transferred to an Agent via another flow, or if they have asked to speak to an Agent anytime during their chat.
To edit or inspect the agent transfer flow, click on it to show the nodes. The agent transfer flow is made up of a 'Condition' node - which is set to an 'Agents available' option and an 'Otherwise' option.
Under the 'Agents available' branch, there is an 'Send message' node, another 'Condition' node (to see whether the customer has already provided their identity), an 'Ask for Identity' node (which will not trigger if the customer has given their identity previously) and an 'Agent handoff' node.
Under the 'Otherwise' branch (if Agents are not available on Live Chat), there is a'Send message' node, another Condition node (to see whether the customer has already provided their identity), an 'Ask for Identity' node (which will not trigger if the customer has given their identity previously), a 'Create ticket' node and a final 'Send message' node.
Note: The 'Create ticket' node will create a ticket in your eDesk mailbox, including all the previous chat history with that customer. It will not give the customer further opportunity to send you a message.
If it is within working hours and Agents are online, the customer is passed to them via normal live chat.
If it is out of hours and the customer hasn't already entered their contact details, the screenshots below show what the Chatbot experience is like for the customer (you can edit these as you wish):


03 Attaching the chatbot to a widget
Once you are happy with the chatbot template, you must attach it to the widget you want to use it on.Go to: Settings > Smart Tools > Widgets > click on the widget name that you want to add the chatbot to > Behaviour tab > scroll down to the chatbot section and choose your desired chatbot from the dropdown there > Save changes.
Find out more about widget settings here.
You can test your chatbot to see what your customers will experience. Read how to test out your chatbot here. Ensure that test mode is off before your widget goes live!
As long as your widget is active on your store, your customers will now come through to this chatbot before they are routed to an Agent, thereby deflecting a large number of your chats.
Further Readings
For a full overview of the chatbot see here.
Learn more about manually creating and editing chatbots here.
Learn more about Training Content here.
To read more about some of the key nodes in chatbots, click here.