Let us help you by making sure you have successfully completed the necessary steps within Gmail.
Before you start
- You’ll need an Admin login to eDesk. If you don’t have an Admin login, you can request one from an Admin user within your business.
- You'll need a Gmail Email account. To find out how to create one, click here.
Check 01: Forwarding enabled
Have you enabled email forwarding in your Gmail account?
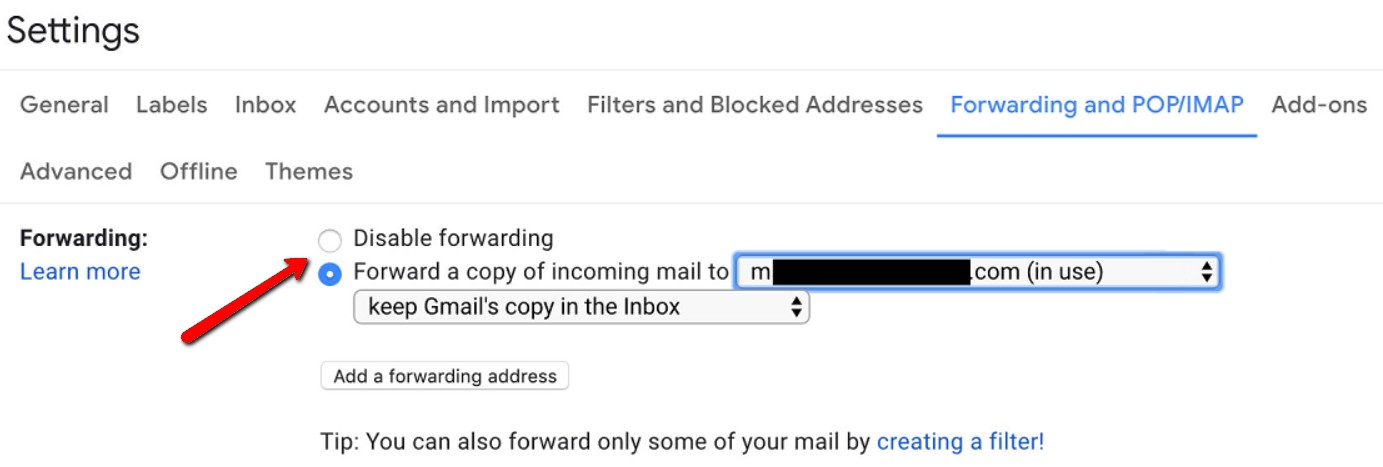
- In your forwarding settings, make sure that you have unchecked the Disable forwarding option.
- Your forwarding settings in Gmail should look like the image below. Make sure you have selected the Forward a copy of incoming mail to option to active email forwarding:
- Once your forwarding settings are correct, scroll to the bottom of the page and click Save Changes.
- Refresh your Gmail browser and check your settings again to make sure they are correct.
- Once you are confident your settings have been saved, go back to your eDesk setup and click Try again.
Check 02: Correct Confirmation Code
Have you copied the correct confirmation code in order to verify your Gmail email forwarding request?
- You will know if you have entered the incorrect confirmation code, as Gmail will not allow you to add the email forwarding address.
- If you have entered the incorrect confirmation code, you will need to add the forwarding address again. To find out step by step instructions on adding a forwarding email address in Gmail, click here.
- Go back to your eDesk setup, and click Try again. You will receive a verification code from Gmail which will be displayed in the next step of your eDesk setup.
- Copy this code, and paste it into the verification field within Gmail and select Verify.
- Once you have successfully verified your eDesk email address as your forwarding address in Gmail, you will have received a notification at the top of your browser.
- Continue to the next step in your eDesk setup to complete the process.
Check 03: Correct Email Forwarding Address
Is your forwarding email address correct?
- In your forwarding settings in Gmail, make sure that the selected forwarding address matches the xSellco email address that you copied. Your eDesk email address will be visible in the Verification failed window in your setup.
- If the forwarding address selected does not match your eDesk email address, remove the incorrect forwarding address using the dropdown.
- Then, either select your xSellco address if it is visible in the drop-down or proceed to add your forwarding address again.

Check 04: Save Settings
Have you saved your changes?
- Before exiting your email forwarding settings, ensure that you select Save Changes in order for your forwarding settings to be saved.
- Refresh your browser, and check that your settings are correct. Then proceed to Try again in your eDesk setup.
Note: If you continue to receive the Verification failed pop-up even after completing the checks outlined above, please contact our dedicated Support Team for assistance.
Further Readings
If you would like to find out more about Gmail Forwarding with eDesk, click here.
If you would be interested in learning more about connecting your Support Email with eDesk, click here.