Stay on top of invoicing and save time by creating templates that you can use to automatically generate invoices for your order-related tickets.
Invoice templates allow you to create various templates in your eDesk account that you can use to automatically generate invoices for order-related tickets.
This help file will guide you through how you can create Invoice Templates within your eDesk account.
Before you start
- You’ll need to have access to Templates in your Settings in order to view, create and edit templates. If you don’t have access, you can request it from an Admin user within your business.
01 Creating an Invoice Template
- To create an invoice template go to Settings > Invoice templates.

- Click the Add invoice template option.
- Select the channel you would like to create a template for.
- Follow the wizard and insert your company details for this invoice:
- Company name
- Company registration
- Company address
- Company Logo (optional)
- Click Finish when all details have been entered. You can then edit the template further to add a customised invoice signature, or links to your website or socials or to add your VAT number (see Section 02 below).
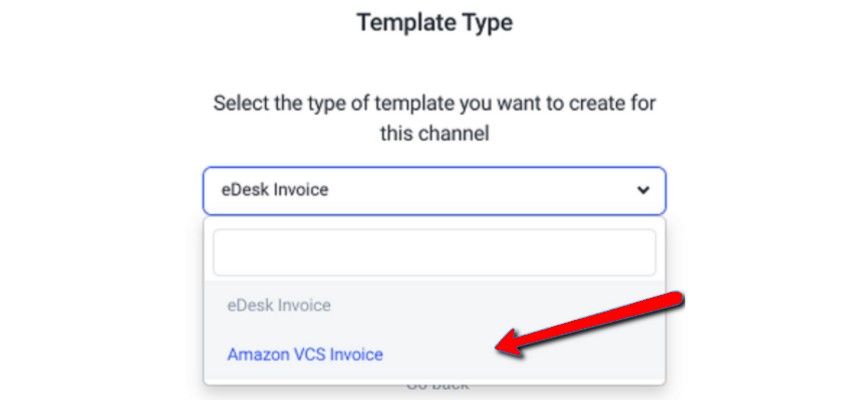
Note: For Amazon channels, the invoice tool integrates with the Amazon VAT Calculation Service (VCS) helping you generate completely customised invoices. If you are using the Amazon VCS, select Amazon VCS Invoice in the Template Type step. If you are not using VCS, simply select eDesk invoice.
To find out more about automating your Amazon invoicing through VCS, you can click here.
02 Editing the template
To customise your Invoice template further or to add a VAT number to it, click on it from your list of Invoice templates.
The Invoice template will have three separate tabs:
- Invoice Settings - your company details
- Template details - invoice format
- VAT details - hide address with VAT details

Invoice Settings
Click on Invoice Settings to view and edit your company details as they appear on your invoice:
- Channel (non-editable)
- Company name
- Company address
- City
- State (optional)
- Post/Zipcode
- Country
- Telephone number (optional)
- Company registration number
- Company registration address (tick box if it's the same as the company address)
- Registration state (optional)
- Registration Post/Zipcode
Template Details
Click on Template details to view and edit the format of your invoice:
- Title (change the title as you would like it to appear on an invoice - ie. Invoice or Receipt)
- Upload new logo
- Invoice signature (the default message is "Thank you for choosing us". You can edit this or add other information useful for your customer)
- Website (optional - add a link to your website)
- Facebook (optional - add a link to your Facebook)
- Twitter handle (optional - add your twitter handle).
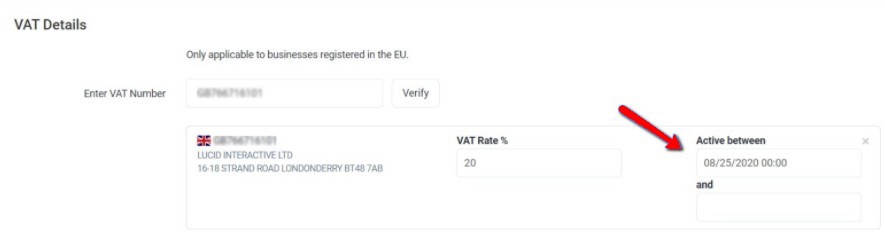
VAT Details
Click on VAT details to hide your company address and allow only your VAT address to be shown (only applicable to businesses registered in the EU):
- Enter your VAT number
- Click Verify
- Click Add VAT number (ensure this information is correct)
- Set your VAT Rate %
- Set your start date in the Active Between section (compulsory)
- Set an end date (optional)
- Ensure to click Save Changes after any edits you have made
Pro Tip: Once the Active Dates are set, any old invoices will be calculated based on the entered tax rate. Also, please note that if you don’t enter an end date, the VAT rate % entered will be used indefinitely.
The VAT we display depends on what we receive from the marketplace. You can find more information on how we receive VAT for each marketplace below:
Amazon
Sometimes the VAT is available, in which case we do show the VAT amount. If it’s not available, we won’t show it.
Mirakl
We don’t receive a specific VAT amount but we are told the VAT is included in the total price. We display the VAT rate that has been entered in the template settings.
Real
The VAT amount is shown.
eBay
The VAT amount will show if we receive it from the API.
If we don’t, we will then calculate the amount based on the data entered. You must have:
- the VAT rate entered.
- Active between - start date entered.
03 View/delete an existing template
Within your lists of templates, you can select more options using the three dots on the right-hand side:
-
Click View to see a sample of how the Invoice template would appear to customers
-
Click Delete to remove this template from your account
-
Click Edit to edit the Invoice template options

For more information using invoice templates, click here
Further Reading
Are you ready to start using your newly created Invoice Templates with eDesk? Click here to find out how.Want to learn more about the Amazon VAT Calculation Service (VCS)? Click here.