Tags are a great way to organize the Mailbox, giving your customer support process more structure. They allow you to categorize tickets for efficient management and reporting, ensuring you always find what you need quickly.
This helpfile will walk you through the different ways you can use and manage tags in eDesk.
Before you start
- You’ll need an Admin login to eDesk. If you don’t have an Admin login, you can request one from an Admin user within your business.
01 Why use Tags
Tags are invaluable for both organising your tickets and reporting. By creating Tag Groups (e.g., "Refund Reasons") and assigning specific Tags to that group (e.g., "Damaged Item," "Late Delivery"), you can identify trends and insights to improve product decisions, shipping processes, or customer service strategies.02 How to create a Tag
It's very simple to create Tag in eDesk, simply follow the instructions below:1. Go to Settings → Smart Tools → Tags

2. Click the + Add tag button in the top right-hand corner and complete the fields:
- Tag Name: Name your tag (e.g., "Delivery Query").
- Tag Group: Select or create a tag group. Learn about tag groups here.
- Icon: Choose an icon for visual identification.
- Color: Choose a color to visually organize tags in the Mailbox.

03 How do I assign tags to my tickets?
Manually
- Open a ticket and click the Tag icon at the top.
- Select the desired tag(s). They’ll appear in the top right of the ticket.

In Bulk
- Select multiple tickets in your Mailbox.
- Click the three dots and select Assign tags.

Automatically by Channel
- Go to Settings → Mailbox Settings → Channels.
- Select a channel (e.g., Amazon.fr), navigate to the Mailbox tab, and assign a Tag under Associated tags.
- Save changes to automatically tag all tickets from that channel.

Pro Tip: Automate tagging further by creating Messaging Rules. You can find out more about this process here.
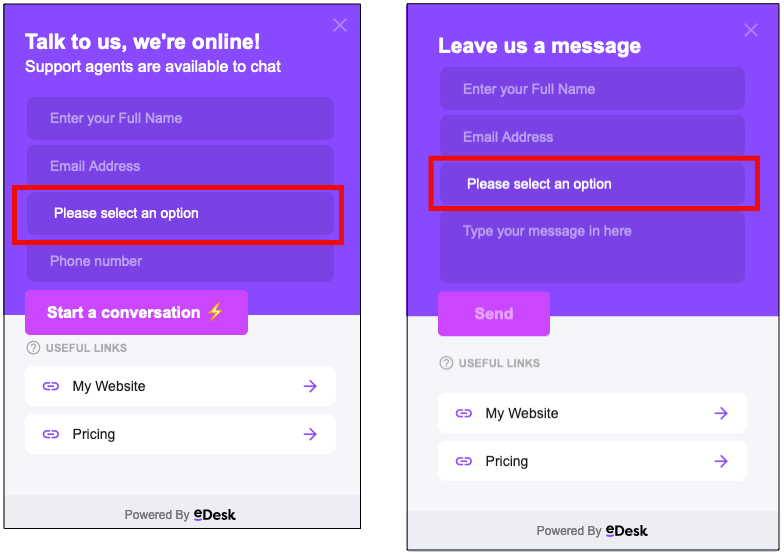
04 Assigning Tags to Live chat
Let customers select tags
- Create a Tag group specifically for Live chat. For more on Tag groups, click here. Note: The Tag group name isn’t shown to the customer.
- Add new or existing Tags to the group. Note: The Tag names will be shown to the customer.
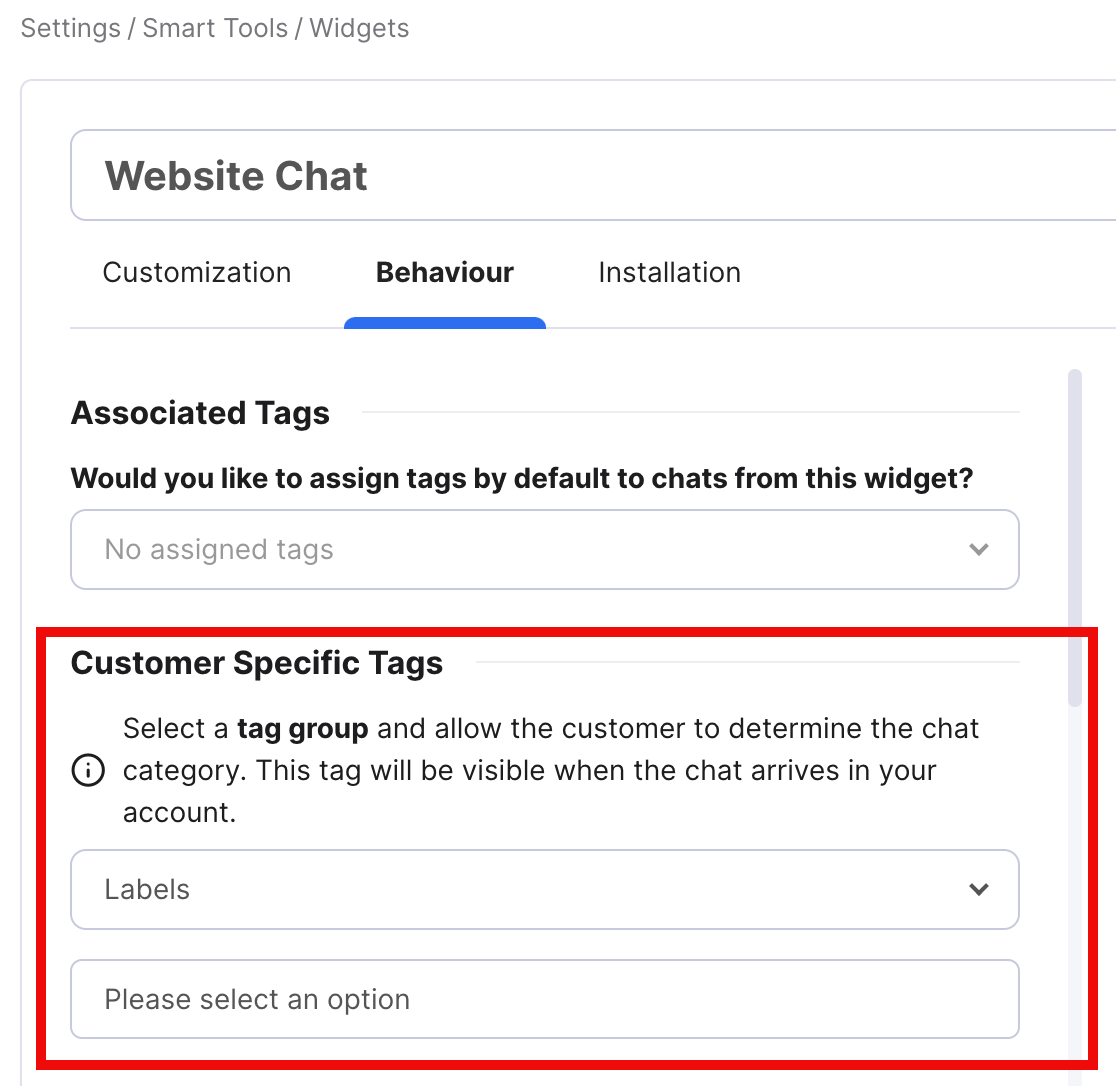
- Assign the Tag Group to a Live Chat configuration:
- Go to Settings → Smart Tools → Widgets.
- Select the Live Chat widget, go to the Behavior tab, and select your Tag Group under Customer Specific Tags.
- In the second field, enter the text the customer will see before choosing the tag that is relevant to their query - e.g. Please select an option.
- Don’t forget to Save changes!
Auto-Assign Tags to Chat Tickets
- Follow the above steps to configure your Live chat widget.
- Use the Associated Tags field to assign tags automatically to all chat tickets that come in on that widget.

05 Viewing tagged tickets in the Mailbox
Create a Pinned Filter to view tickets with specific tags:
- Apply filters in your Mailbox to select tickets by tag.

- Save the filter, give it a title, and pin it to the sidebar for quick access.

- The Pinned filter will then show on the side of your Mailbox so you can easily access all the Amazon FR tickets.

06 Reporting on Tags
Tag reports, available in the Report extracts section, offer valuable insights for quarterly or yearly analysis, helping you make informed, data-driven decisions.
To create a Tag report:
- Go to Insights → Reports → Report extracts.
- Click Create report.
- Select Tag report from the Report type dropdown.
- Choose the tag(s) you want to include in the report from the Tag dropdown.
- Click Create report.
Use these reports to analyze trends, improve processes, and make strategic decisions across your business.

07 Edit, activate/deactivate and delete Tags
Managing your tags is simple with the ability to edit, activate, deactivate, or delete them.

Editing tags
You can edit the name, group, icon and colour of your tag at any point. This will update the tags throughout your tickets.
To edit a tag:
- Go to Settings → Smart Tools → Tags.
- Click the ellipsis next to the Tag you want to deactivate.
- Select Edit and make your changes.
Activating/Deactivating tags
Deactivating a tag removes it from dropdown lists and filters throughout eDesk, helping you clean up unused tags without deleting them. However, inactive tags:
- Cannot be assigned manually or via bulk actions.
- Will still appear on existing tickets and in dashboards.
To deactivate a Tag:
- Go to Settings → Smart Tools → Tags.
- Click the ellipsis button next to the Tag you want to deactivate.
- Select Deactivate Tag. The Tag will move to the Inactive list.
Note: If a tag is in use (e.g., in Message Rules or Widgets), a confirmation pop-up will notify you before deactivating it. Deactivated tags will no longer function in settings like Message Rules, though existing tickets will retain them

To reactivate a tag, follow the same steps and select Activate tag.
Deleting tags
If a tag is no longer needed, you can delete it entirely:
- Go to Settings → Smart Tools → Tags.
- Click the ellipsis button next to the tag.
- Select Delete and confirm.
Remember that tags can be used in multiple places throughout the product:
-
Message rules. To find out more about this, click here.
-
Widgets. To find out more about this, click here.
-
User settings. To find out more about this, click here.
-
Channel settings. See Section 03 'Automatically by Channel' above.
Further Reading
To find out more about elevating your customer service with Tag groups, click here.
To find out more about using Message Rules to automatically tag tickets click here.