This help file describes what's in the ticket view, and explains how to use it to reply to your customers.
01 Introduction to the ticket view
Whenever a new customer message arrives into your account, it's put into a ticket. The ticket is shown in your Mailbox and in the Mailboxes of your team mates.
Open the ticket to see the customer, any associated order information and perform actions for that ticket, such as send a response to the customer, make an internal note, or involve other people that can help you resolve the ticket successfully.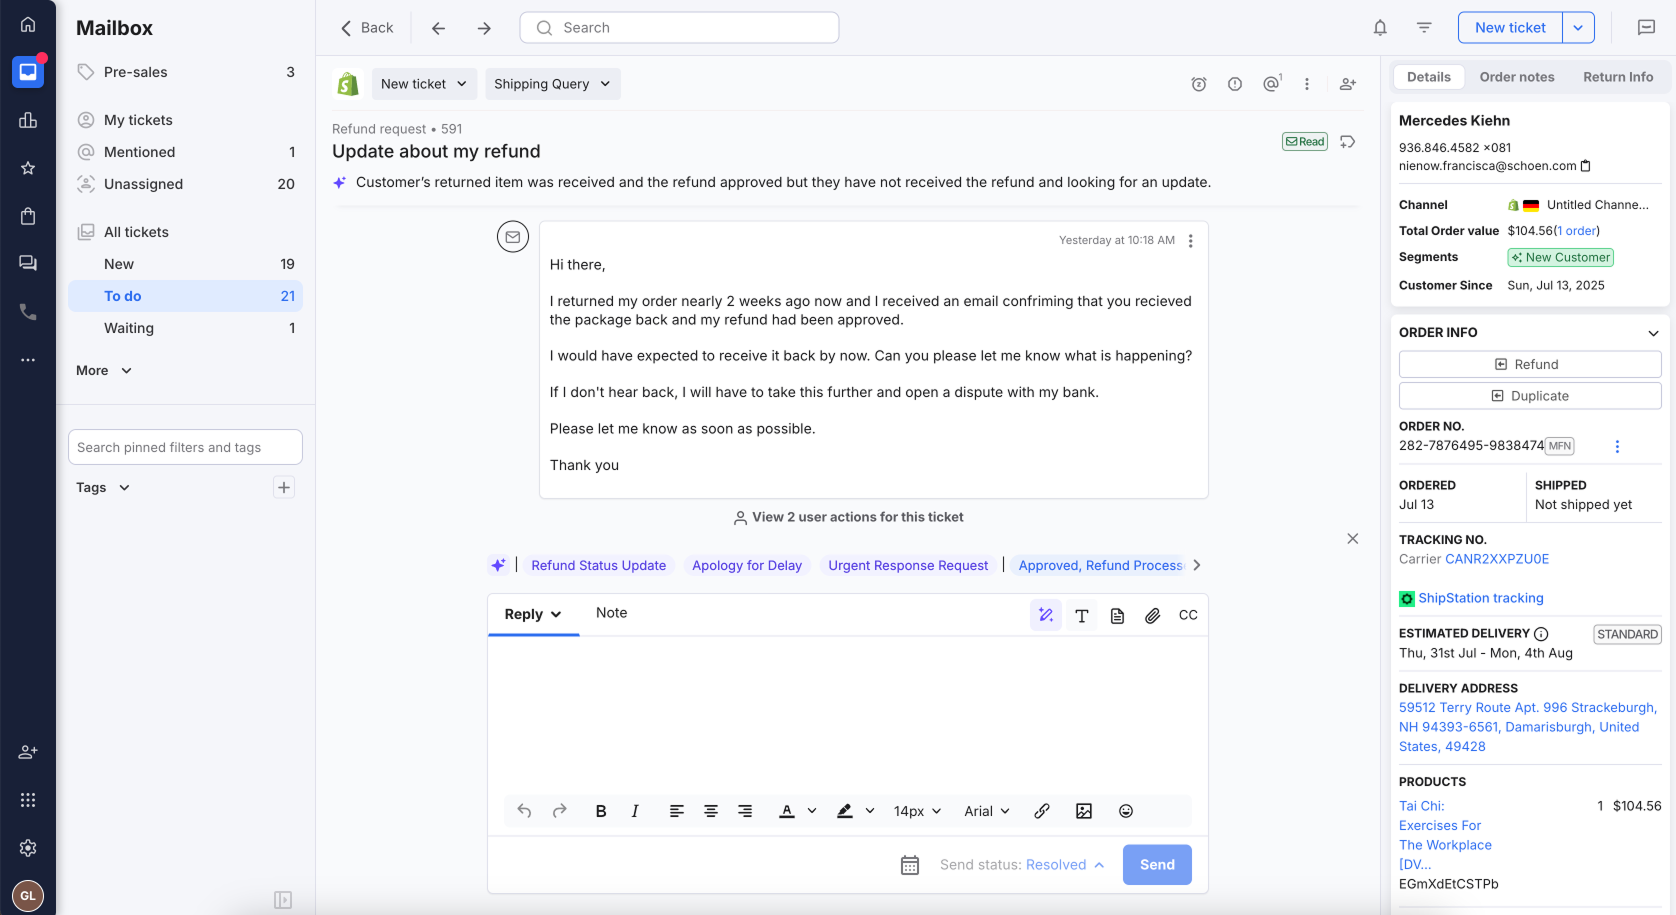
The entire history of the ticket including actions by your team and any follow-up messages from the customer are logged in the ticket also so you can view a full audit trail whenever you need to. Learn more about tickets here.
02 What’s included in the ticket view?
The ticket view gives eCommerce sellers a complete overview of the customer’s message and all related details. This view is not visible to customers.
Ticket information
- Ticket status
The current status of the ticket - Ticket type
What the marketplace/eDesk have determined is the ticket type. This can be manually changed if needed. - AI Classification
The classification the AI has given the ticket - based on the first incoming message from the customer. This cannot be manually changed. Displayed only if you are using eDesk AI. - Ticket ID
The unique identifier of the ticket. Particularly useful when coming into our support team with queries. - Email subject
The subject of the email added by the customer or automatically generated by the channel. - AI Summary
A short AI-generated summary of the first message from the customer. If you click on the Sparkle icon, you can generate a summary for longer tickets. Displayed only if you are using eDesk AI.
Ticket options
- Snooze
Snooze the ticket to a later time/date - Spam
Mark the ticket as spam. Note: This will only mark this specific ticket as spam. If the same customer comes in on a new ticket, that one will go into To do. To permanently mark specific tickets as spam, use a Message Rule. To read more on managing spam, click here. - Mention
Use this to mention a teammate on a ticket. Read more here. - More options - Important or Favourite
The option to Mark a ticket as important or Favourite the ticket is collapsed in the more options icon. Read more here. - Assign owner
Assign an owner to the ticket. Read more here. - Add tag
Assign a tag to the ticket. Read more here.
Customer and order information
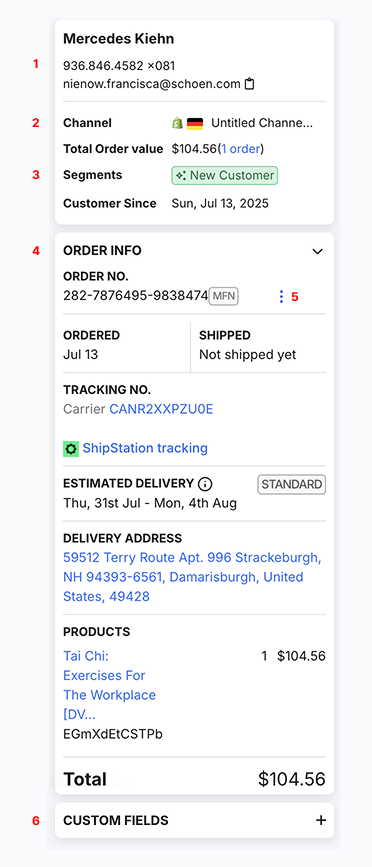
- Customer details
Name and email of customer, if available. Note: Amazon do not provide customer names. - Channel
The channel which the customer message came in on. - Summary of all orders
The total order value, customer segment and how long they've been a customer. To see more on the Customer view, click here. - Order information
Details of the order itself - order number, date ordered, shipping status, tracking number and link (if available), estimated delivery, delivery address and the product(s) and cost of what was ordered. - Order actions
Allows you to view the order, show in Linnowrks (if connected), open the order in the marketplace, send and view an invoice, open a new ticket for the order and remove the order from the ticket if needed. - Custom fields
Allows you to add custom fields to the ticket. For more on this, click here.
Logging and reply options
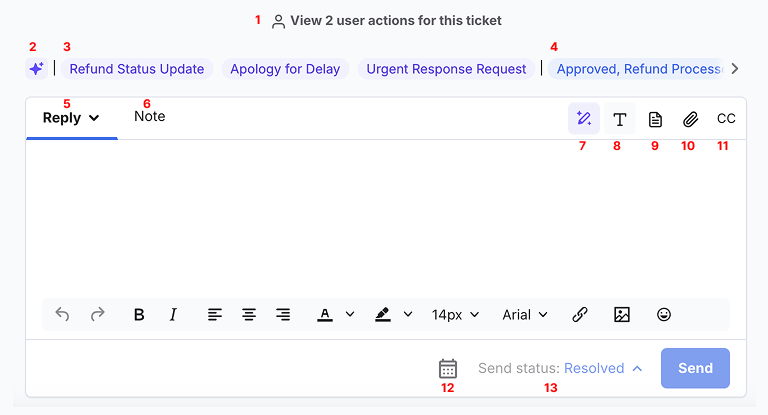
- Logging
Logging - user actions, message rules triggered etc. - are displayed throughout a ticket. Click on the link to view the actions. - AI icon - Quick reply
Click to generate an AI response from scratch. - Prompt chips (purple)
Select a suggested prompt to generate a response related to the chip title. - Template chips (blue)
Any templates you have assigned to a Classification which matches the ticket are displayed along the top of the reply box. For more on AI Assist, click here. - Reply
The reply box allows you to respond directly to your customer. Clicking the dropdown arrow displays the Share and External options.
Share allows you to share the entire ticket thread with third parties. For more on this, click here.
External allows you to send a message to an external email address (like a supplier or courier for example). Customers will not see this. Any replies from the external address will also come in on the same ticket thread. For more, see Section 02 here. - Note
Allows you to leave an Internal note for your teammates. Customers will not see this. For more on Internal notes, click here. - Composer
Displayed only if you are using AI Assist. Highlight text you type in the reply box and use the Composer to enhance it. For more, click here. - Formatting options
This will show the text formatting options at the bottom of the reply box. Important to note that this can differ depending on what the channel allows. - Manual templates
This will show the option to choose your manual templates at the top of the reply box. For more on manual templates, click here. You can also access your manual templates in the reply box by using the shortcut _ (underscore) and start typing the name of the template. - Attachments
Allows you to add an attachment to your message. - CC
Gives you the option to CC and BCC recipients in your messages. - Schedule send
Allows you to schedule the message to be sent at a later date/time. - Send status
Allows you to choose a different status to the default Resolved when sending the message. For more on Send status, click here.
03 Supercharge your customer support
Now that you're acquainted with the ticket view, it's time to learn about all the ways in which you can respond to your customers, and how you can automate and speed up these replies using eDesk's AI, snippets, and templates!
- Deliver super fast responses using AI-powered suggestions
- Include personalized information using Snippets
- Use Templates to handle your most common customer queries
- Support international customers with eDesk's AI Language support
- Use eDesk's AI Composer to instantly change the tone, rephrase, and expand your messages.
Further readings
For a short video tour of your eDesk Mailbox, click here.
You can also use eDesk's Live Chat to support your customers. For more information, click here.