Want to include extra information in your tickets and orders that you can also report on? Custom fields are a great way to store ticket/order information that isn't stored by default in eDesk, and eDesk enables you to report on the information in custom fields to unlock valuable insights into your customer base and your sales.
In this help file, we'll show you how to add custom fields to your tickets, orders, and Chat settings, and explain how Agents then populate the custom fields you've created.
Before you start
- You’ll need to have Permissions to access Custom fields in eDesk. If you don't have permissions, you can request them from an Admin in your account.
01 Introducing custom fields
Some sellers like to include extra information in their eDesk tickets or orders, which isn't included in the ticket/order by default. eDesk makes it easy to do this by enabling you to set up custom fields to store this additional information. The custom fields are then included in the ticket or order, where Agents can populate them manually OR you can instruct eDesk to automatically populate them by pulling information from another platform via the eDesk API. Agents can also populate custom fields in Live Chat.
Another great benefit of custom fields is that you can unlock insights into the information in custom fields by running report extracts against them.
There are two types of custom fields:
- Order Fields
These are available via the pop-out sidebar in the Order view and in the right-hand panel in the Ticket view. - Ticket Fields
These are available via the right-hand panel in the Ticket view.
Note: Prior to the introduction of Order Fields, Ticket Fields were known as Custom fields.
02 How do I create a Custom field?
It's easy! Follow the instructions below:1. Go to Settings > Smart Tools > Custom fields.
The Custom fields page has dedicated tabs for Ticket fields and Order fields (and also for Field views, which we'll cover in the next section of this help file). Each tab lists the custom fields that have already been created.
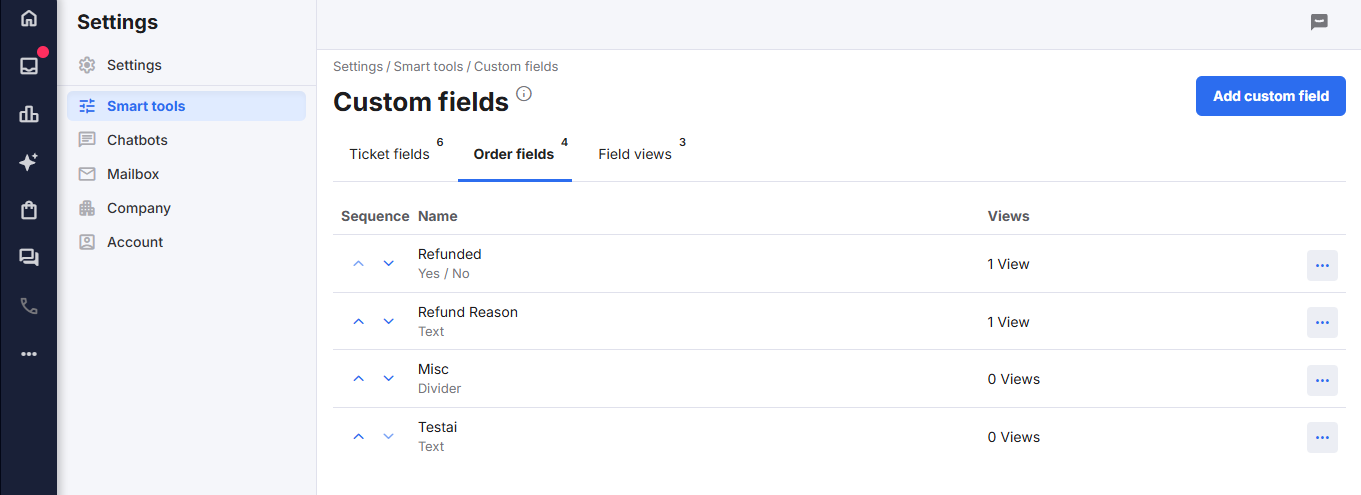
2. In the Ticket fields tab or Order fields tab, select Add custom field to open the New custom field page.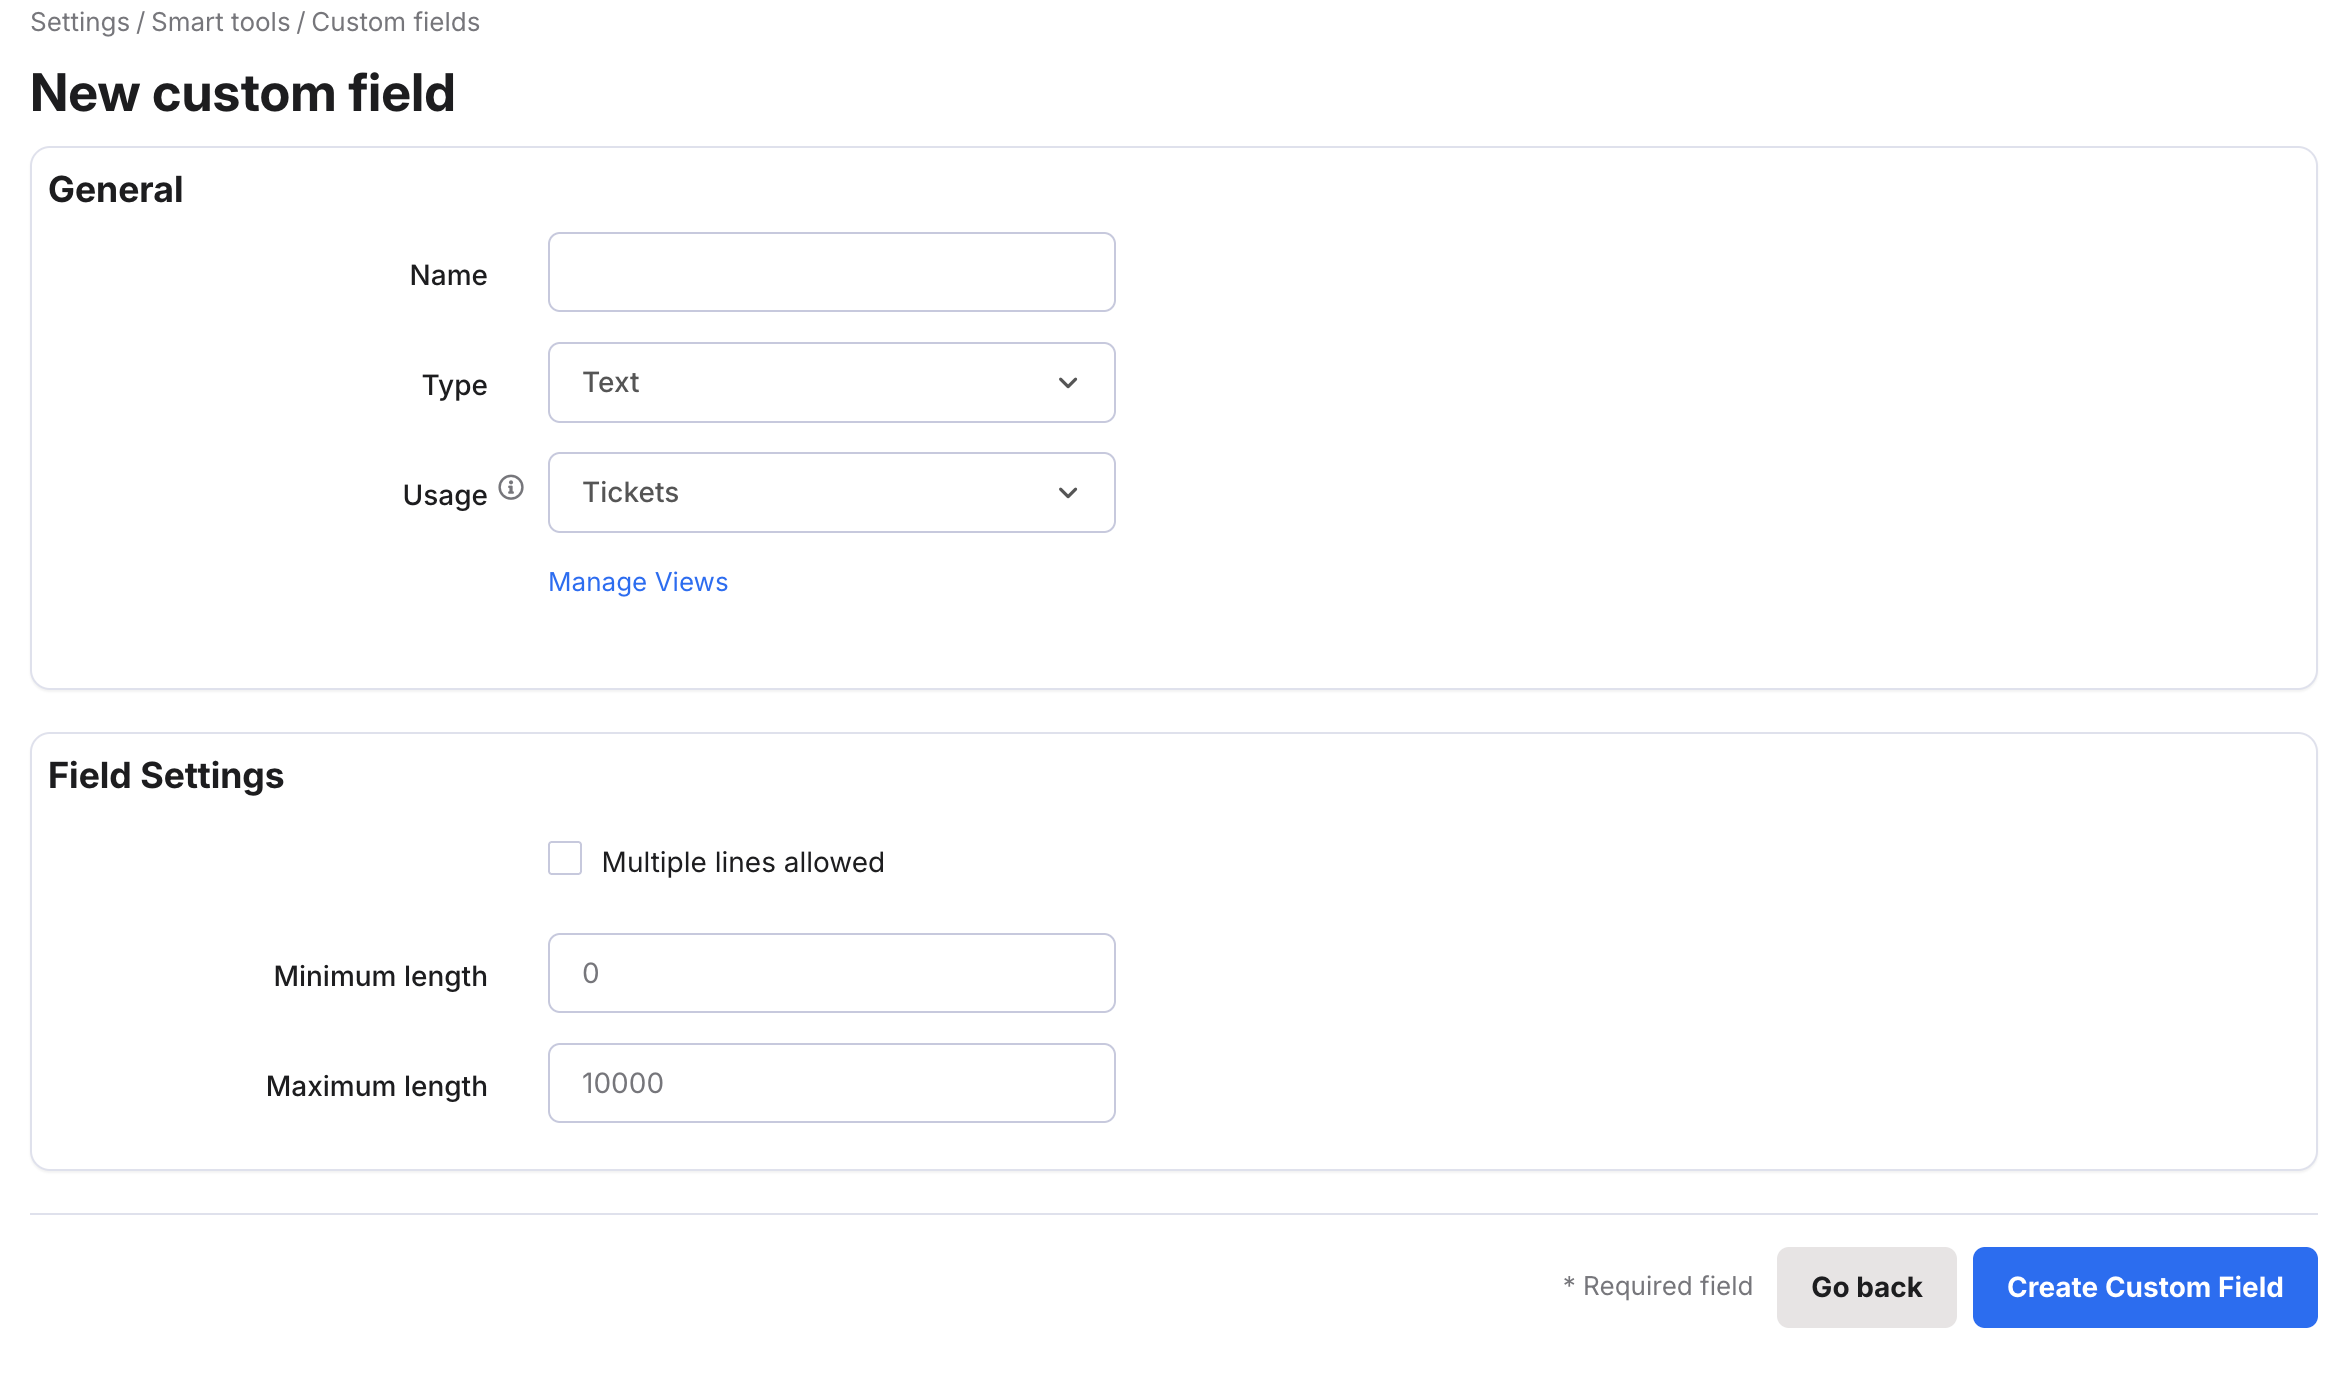
- Name
Enter the title of the custom field.
- Type
Select the format of the data in the field.
The options are:
Text: A free text field.
Date: A DD/MM/YYYY field.
Date & time: A MM:HH DD/MM/YYYY field.
Selectable options: A menu in which the Agent can select one item.
Multiple selectable options: A menu in which the Agent can select one or more items.
Number: A numeric field.
Yes/No: A checkbox which the Agent ticks to indicate Yes.
URL: A website URL field.
Email address: An email address field.
Divider: Not a field per se, instead this is a heading that you can insert into the list of custom fields to divide different groups of custom fields. The heading is displayed with a horizontal line below it. See example below, in which the Divider is called Misc:
- Usage: Choose Ticket or Order, depending on where you want the custom field to be available.
- Manage views: click this link to jump to the Field Views listing.
- Field Settings > Multiple lines allowed
Tick the checkbox if your custom field will be displayed across multiple lines.
- Field Settings > Minimum length
Enter the minimum number of characters required.
- Field Settings > Maximum length
Enter the maximum number of characters allowed.
3. Select Create Custom Field.
The Custom fields page is redisplayed showing the new custom field in the listing in the appropriate tab (Ticket fields or Order fields).
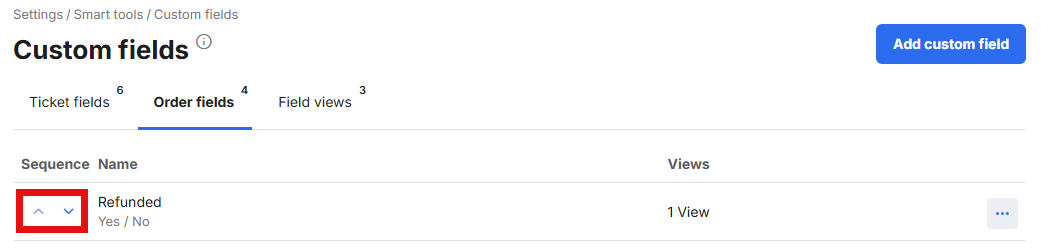
To change the order in which the custom fields displayed in the ticket, order, or chat, select the arrows beside a custom field to move it up or down in the listing on screen here and also in the ticket/order.
To delete a Custom Field, select the ellipsis button (three dots) next to your chosen Custom Field and hit Delete.
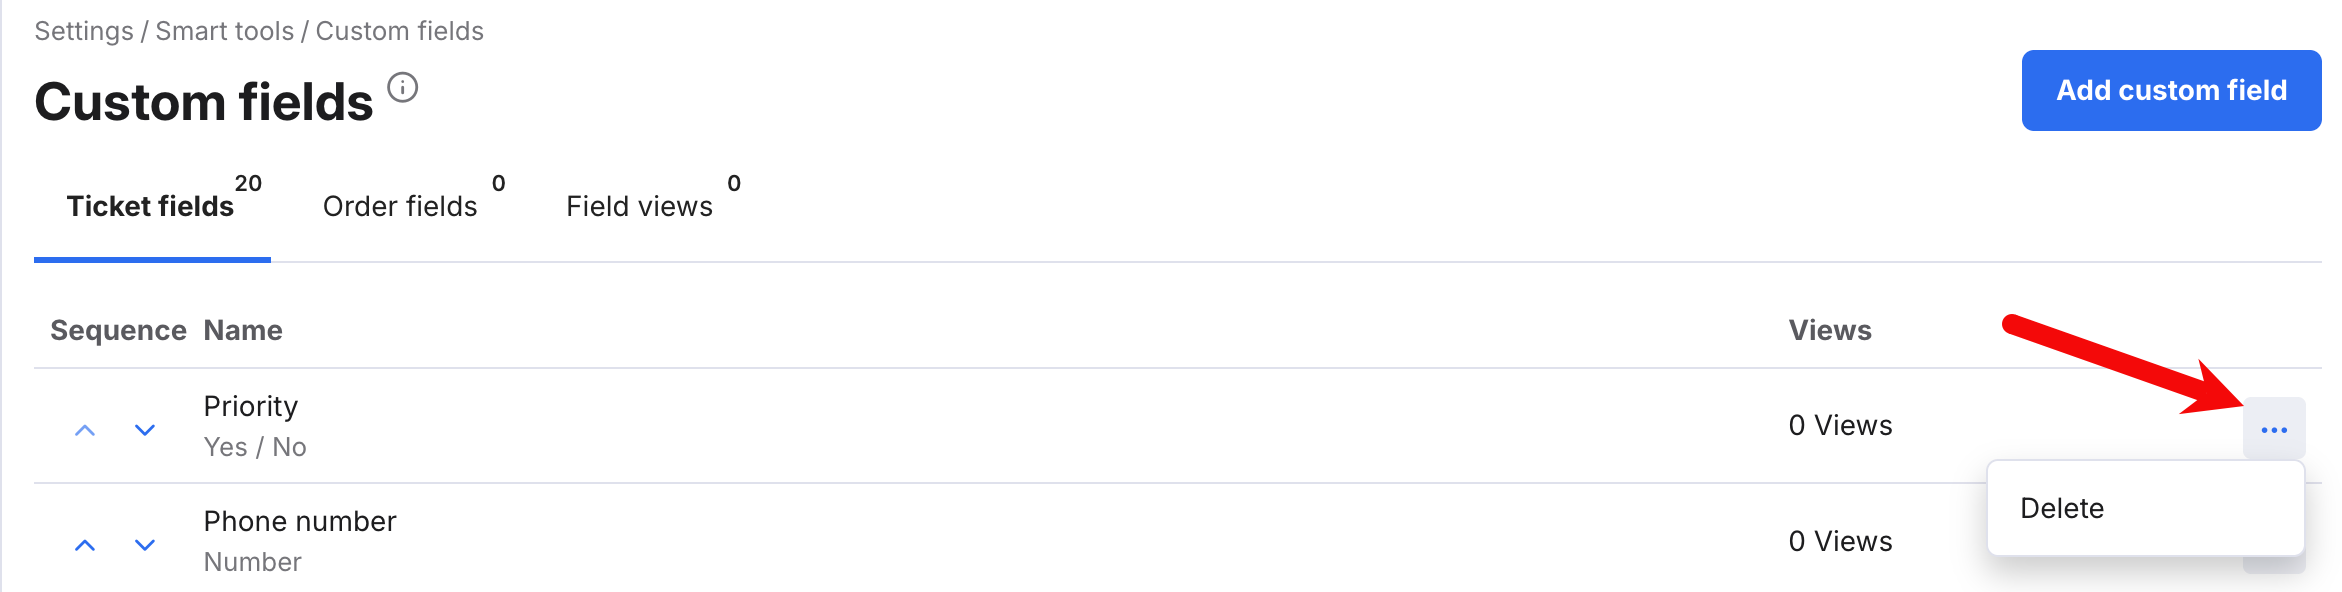
Note: This will delete all data entered on tickets/orders for this custom field.
03 How do I create a Field View?
Field Views empower Agents to quickly populate the fields that are relevant to the ticket or order, by filtering out irrelevant custom fields. The Agent has the option to select the Field View that is relevant to that particular ticket or order, and thereby instruct eDesk to show only the fields defined in that Field View. For example, if you receive a lot of queries about shipping for your Pet Store, you might create a Field View that contains custom fields about pet store shipping queries only.
To create a Field View:
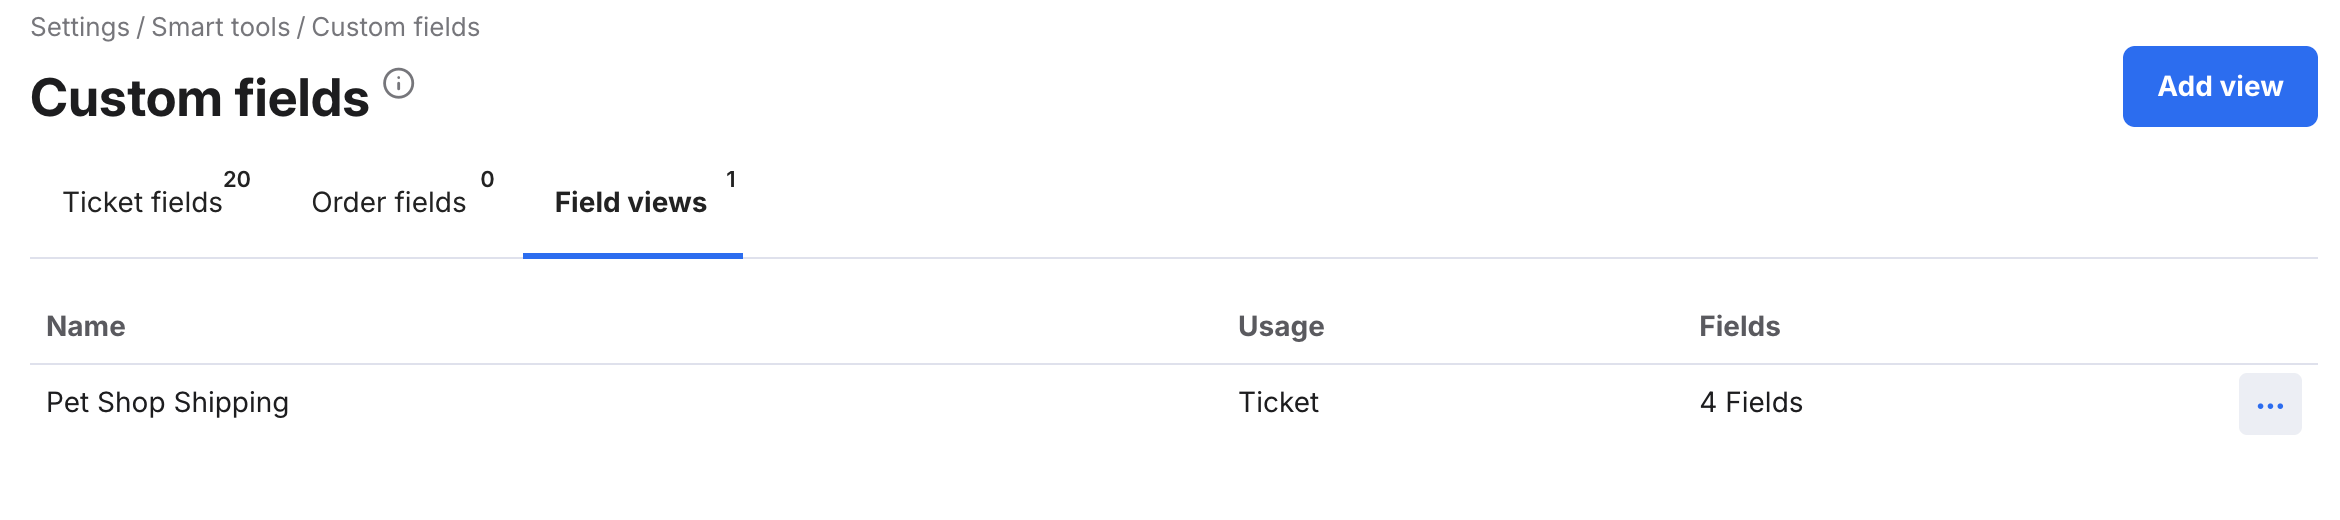
1. Go to Settings > Smart Tools > Custom fields and select Field Views.
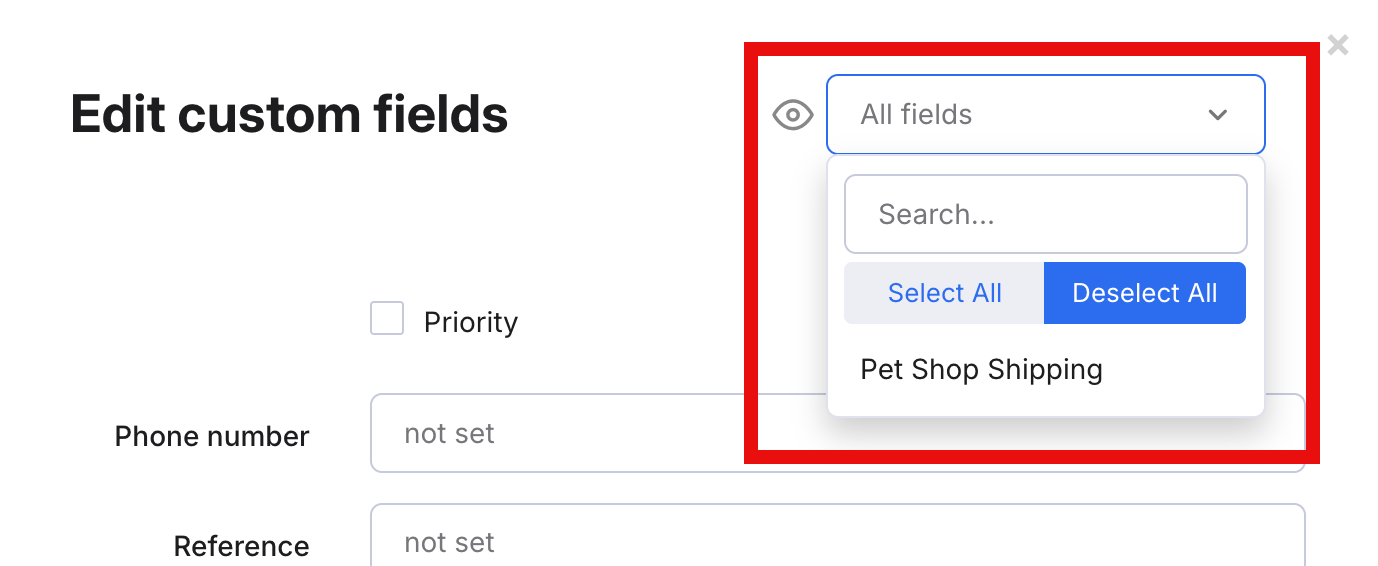
2. The Field Views tab is opened, showing the list of Field Views that have already been created. In the example below, the listing shows one previously-created Field View called Pet Shop Shipping.
3. Select Add View to open the Add View modal window.
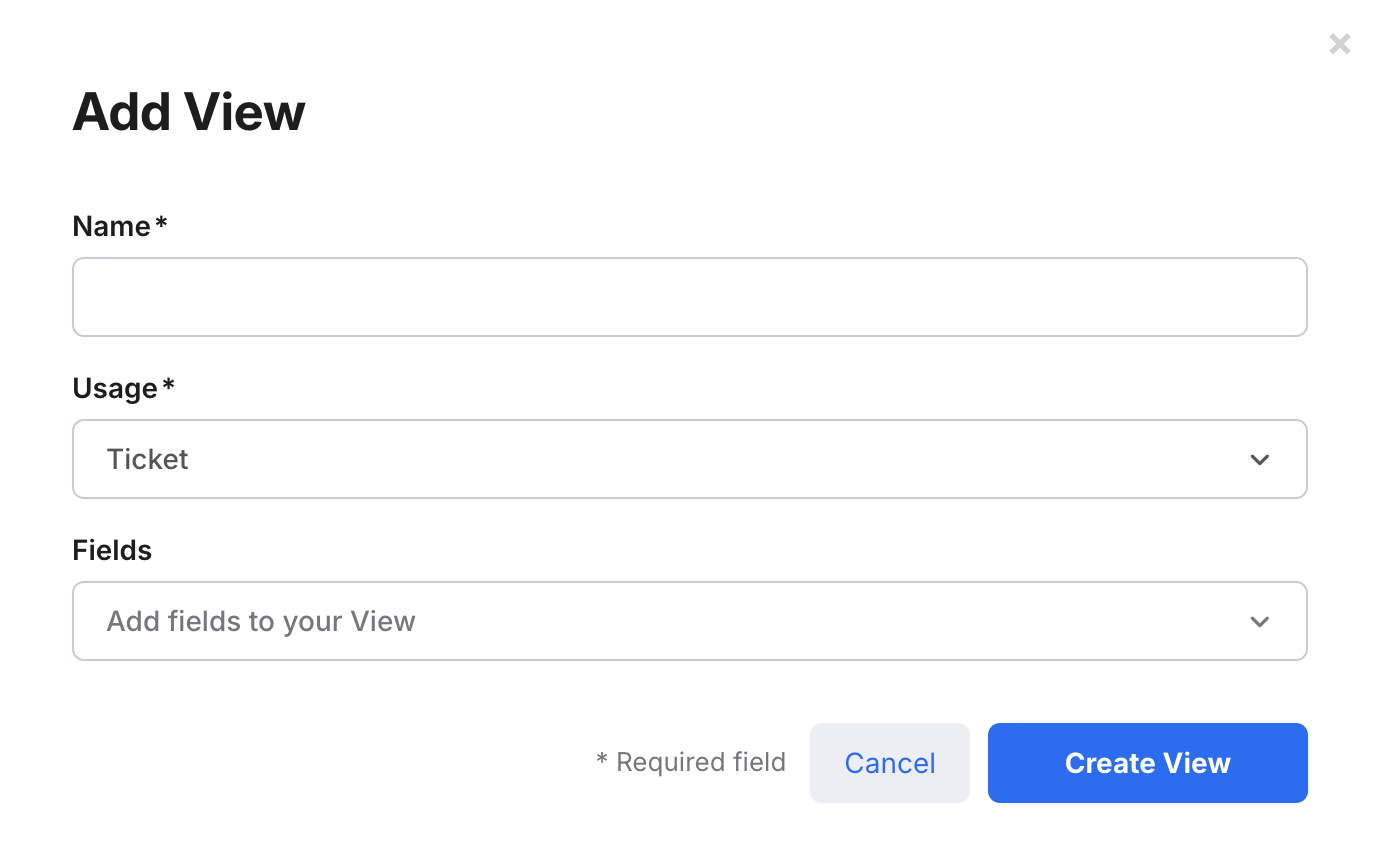
Complete the fields:
- Name
The Name of the Field View, which will be displayed in the filter. - Usage
Choose Ticket or Order, depending on where the Field View will be used. - Fields
Select the custom fields that you want to include in this Field View.
The listing is redisplayed to show the new view in the listing.
This new Field View will now be available as a filter in the Custom Fields section of the ticket or order.
To edit or delete a Field View, select the ellipsis button (three dots) next to the Field View and hit Edit or Delete.
04 How do Agents populate custom fields?
Now you've created your custom fields, let's talk about how they are populated. There are 2 ways to populate a custom field:
A) Populate it automatically via API.
Our API documentation is here.
- Custom Ticket Fields calls are detailed in EDESK OPEN API > Tickets > Update Ticket.
- Custom Order Fields calls are detailed in EDESK OPEN API > Sales Orders > Update Sales Order.
B) Populate it manually.
Follow the instructions below.
Populating custom fields in the ticket
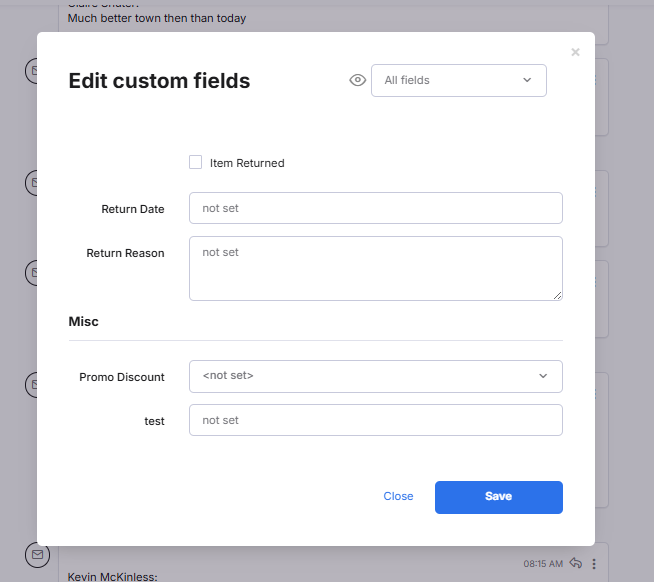
If custom Ticket Fields or Order Fields exist, the CUSTOM FIELDS + option is available on the right-hand side of each ticket in the Mailbox.
Select CUSTOM FIELDS + to open a modal window listing the fields, where you can populate them as needed, and then select Save.
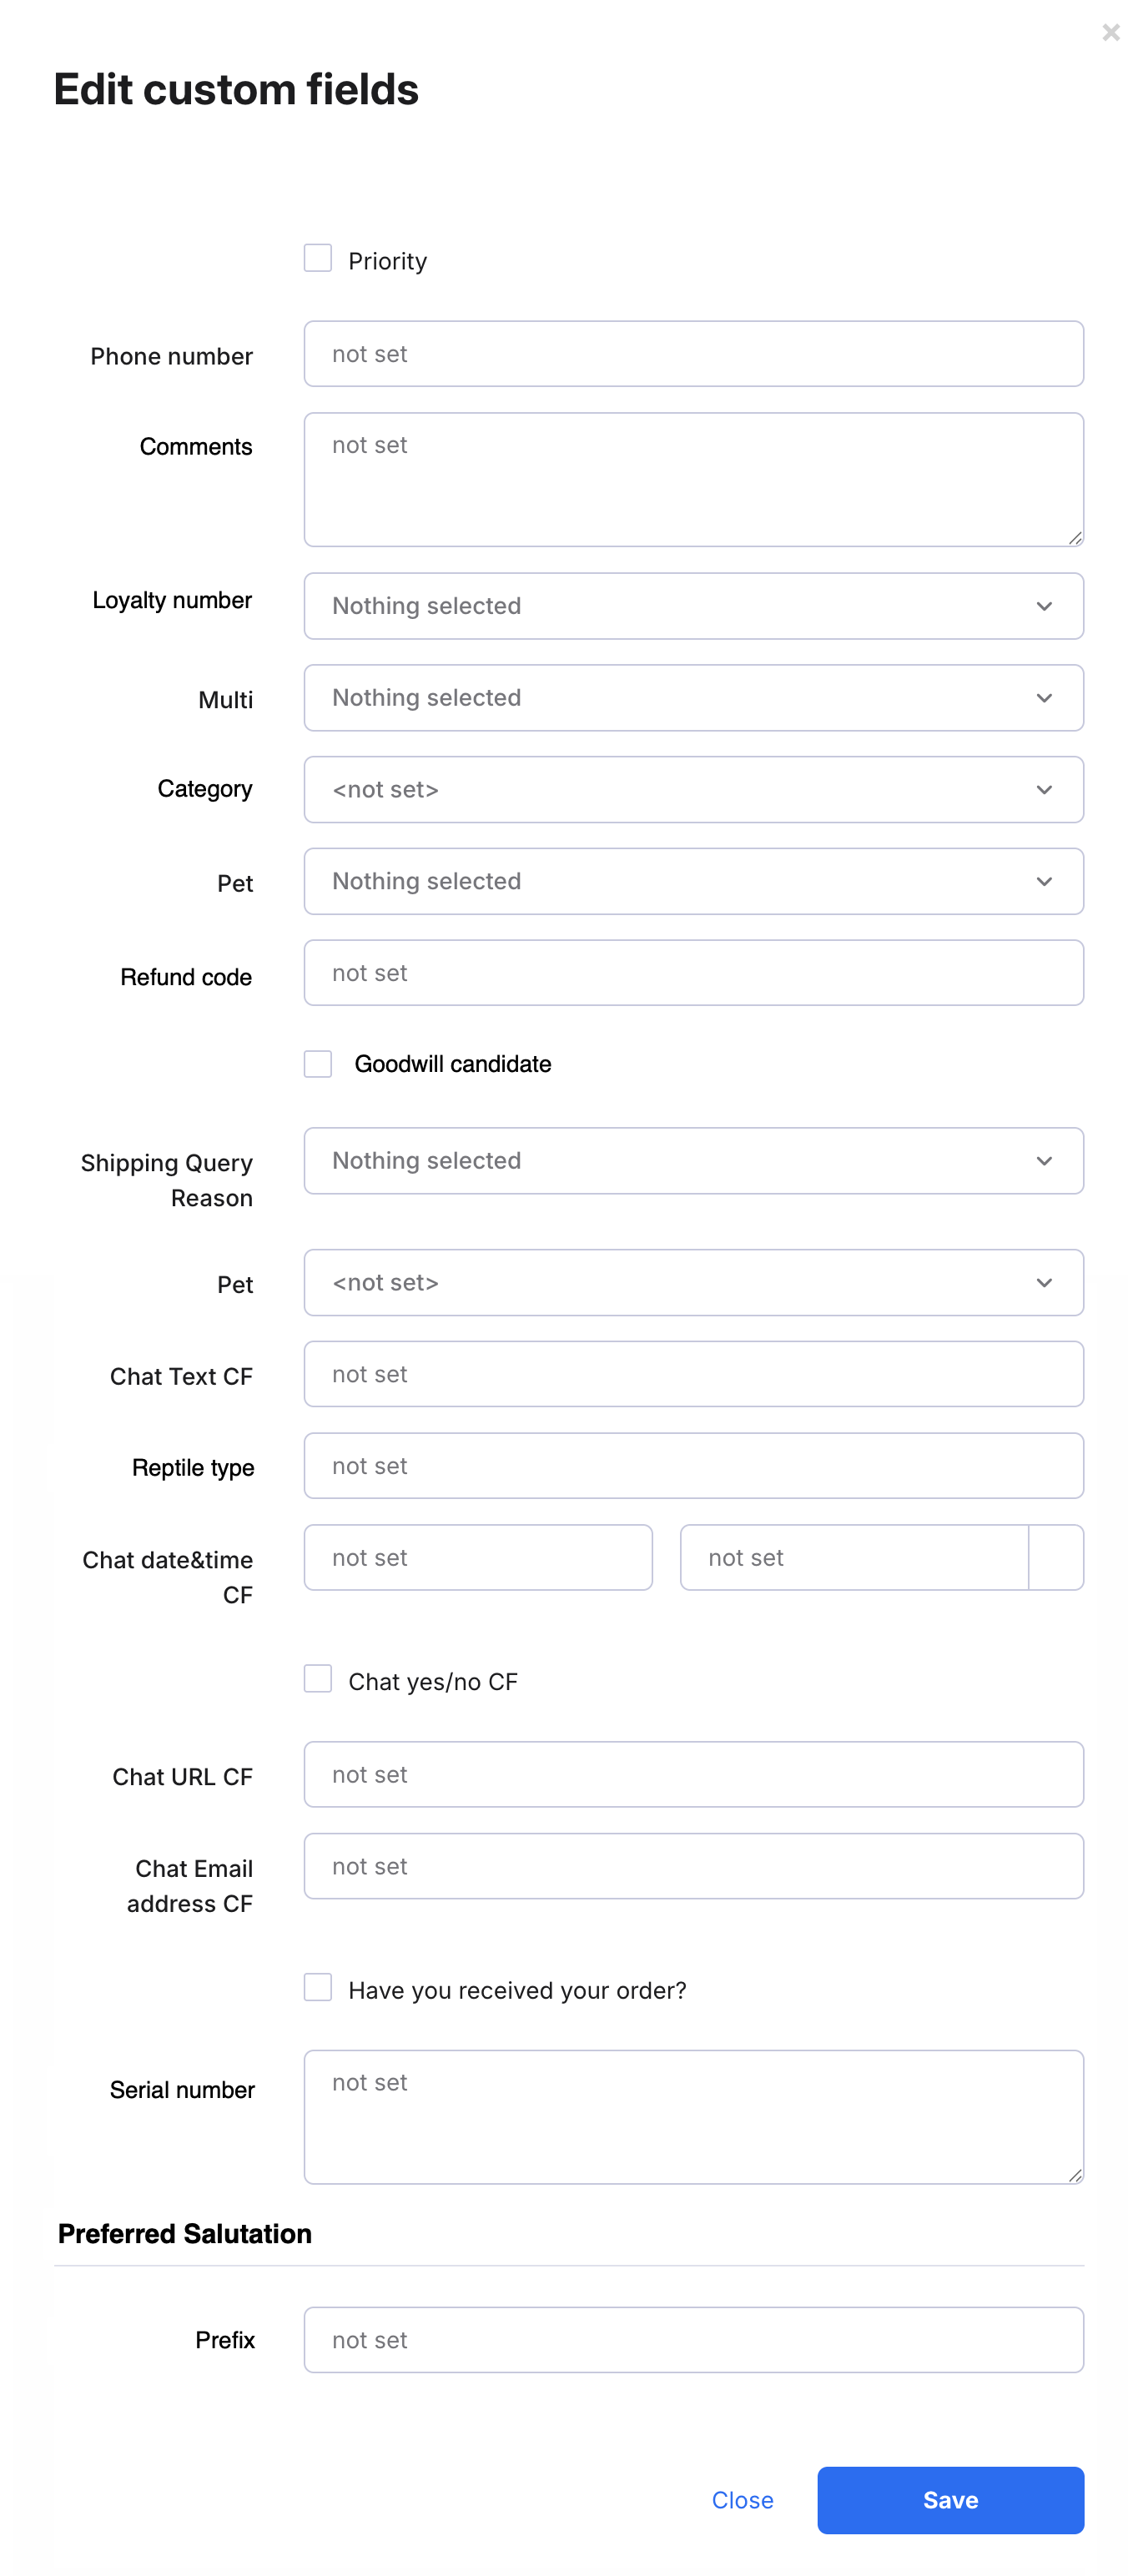
If you have created Field Views in which the usage is Ticket, then a filter is displayed at the top of the modal window that enables you to choose a Field View and therefore display only the custom fields that are in that Field View. In the example below, we have previously created a Field View called Pet Shop Shipping, which is available for selection in the filter.
Populating custom fields in the order
If custom Order Fields exist, the CUSTOM FIELDS option is available in the pop out sidebar in the order.Select CUSTOM FIELDS to view the fields, which you can then populate as needed.
Then select Save.
If you have created Field Views in which the usage is Order, then a filter is displayed at the top of the list of custom fields that enables you to choose a Field View and therefore display only the custom fields that are in that Field View.
05 How do I set up custom fields in Chat Settings?
If custom fields of type Text exist, they are automatically displayed in the Behaviour section of the Chat Settings.
Note: Other custom field Types will not show in the Chat settings.
To use the Text custom fields in your Chat:
- Go to Settings > Smart Tools > Widgets > click on the name of your Widget > Behaviour tab.
- Select the Custom Fields field to display a list of all custom Ticket Fields of type Text.
- Select the custom fields you want to make available to Agents in the chat.
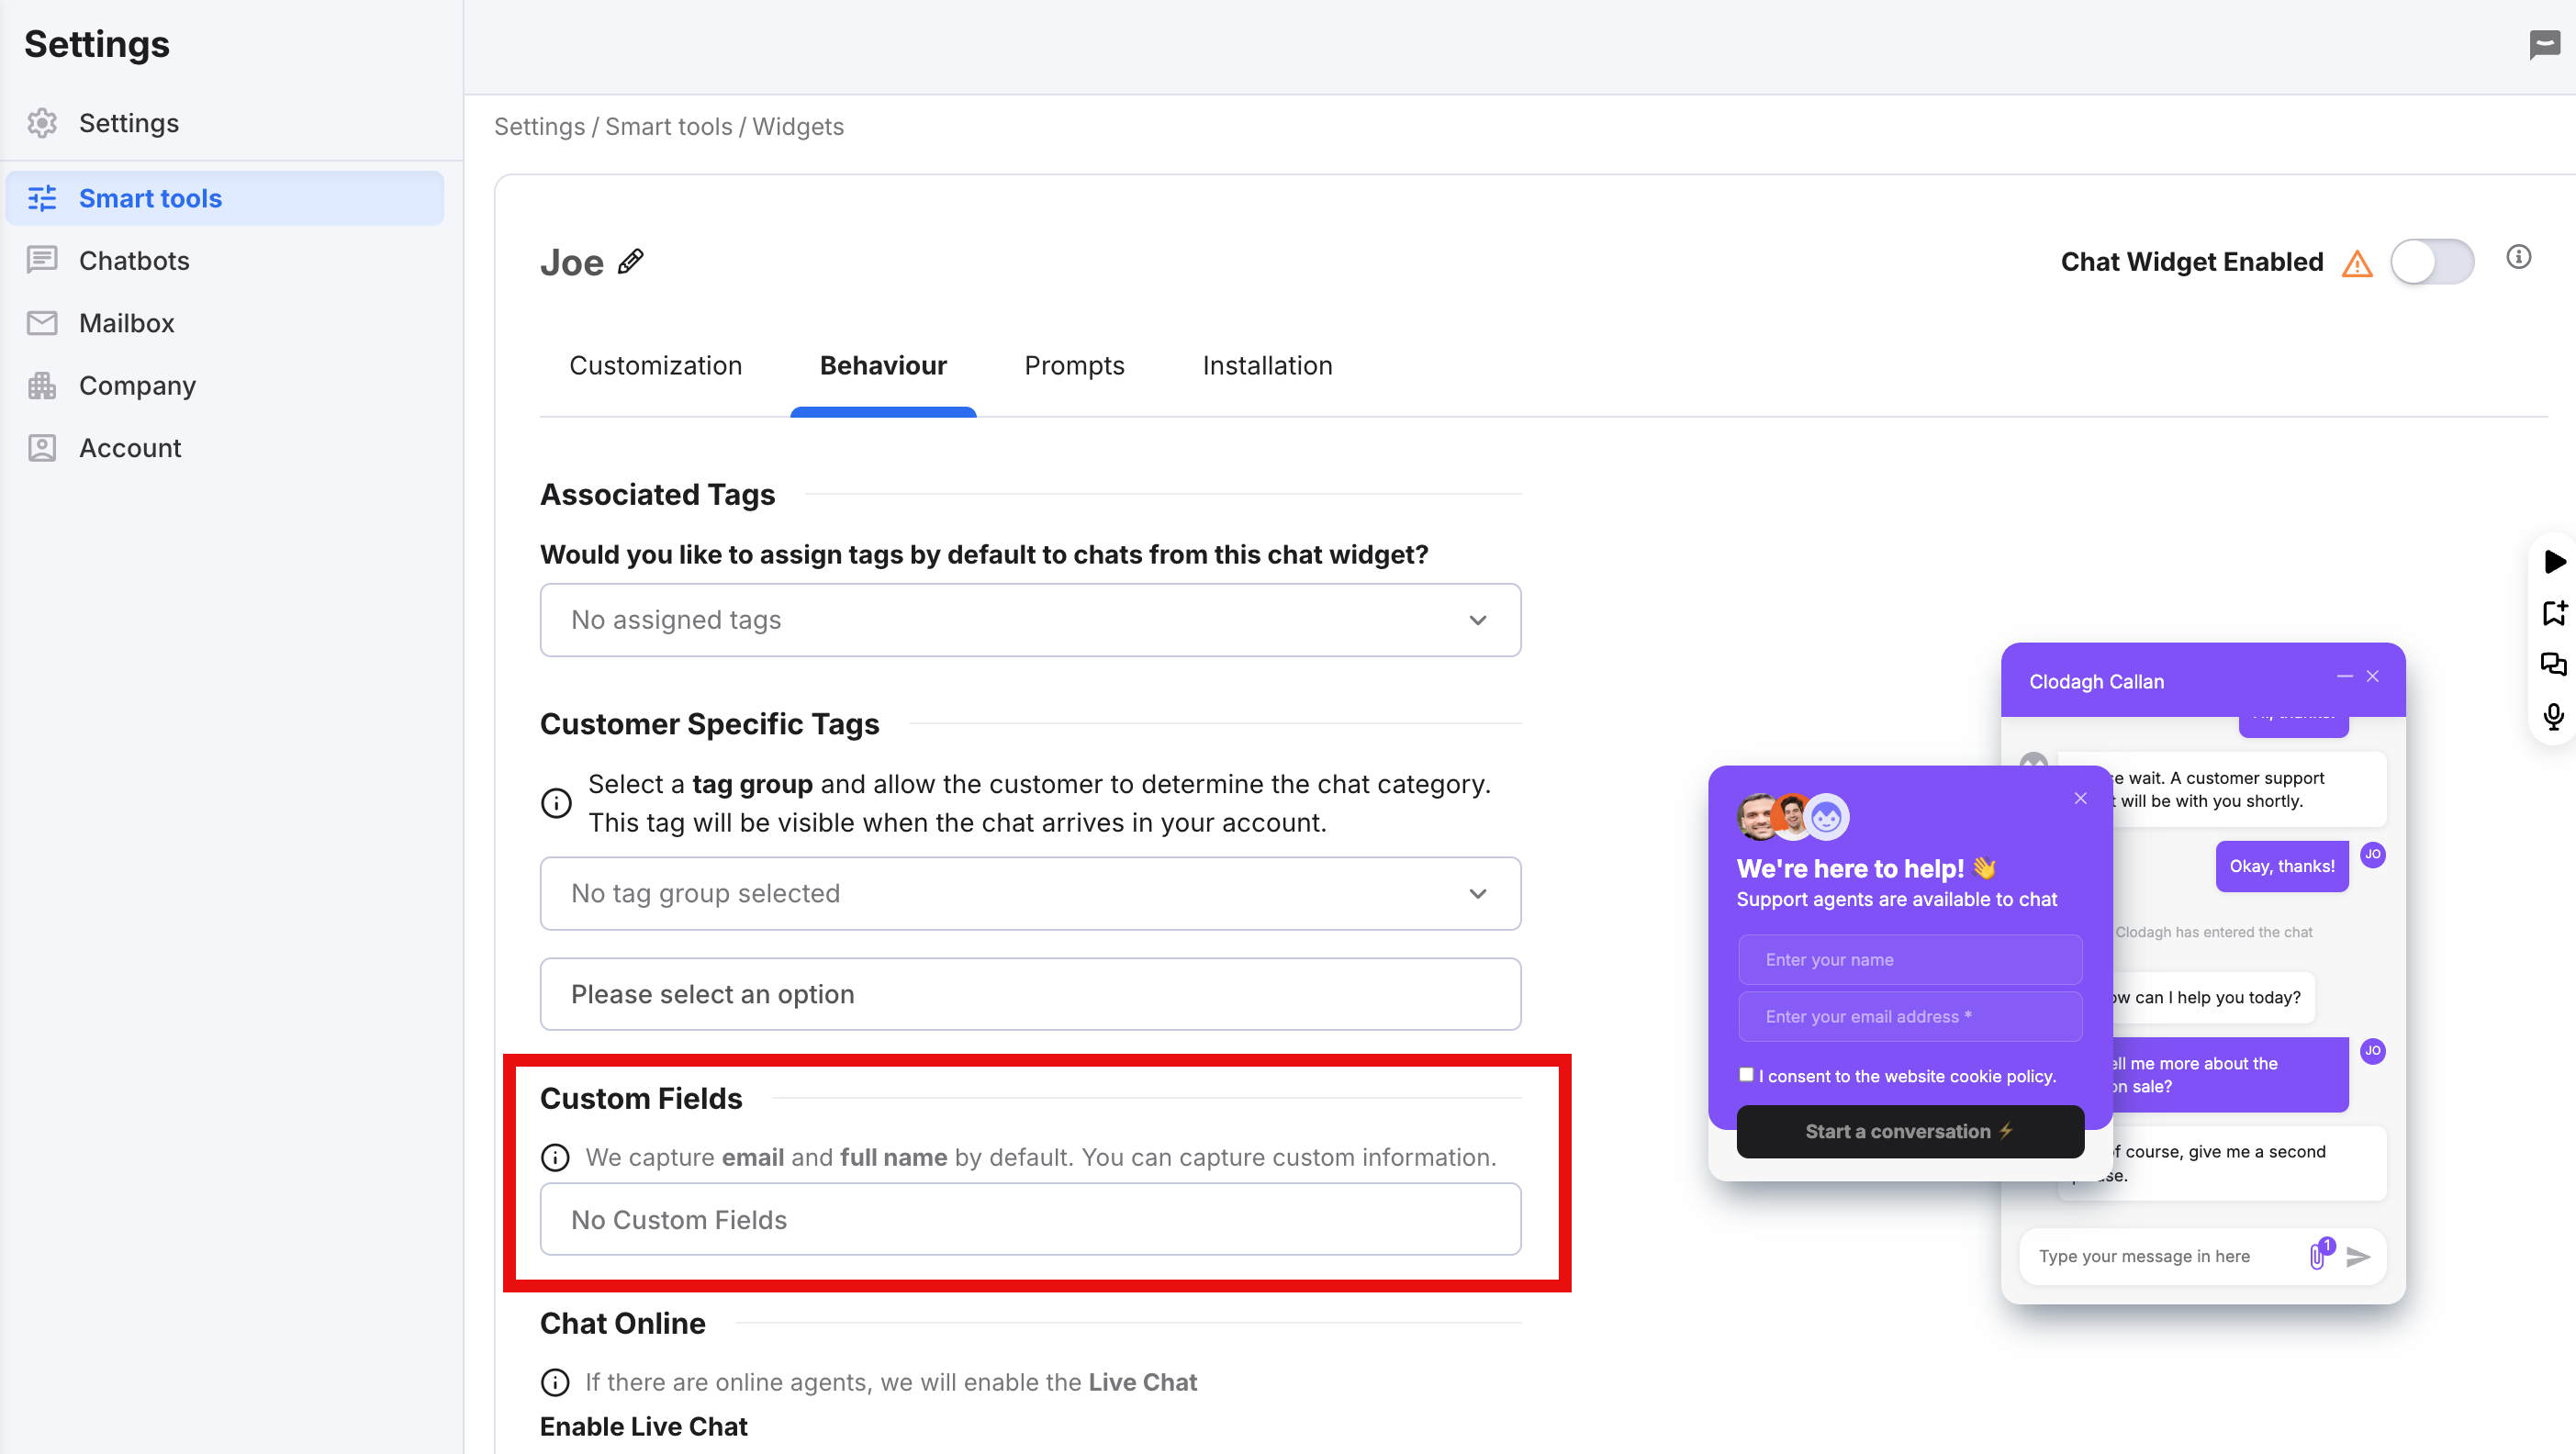
This allows sellers to collect specific information during Live chats, improving customer interactions and data organisation.
06 Reporting for Custom fields
To see a detailed report of your Custom fields:- Go to Insights > Reports > Report extracts
- Then select Create report, choose Order custom field report or Ticket custom field report in Report type, and choose any other required filters.
- Click Create report.
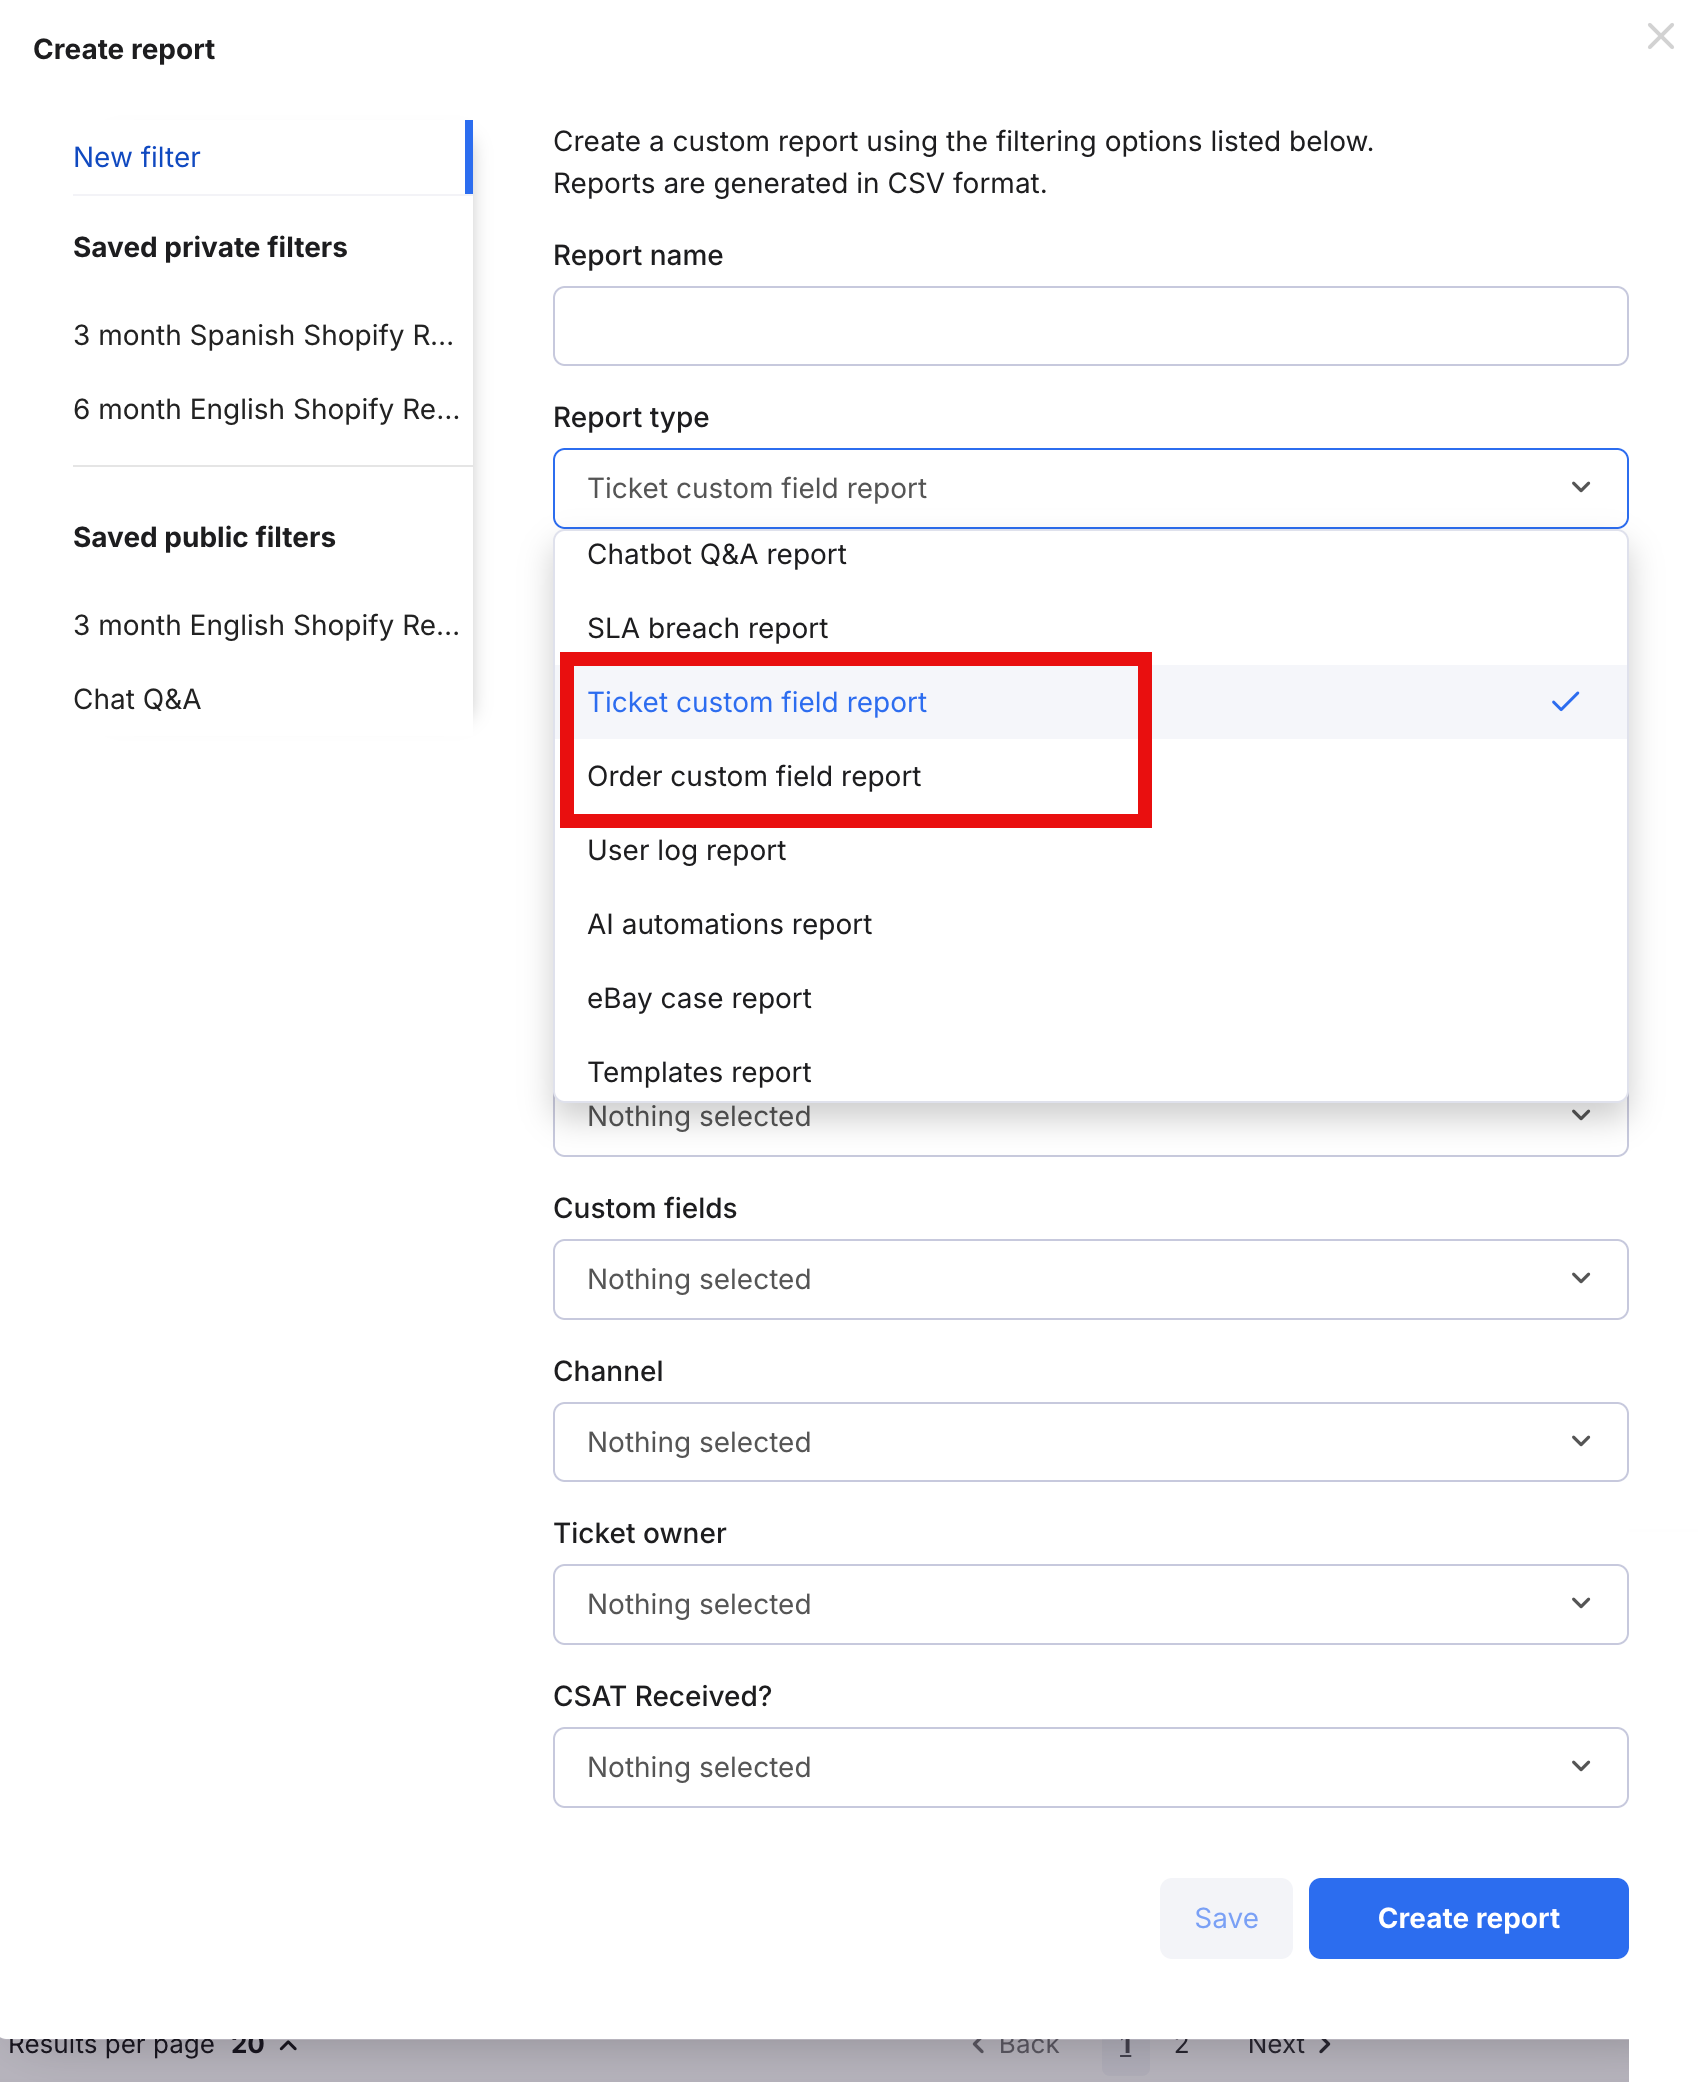
eDesk will generate a CSV file containing ticket information of any tickets where data has been entered in the selected Custom Fields. Only orders/tickets with populated Custom Fields will be returned with these report extracts. Read more about Report Extracts, including Order Custom Field reports and Ticket Custom Field reports.
Further Reading
If you would like to find out more about Report Extracts click here.If you would like to learn how to set up a Live Chat widget, click here.