Procedures tell your AI Agent how to auto-reply to tickets and execute actions like approving a Return, escalating to a human Agent, and more. eDesk enables you to easily build Procedures to suit your existing business practises, and empower your AI Agent to become an invaluable member of your Care Team.
This help file explains how to create Procedures in eDesk.
Before you start
- Read this help file that explains all about Procedures.
01 Recap on Procedures
A Procedure is a set of rules in flowchart format that tells the AI Agent how to handle a specific type of customer question. For example, "Where is my order?" or "I want to return this item."Procedures are what empower your AI Agent to auto-reply and perform actions completely autonomously. However, other factors also govern whether an AI Agent is able to handle a ticket, including guardrails, the channels it is assigned to, and more. Learn more here.
02 What pre-built Procedures are available in eDesk?
eDesk provides a set of pre-built Procedures and allows you to create editable copies of them which you can customise to suit your needs. Alternatively you can create new Procedures from scratch.The pre-built Procedures are listed below, organised by Type:
Order & Shipping
These Procedures handle "Where is my order?", carrier / delivery questions, ETA chases, shipping-method asks, address changes before dispatch.
- Order status Procedure
Automatically responds to customers asking where their order is. Checks the order status and provides the customer with the relevant update - tracking details if shipped, or reassurance that it's being prepared if not yet dispatched. Escalates to a human agent if the status is unavailable or unexpected. - Order Status - Advanced - Standard and Next day Procedure
Handles customer order status enquiries by collecting their order reference, then routing based on whether the order is Shipped, Processing, or Cancelled. It lets the AI self-serve on-time orders with tailored messaging, while automatically escalating late or unrecognised cases to a human agent.
These Procedures handle pre-purchase enquiries like sizing, compatibility, "does this work with X?", availability, spec questions.
- Pre-sales
Answers product questions before a customer buys. Uses your training content to respond to queries about specs, compatibility, warranty, and availability. Escalates if no relevant knowledge is found.
These Procedures handle enquiries that are made after the order arrives: warranty claims, defects, missing parts, billing chases, troubleshooting.
- Post-sales
Handles post-purchase queries including warranty claims, product faults, defects, and complaints. Uses your training content to resolve issues or escalates to a human agent. Refunds and replacements that come out of these get handed off to the Return, Refund, & Replacement Procedures.
The customer wants to return, get refunded, or have an item replaced.
- Returns - Advanced
Handles customer return requests. Checks eligibility based on order status and routes accordingly - approving, declining, or escalating to a human agent.
The customer wants to cancel an order, typically before dispatch.
- Cancellation
Handles order cancellation requests. Confirms if the order can still be cancelled based on its current status and responds accordingly, or escalates to a human agent. - Cancellation - Advanced
Handles order cancellation requests and communicates cancellation policies.
03 Building a new Procedure
1. In the main menu, select AI and then choose Procedures from the AI menu.A list of the Procedures you have already created is displayed in the My Procedures tab
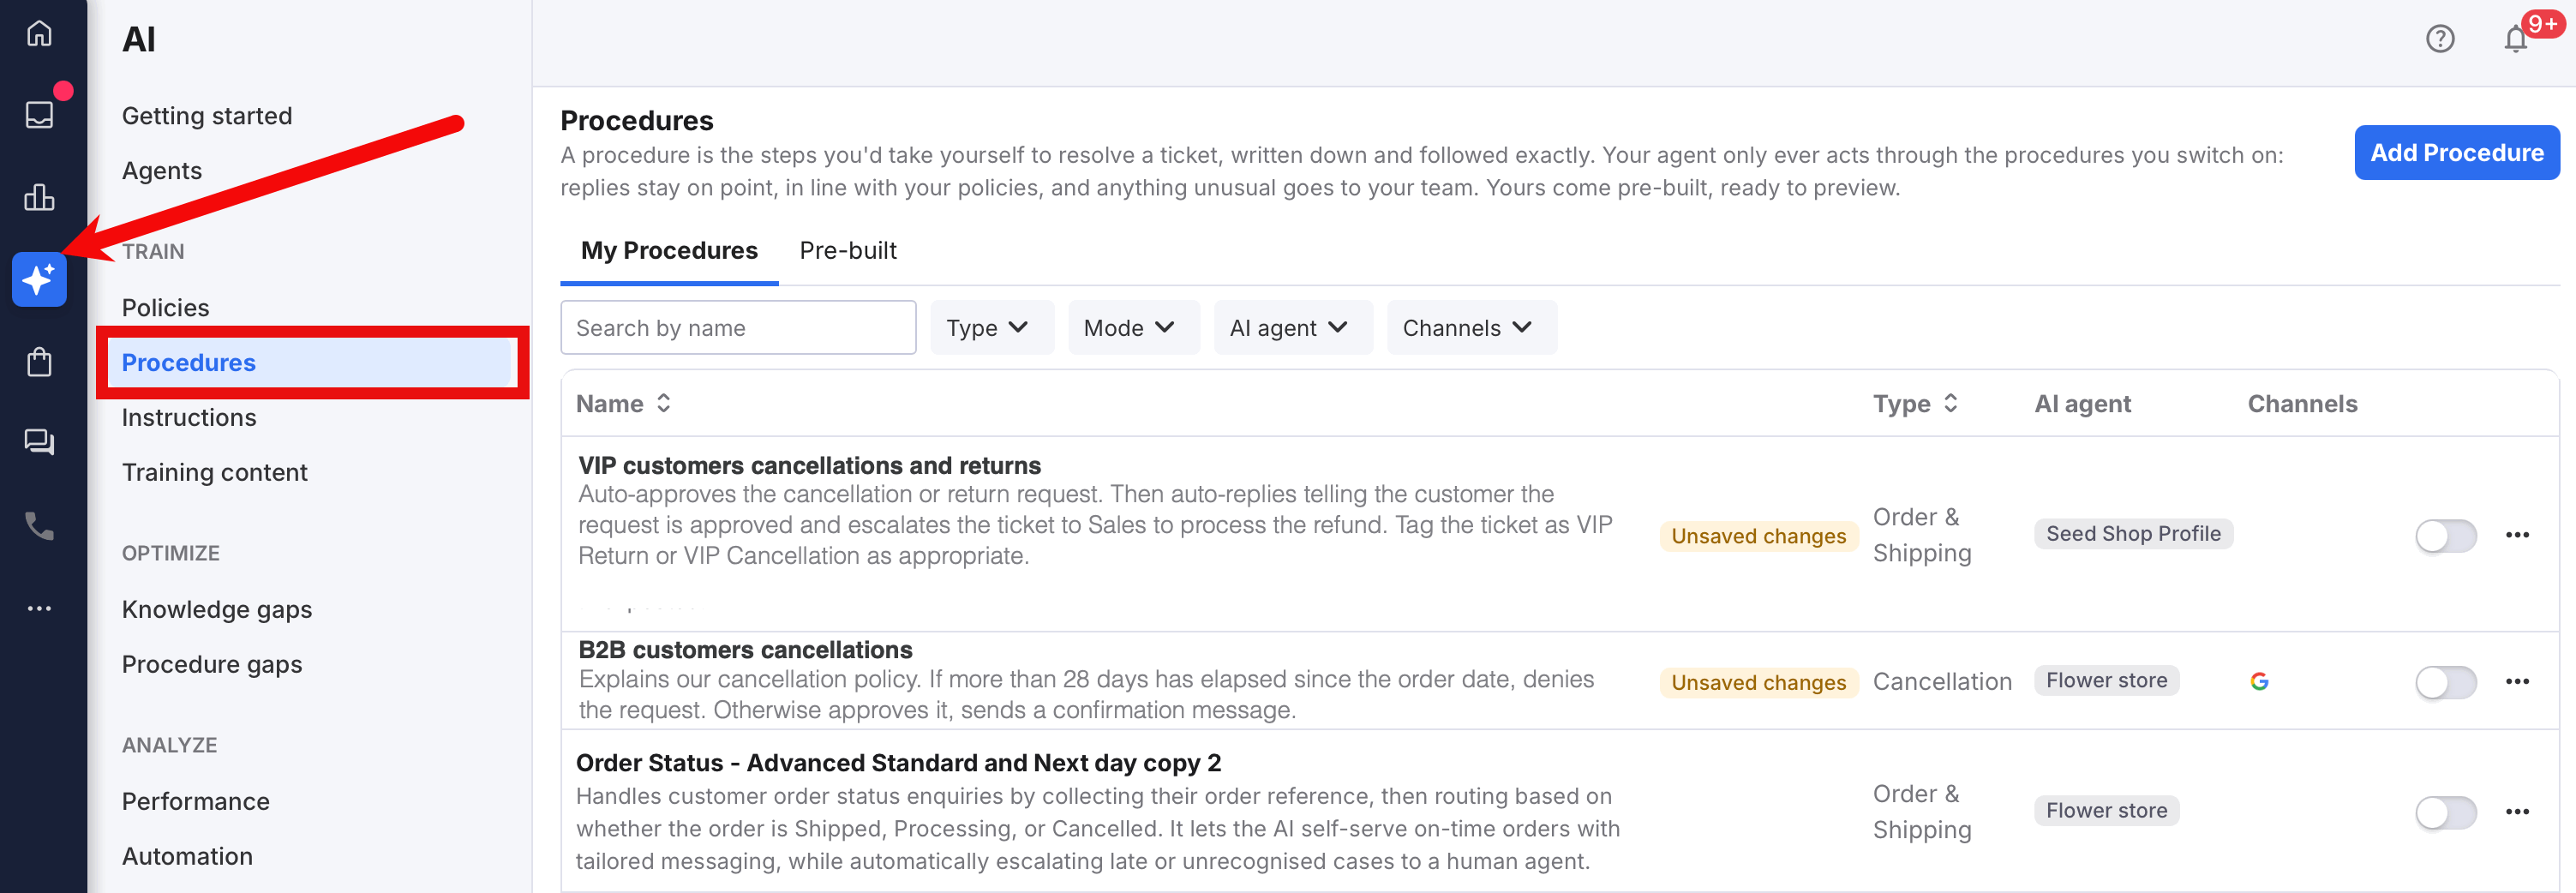
To view or edit an existing Procedure in the Flow Editor, select it.
2. To view the pre-built Procedures, select Add Procedure, which will display the Pre-Built Procedures (alternatively, select the Pre-Built tab, which shows the same list).
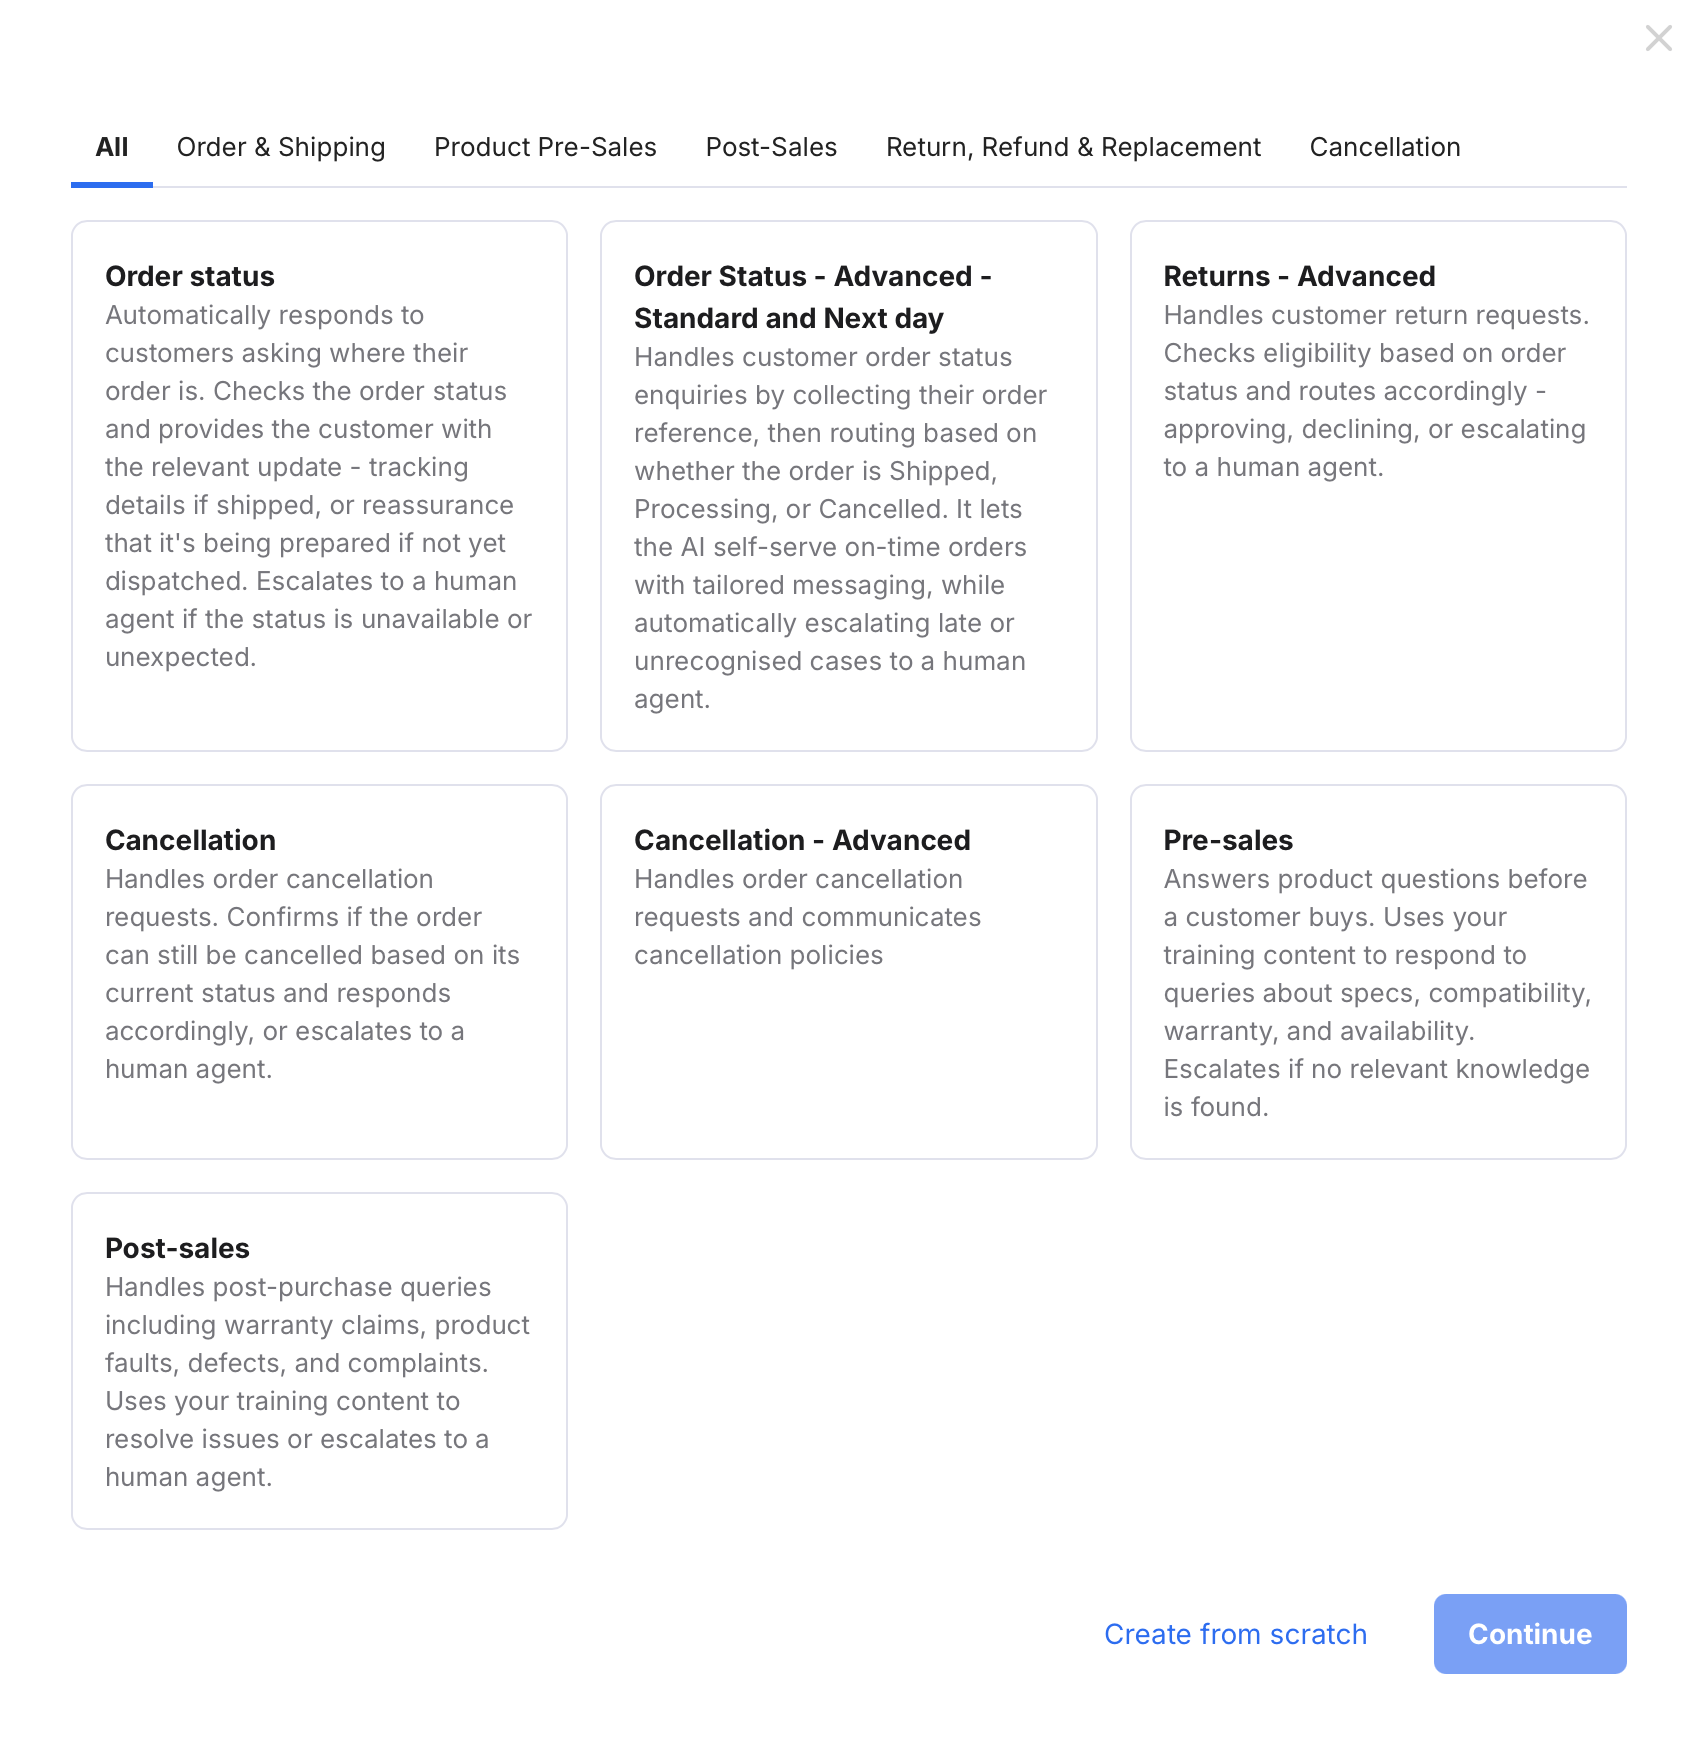
3. You now have 2 options:
- Create a copy of one of the Pre-Built Procedures and customise it.
- Create a Procedure from scratch.
To customise a copy of one of the Pre-Built Procedures:
A) Click the tile for that Procedure. A tick will be displayed in it to confirm your selection. Then select Continue to display the Choose an AI Agent page.
B) From the list of AI Agents, select one or more AI Agents that will be allowed to use this Procedure. This is mandatory.
C) Select Create Procedure.
The Procedure is opened on the Flow Editor, showing the different steps that have already been added:
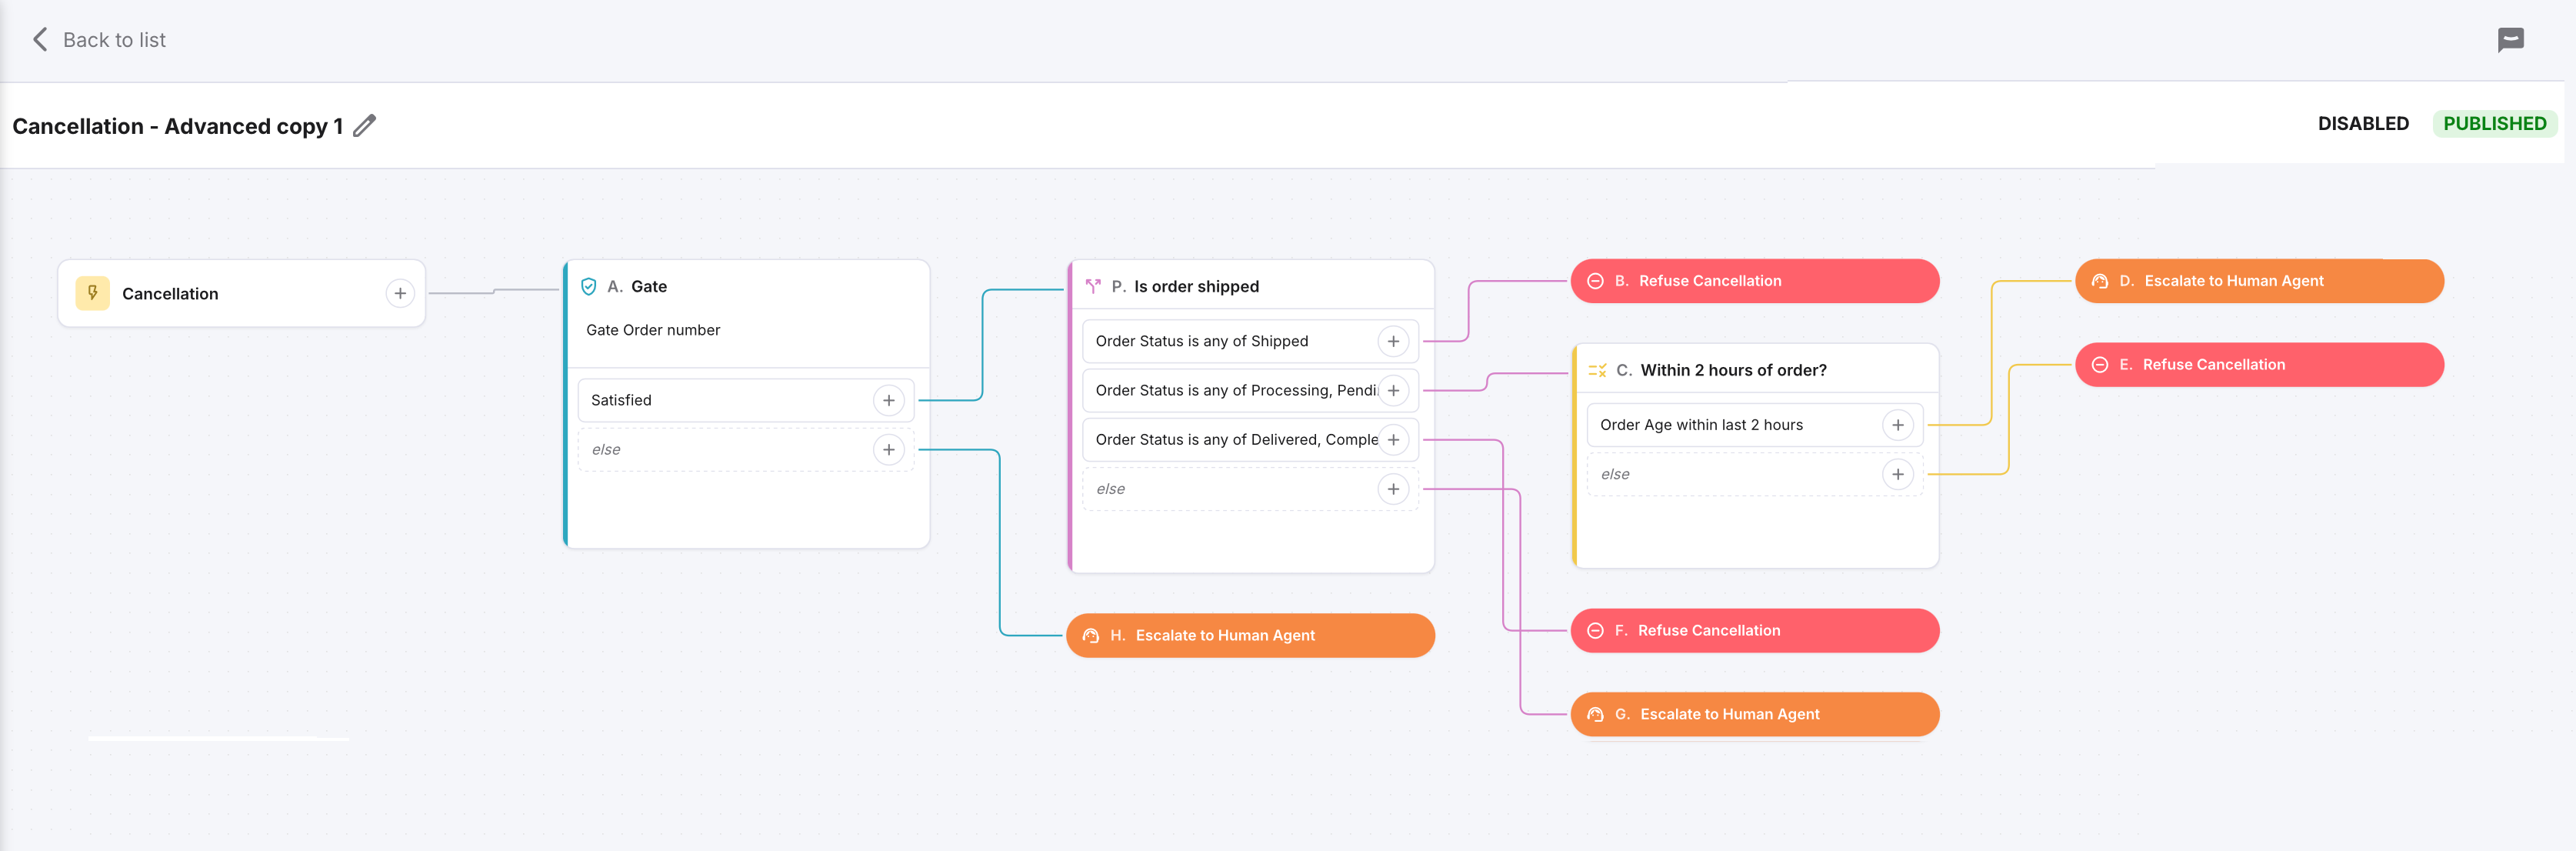 D) Now you can add, remove, or edit steps like Gates, Conditions, Routing Conditions and Outcomes as needed. See below for instructions.
To create a Procedure from scratch:
A) Click Create from scratch.
The Add procedure window opens.
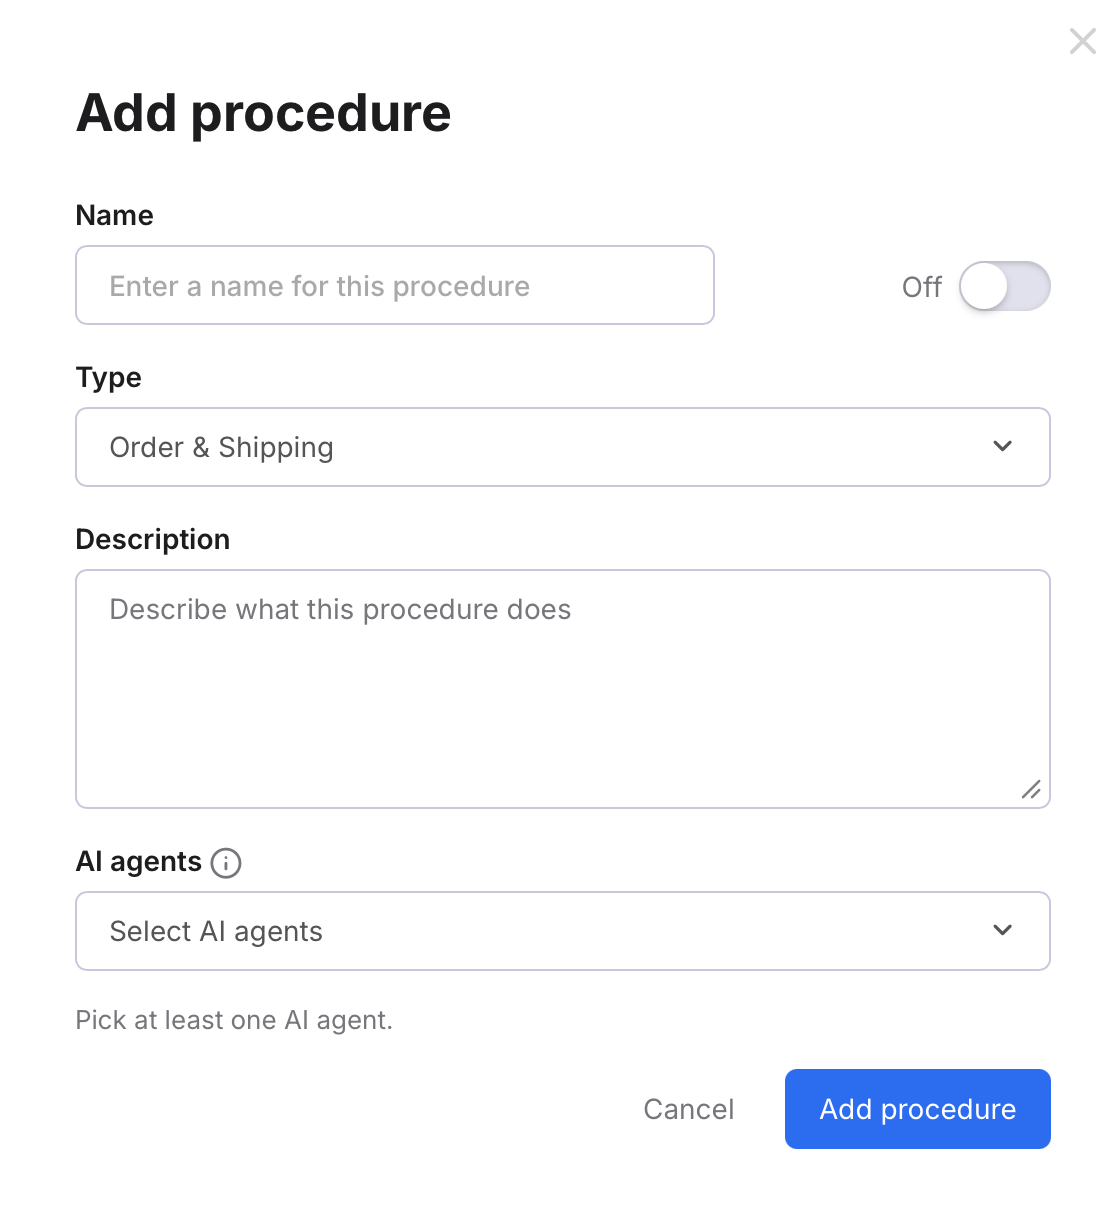
B) Complete the fields:
- Name
E.g. VIP Returns - Type
Select a Type from the menu. - Description
Describe what the Procedure will do. E.g. If the customer is a VIP and the return request is within 3 months of the order date, auto-reply confirming the return is permitted and issue them a refund. If the customer is a VIP and the return request is between 3 and 6 months of the order date, approve the return and issue a credit note. If the customer is a VIP and the return request is more than 6 months after the order date, escalate to the Care Team. - AI agents
Select at least one AI Agent that will have access to this Procedure. - When you have selected an Agent, a Restrict to channels (Optional) field is displayed.
Either leave this unchanged if you want this Procedure to apply to all channels that the selected Agents will serve - or select a sub-set of the channels to restrict the Procedure to these channels only.
The Procedures listing is redisplayed, showing the new Procedure in the list.
D) Now select the Procedure to open it in the Flow Editor. Since the Procedure does not yet have Gates, Conditions, Routing Conditions and Outcomes, you'll see something like the example below, which shows only the Name (VIP Returns in the example) and Type (Return, Refund, & Replacement in the example) in the flow chart.

You can now add steps like Gates, Conditions, Routing Conditions and Outcomes as needed. See below for instructions.
04 Procedure Status
Each Procedure has a status that is one of the following:
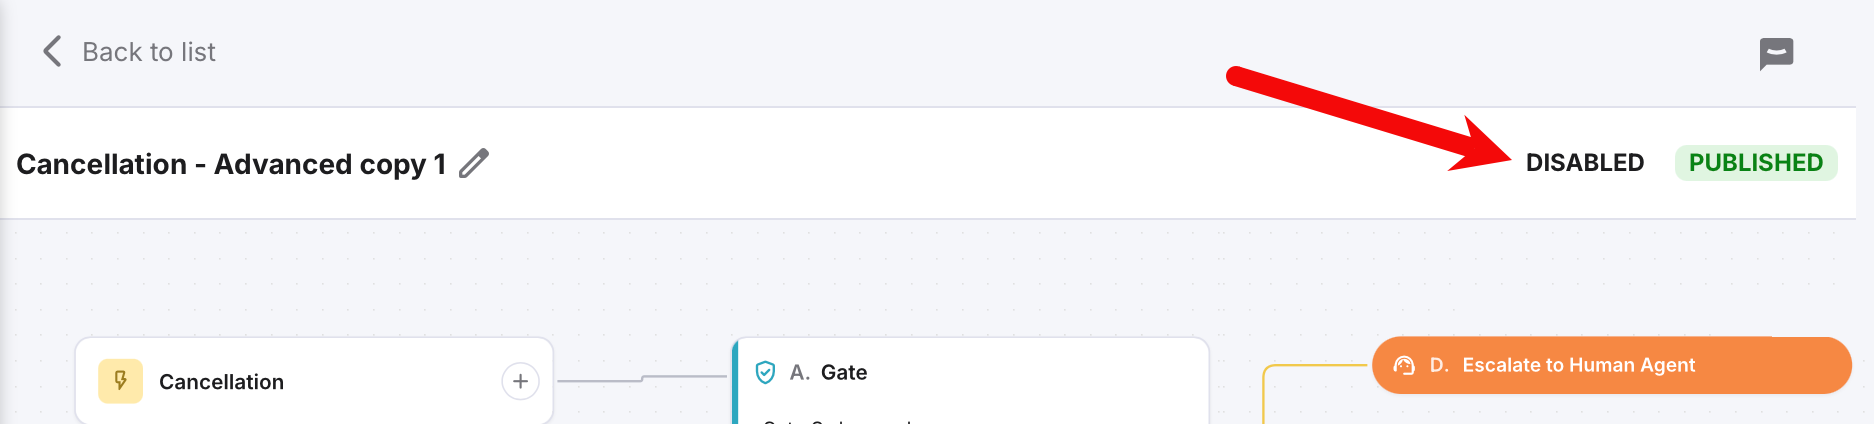
- Disabled
The Procedure is hidden from the AI Agents, who cannot use it - Simulation
Used for testing your AI Agent during an eDesk trial. - Auto
The Procedure is available to be used by the AI Agents.
As soon as you set a Procedure to Auto, the AI Agents that have been given access to it can start auto-replying/performing actions for tickets that have been classified into that Type.
Procedure status is displayed at the top of the Procedure in the Flow Editor:
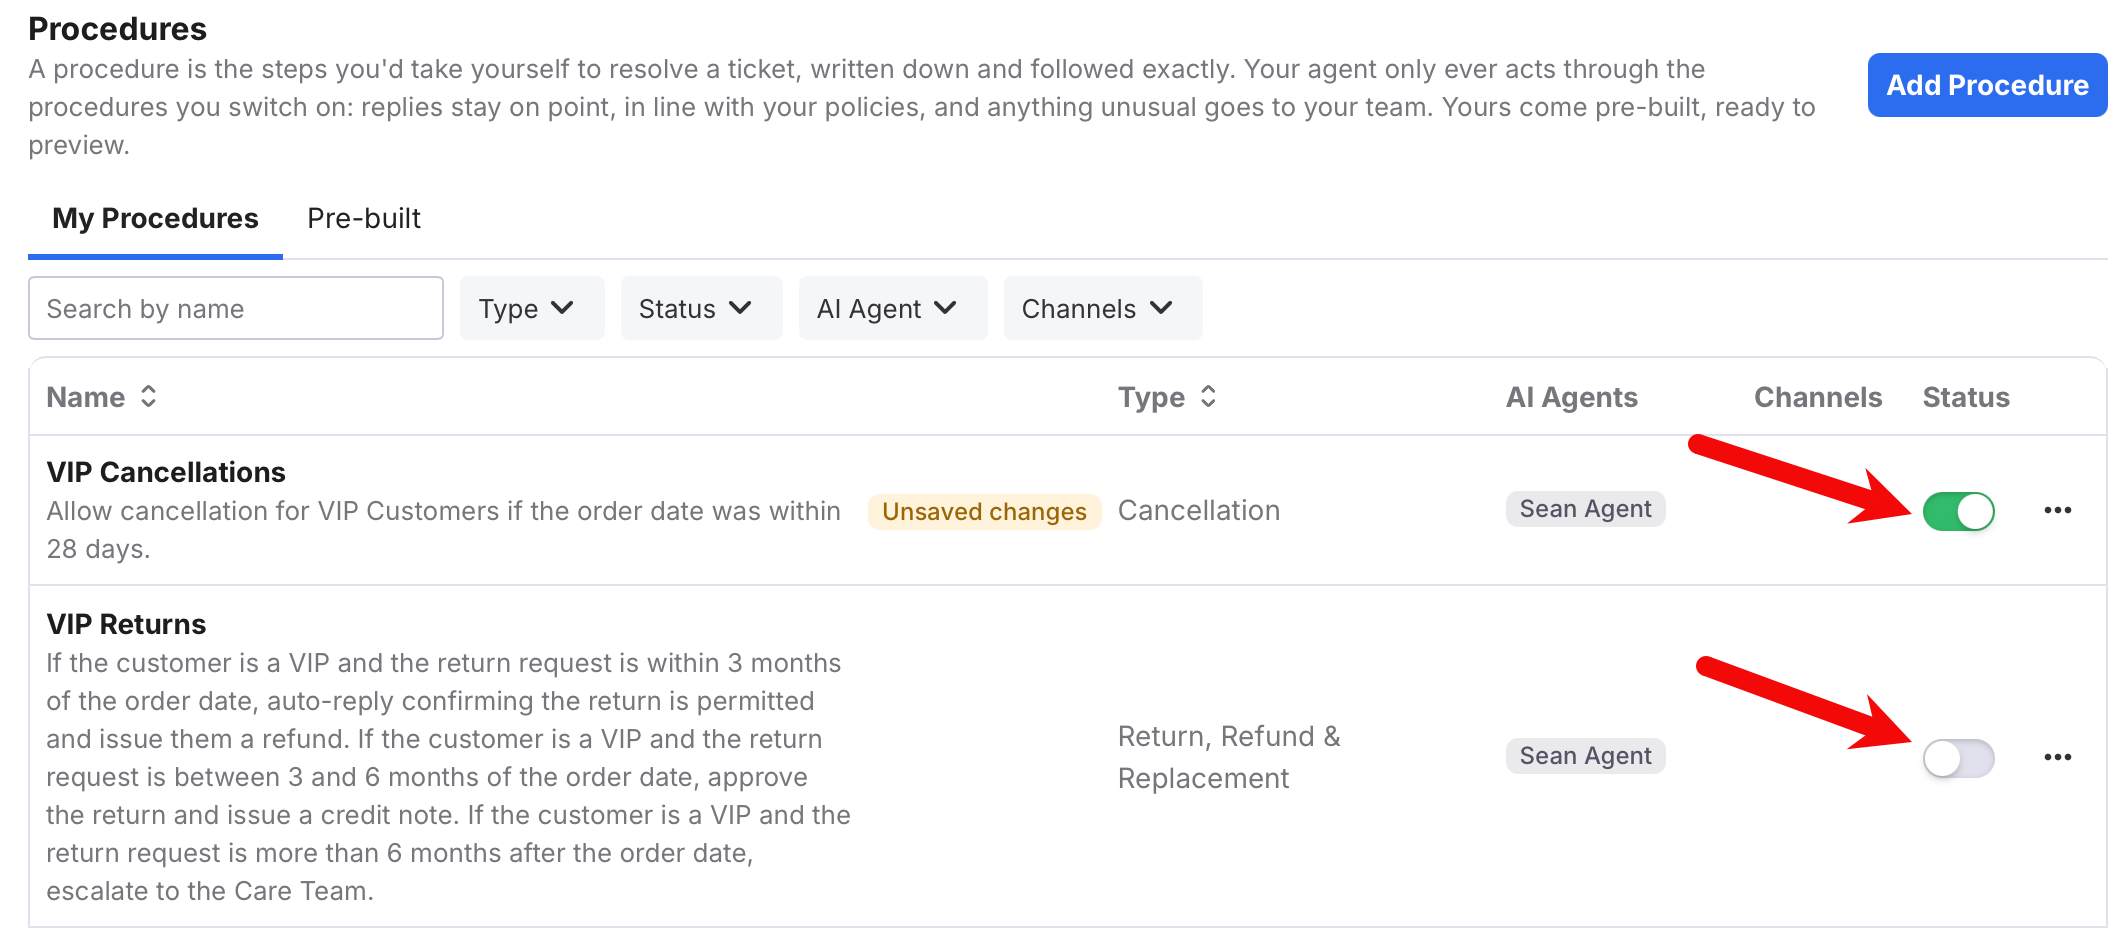
Auto/Disabled is also indicated in the Procedures listing with an On (i.e. Auto) / Off (i.e. Disabled) toggle:
05 Editing your Procedure
In this section, we explain Editor status and describe how to add steps to your Procedure.Editor status
When you make changes to a Procedure and select Done to save your changes, you have the option to Discard (i.e. revert to the Published version) or Publish Changes to copy your changes into the Published version. The Published version is the version in which all the latest changes have been saved.
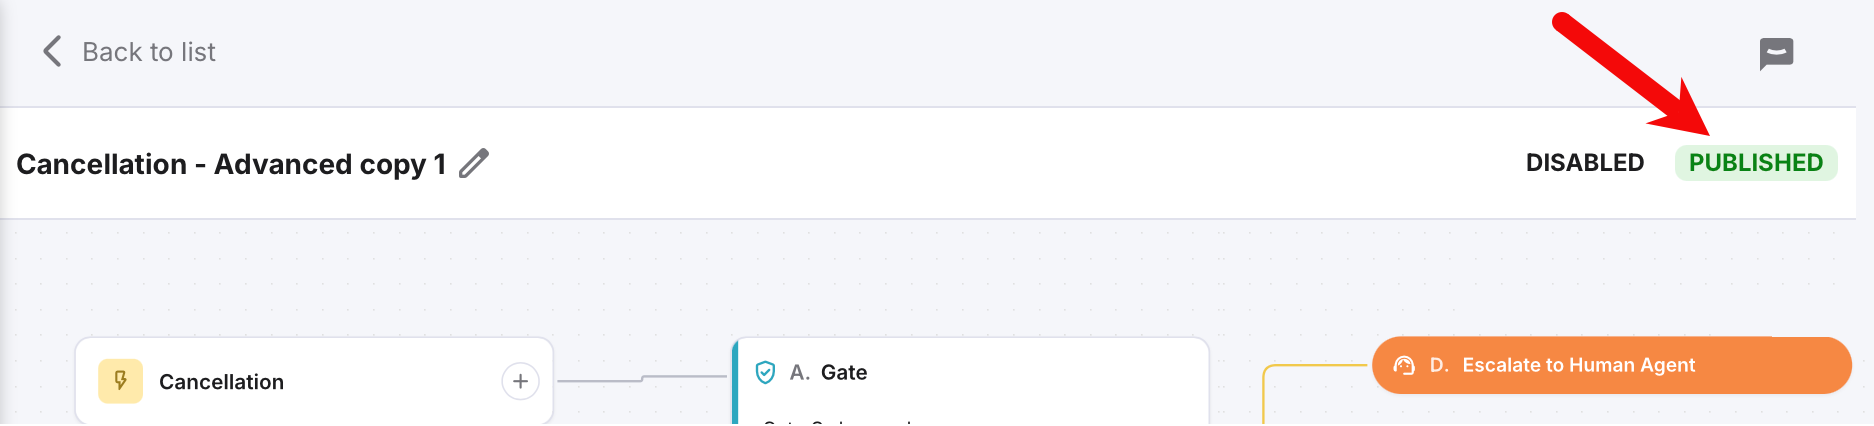
An Editor status of Published means that all changes have been saved to the Published version.
Editor status is displayed at the top of the Flow Editor next to the Procedure status, and simply shows if there are unpublished changes or not (it is the Procedure status that determines whether AI Agents can use the Procedure to auto-reply/perform actions in tickets).
To change the name, description, or status of the Procedure
1. Select the pencil icon:
The Edit Procedure window opens:
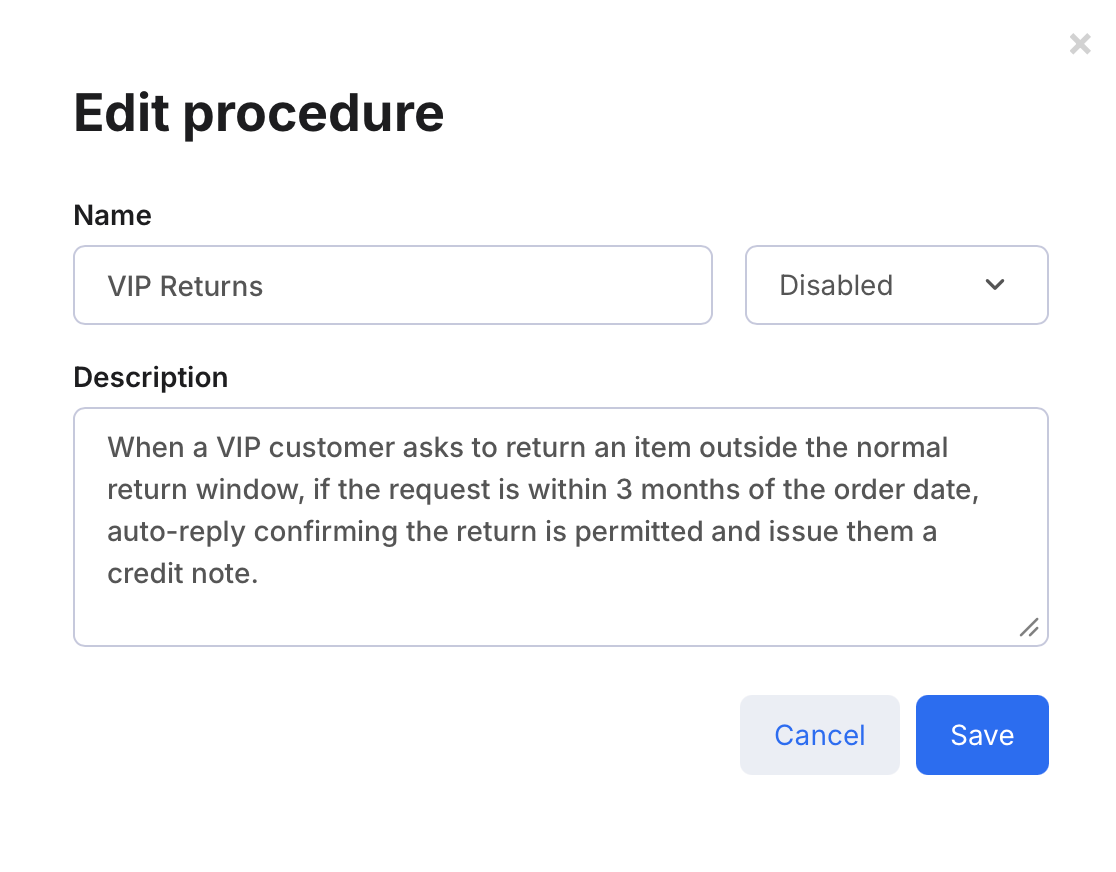
2. Edit the Name and Description. This is also where you change the status of the Procedure, e.g., from Disabled to Auto. Be careful not to change it from Disabled until you have completed the Procedure and are completely ready for your AI Agents to use it.
To add a step
The Flow Editor is our flexible Procedure editor. Follow your nose and you'll soon get the hang of it.1. Select the + icon in the box to display the Add Step menu:
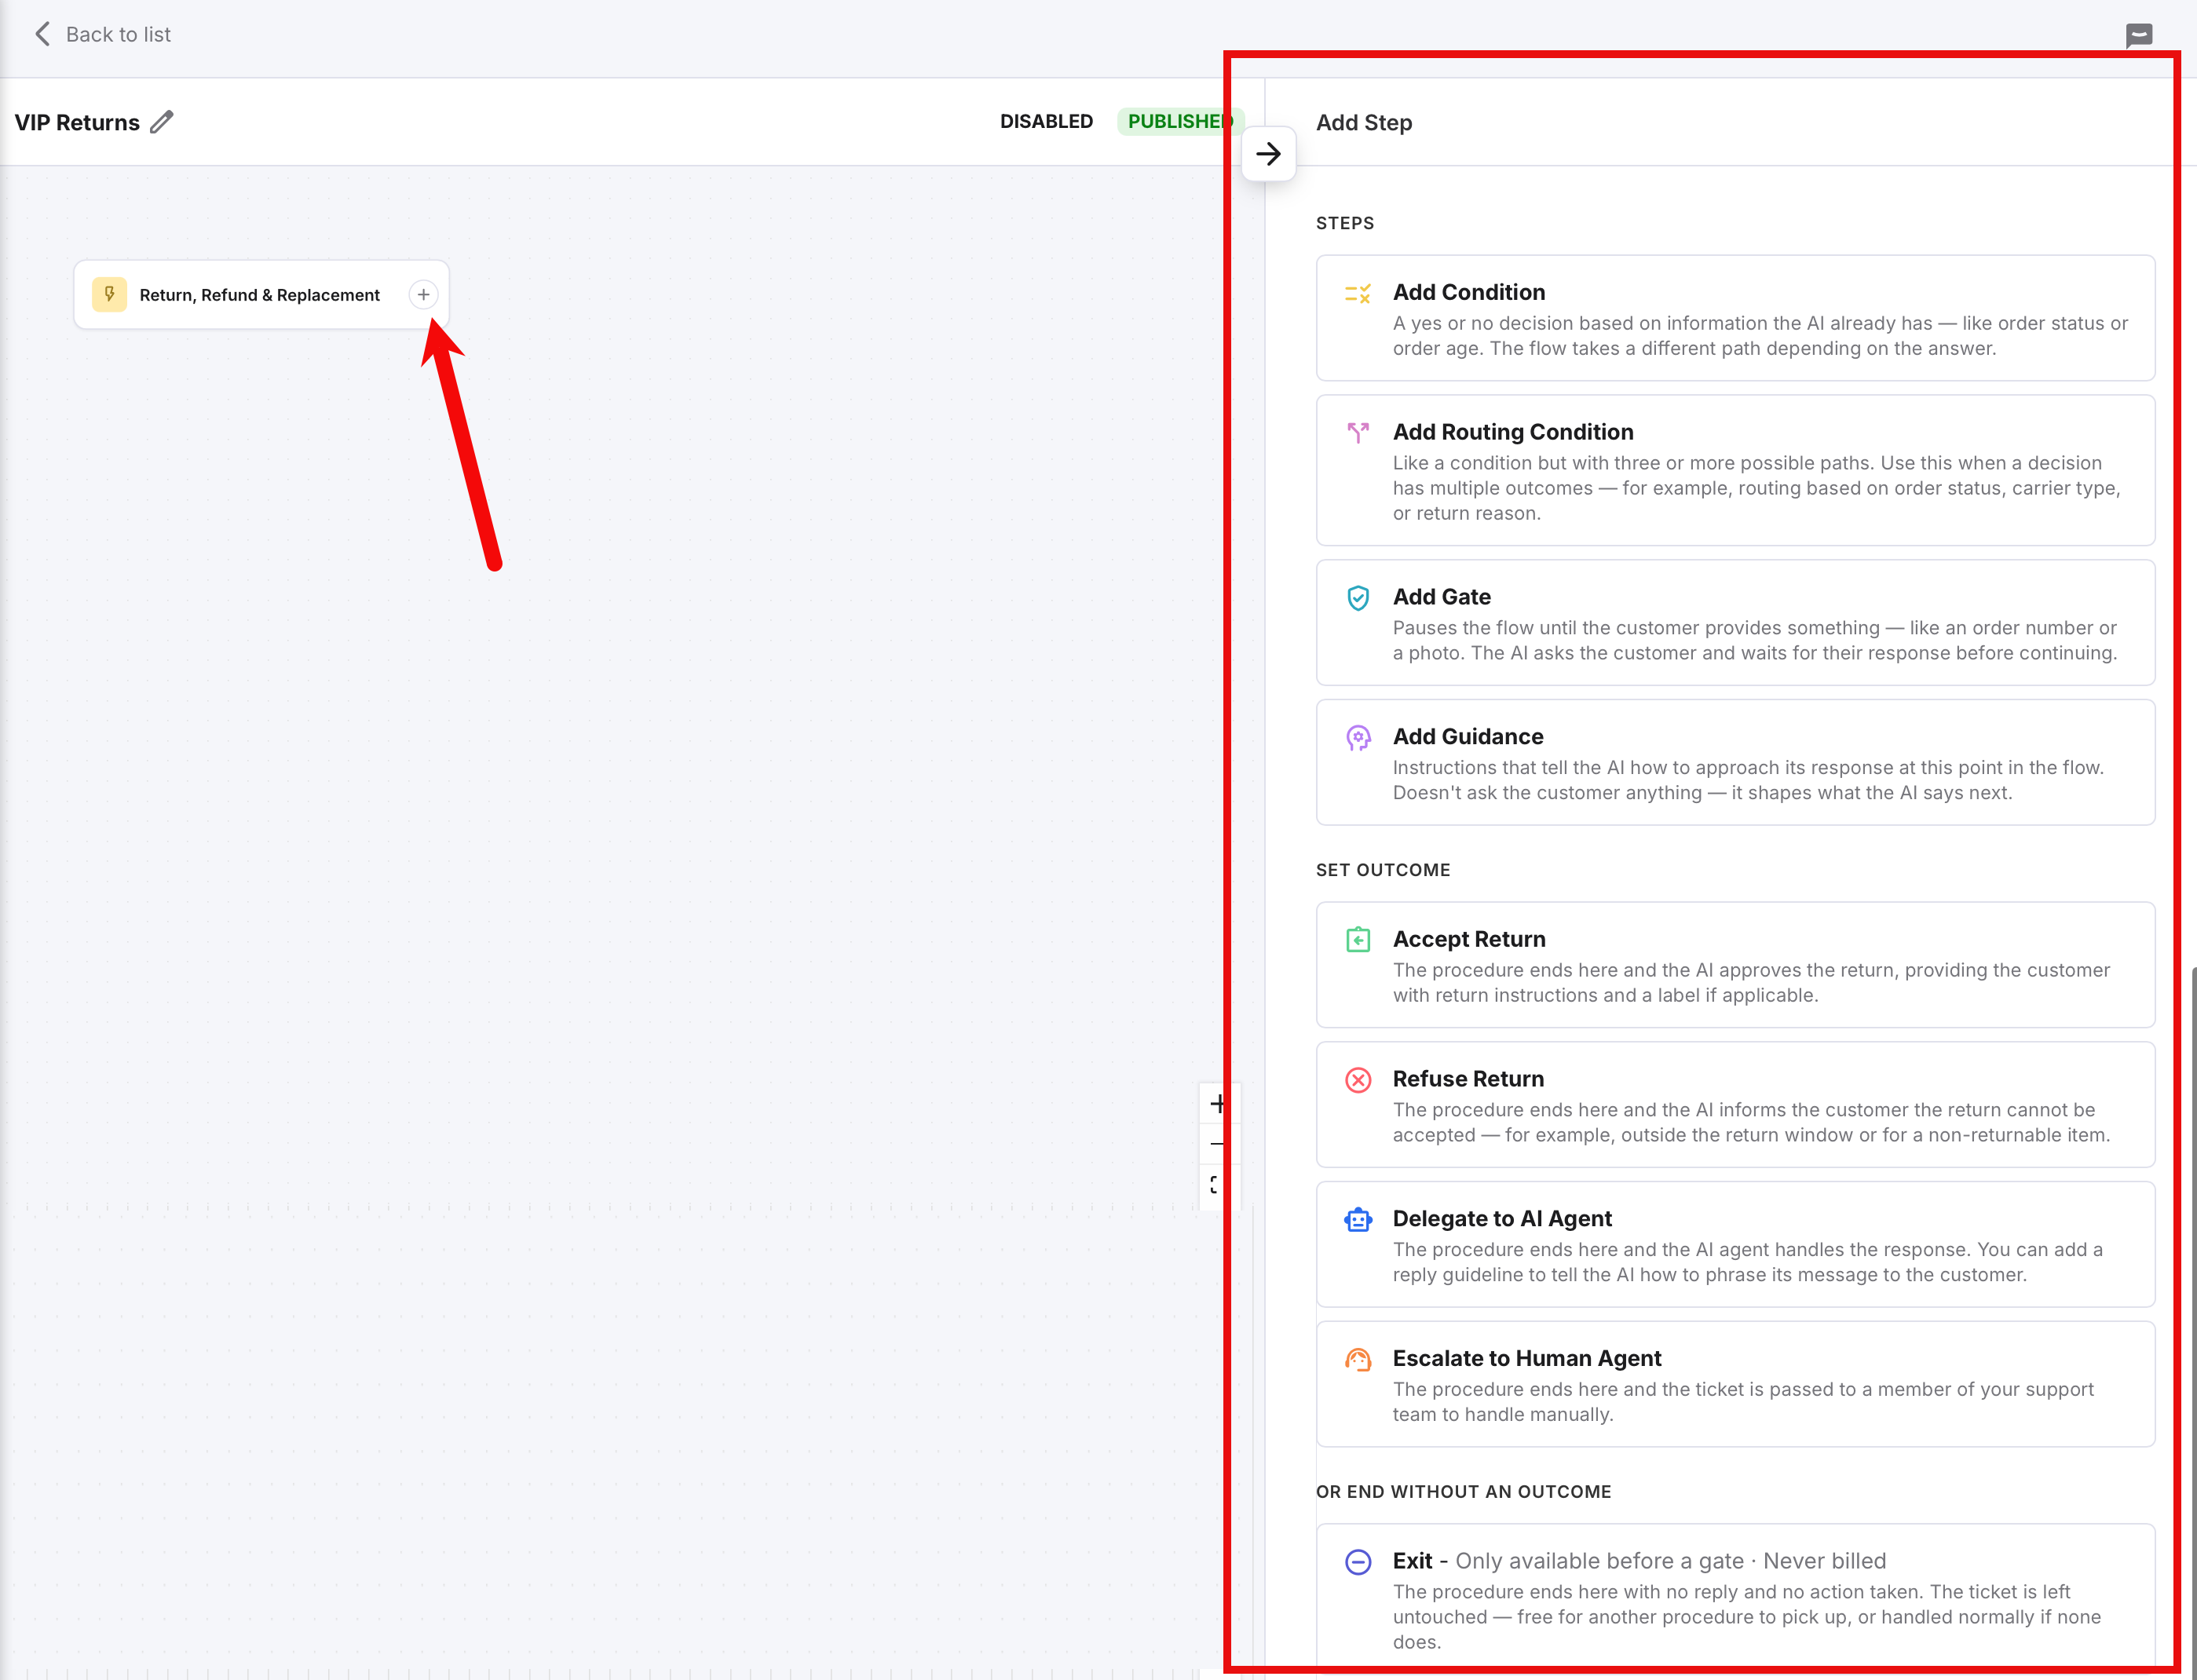
2. Select the tile for the type of step you want to add. Learn about Conditions, Routing Conditions, Gates, Guidance, and Outcomes here.
A new box for the selected step will be added to the flow chart and an Edit panel is displayed on the right that enables you to edit the new step.
3. Complete the fields as follows:
- A Condition step enables the flow of the Procedure to follow one of two branches. The AI Agent follows the top branch when the condition is true, and the bottom branch if it isn't true. The bottom branch is labelled "else" because the AI Agent follows it only if the Condition isn't true. Each branch contains further steps and/or an Outcome.
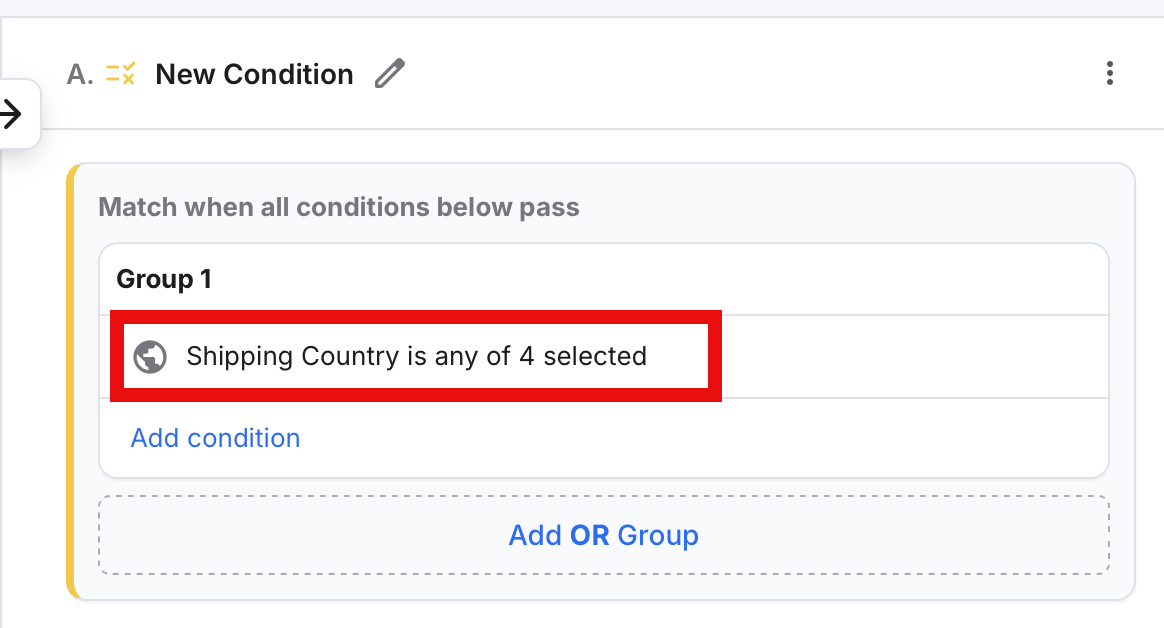
- In a Condition step, you'll create a condition like "Shipping Country" is any of "France, Belgium, Ireland, Spain". If the AI Agent is responding to a message in which the Shipping Country is Belgium, then the AI Agent will go to the next step in the top branch, otherwise it'll take the bottom branch.
- You can create more complex Condition steps that use more than one condition, for example, "Shipping Country" is any of "France, Belgium, Ireland, Spain" AND "Channel" is any of "Shopify". In this example, if the Shipping Country for the ticket is Belgium and the Channel is Shopify, i.e. both conditions are true, then the AI Agent will proceed along the top branch.
- You can also create complex Condition steps that use multiple conditions that will drive the flow along the top branch if only one of the conditions is true. For example, "Shipping Country" is any of "France, Belgium, Ireland, Spain" OR "Channel" is any of "Shopify". In this example, if the Shipping Country is Belgium and the Channel is eBay, i.e. one condition is true, then the AI Agent will take the top branch.
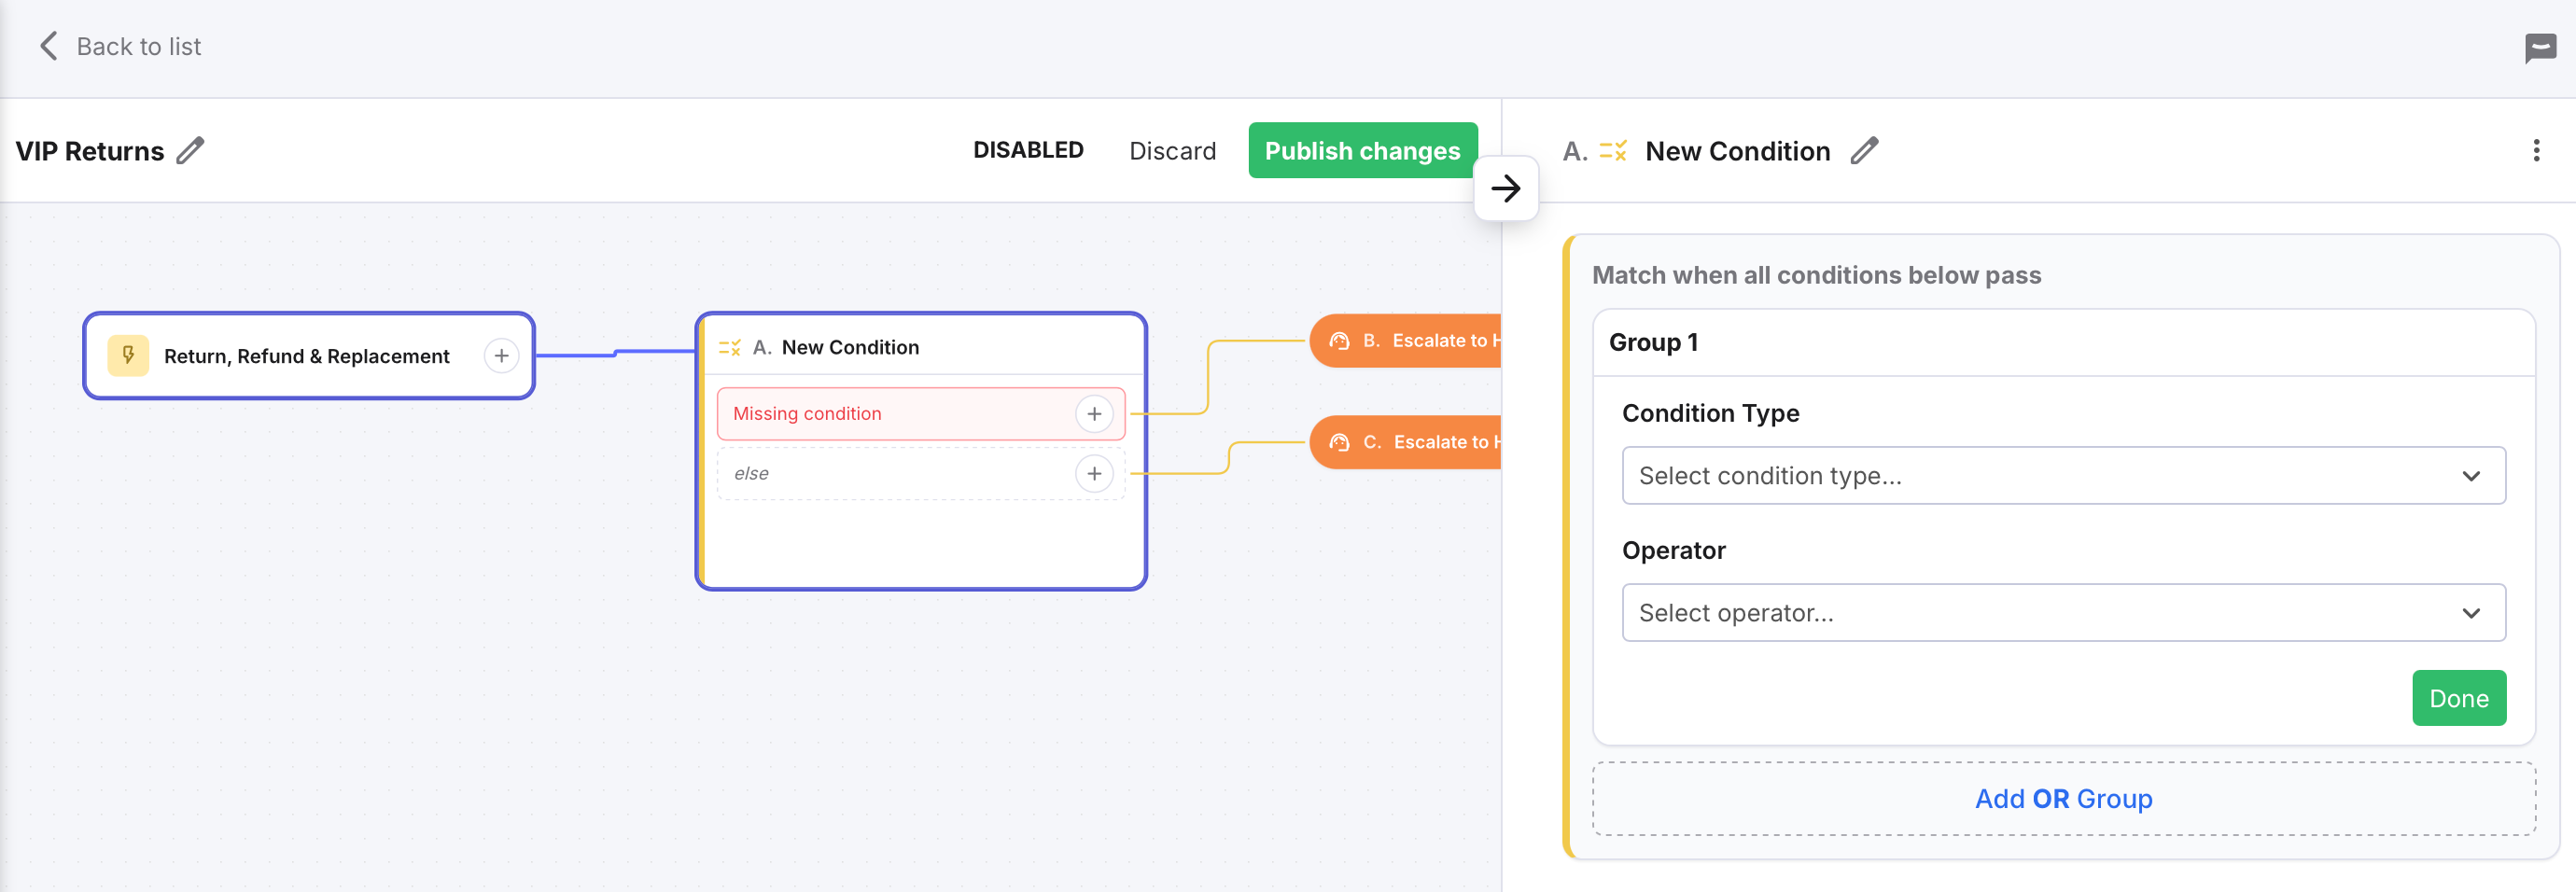
- To edit the name ("New Condition" by default), select the pencil icon in the Edit panel.
- To add your first condition, in Group 1 > Condition Type, select the condition type from the menu, e.g. Shipping Country.
- In the Operator field, select an operator from the menu, e.g., "is any of".
- A further menu will be displayed, showing possible values for your selected Condition Type. Choose a value.
- Select Done to save your changes (or Delete to delete the Condition). The new Condition is represented by a bar in the Edit panel, which you can then select to edit or view:
- To create a complex Condition step that uses multiple conditions which must all be true to drive the flow along the top branch, now select Add Condition and repeat the previous steps.
- To create a complex Condition step that uses multiple conditions of which ONE must be true to drive the flow along the top branch, now select Add OR Group and repeat the previous steps.
- Don't forget to select Done to save each condition.
- Select the arrow at the top of the Edit panel to close it.
Add Routing Condition
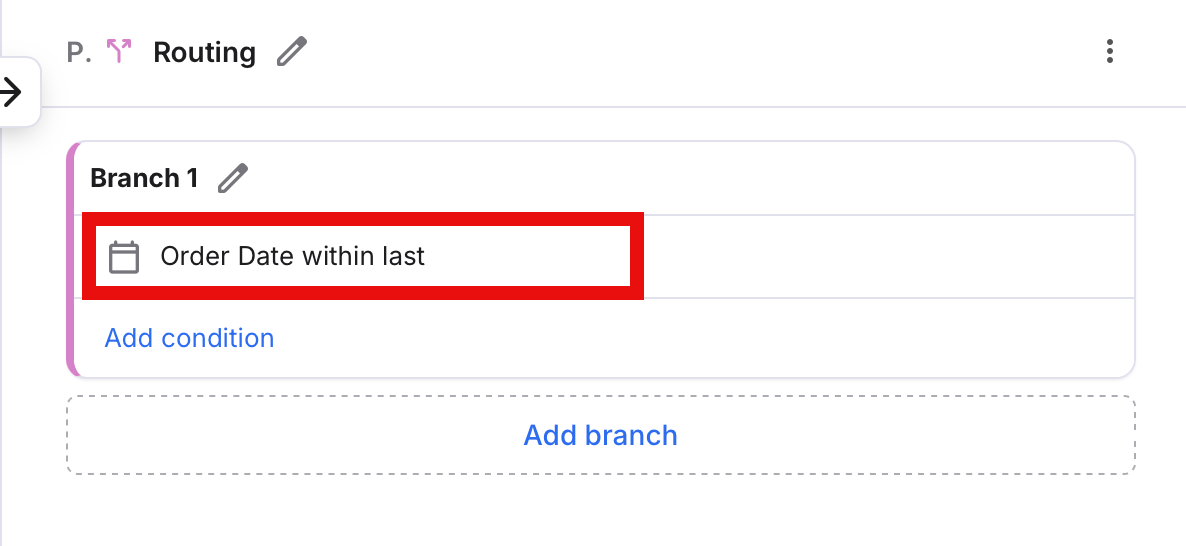
- A Routing Condition step behaves like a Condition step but enables you to set up more than two branches, with a condition for each branch. The AI Agent checks the conditions from top to bottom and follows the branch of the first condition that is true. If none of the conditions are true, then it takes the "else" branch.
- For each Branch, you can create one or more conditions. Both conditions must be true to direct the AI Agent down that branch.
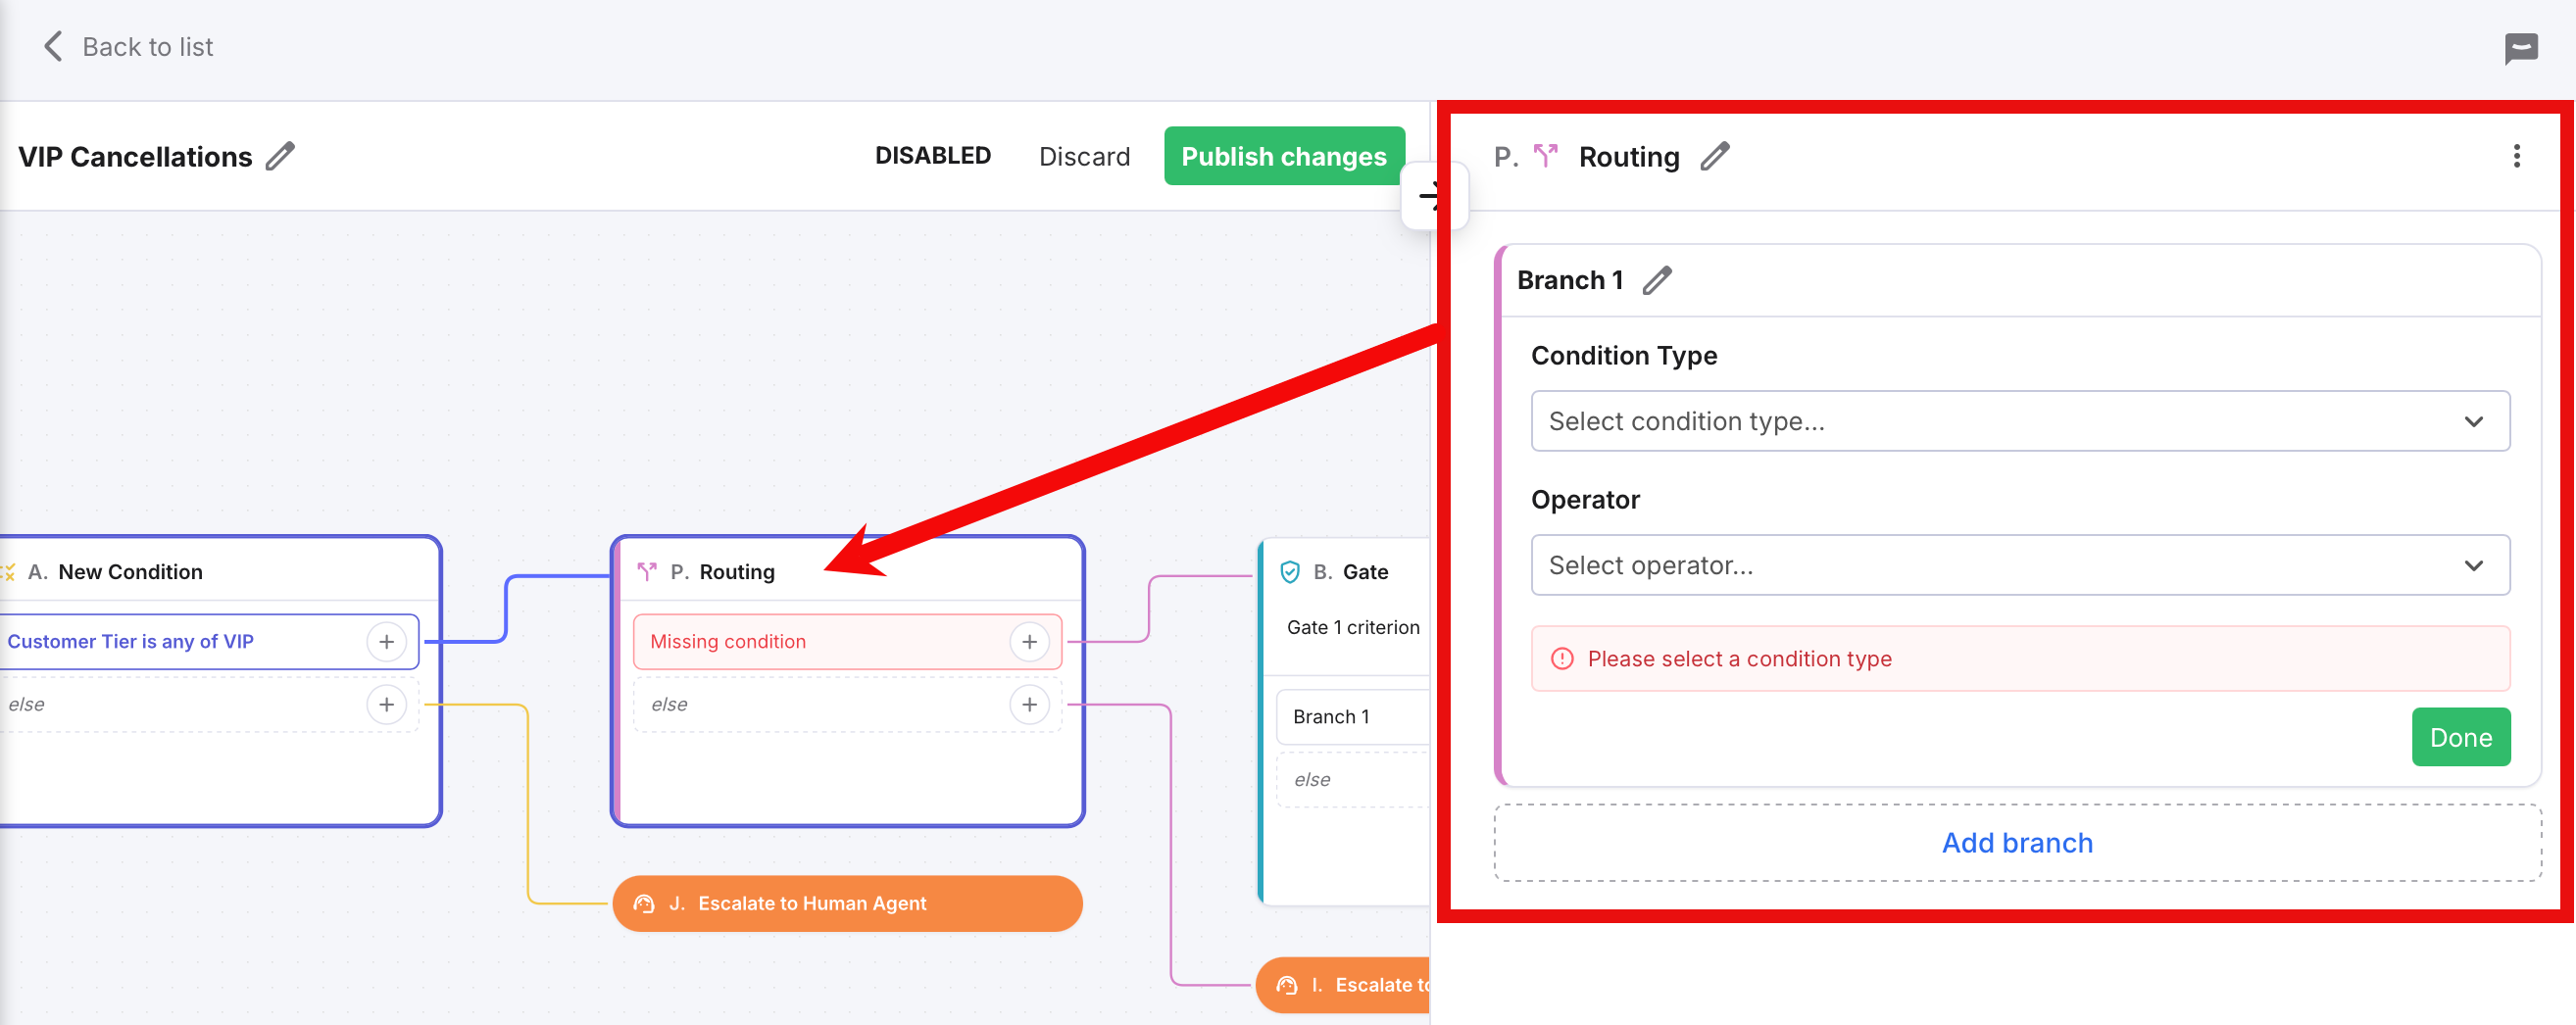
- To edit the name ("Routing" by default), select the pencil icon in the Edit panel.
- To add your first condition, in Branch 1 > Condition Type, select the condition type from the menu, e.g. Shipping Country.
- In the Operator field, select an operator from the menu, e.g., "is any of".
- A further menu will be displayed, showing possible values for your selected Condition Type. Choose a value.
- Select Add Condition to add another condition to the Branch.
- Select Add branch to add another branch.
- Select Done to save your changes (or Delete to delete the Condition). Each Routing Condition is represented by a bar in the Edit panel (and in the step box), which you can then select to further edit or view:
- Select the arrow at the top of the Edit panel to close it.
Add Gate
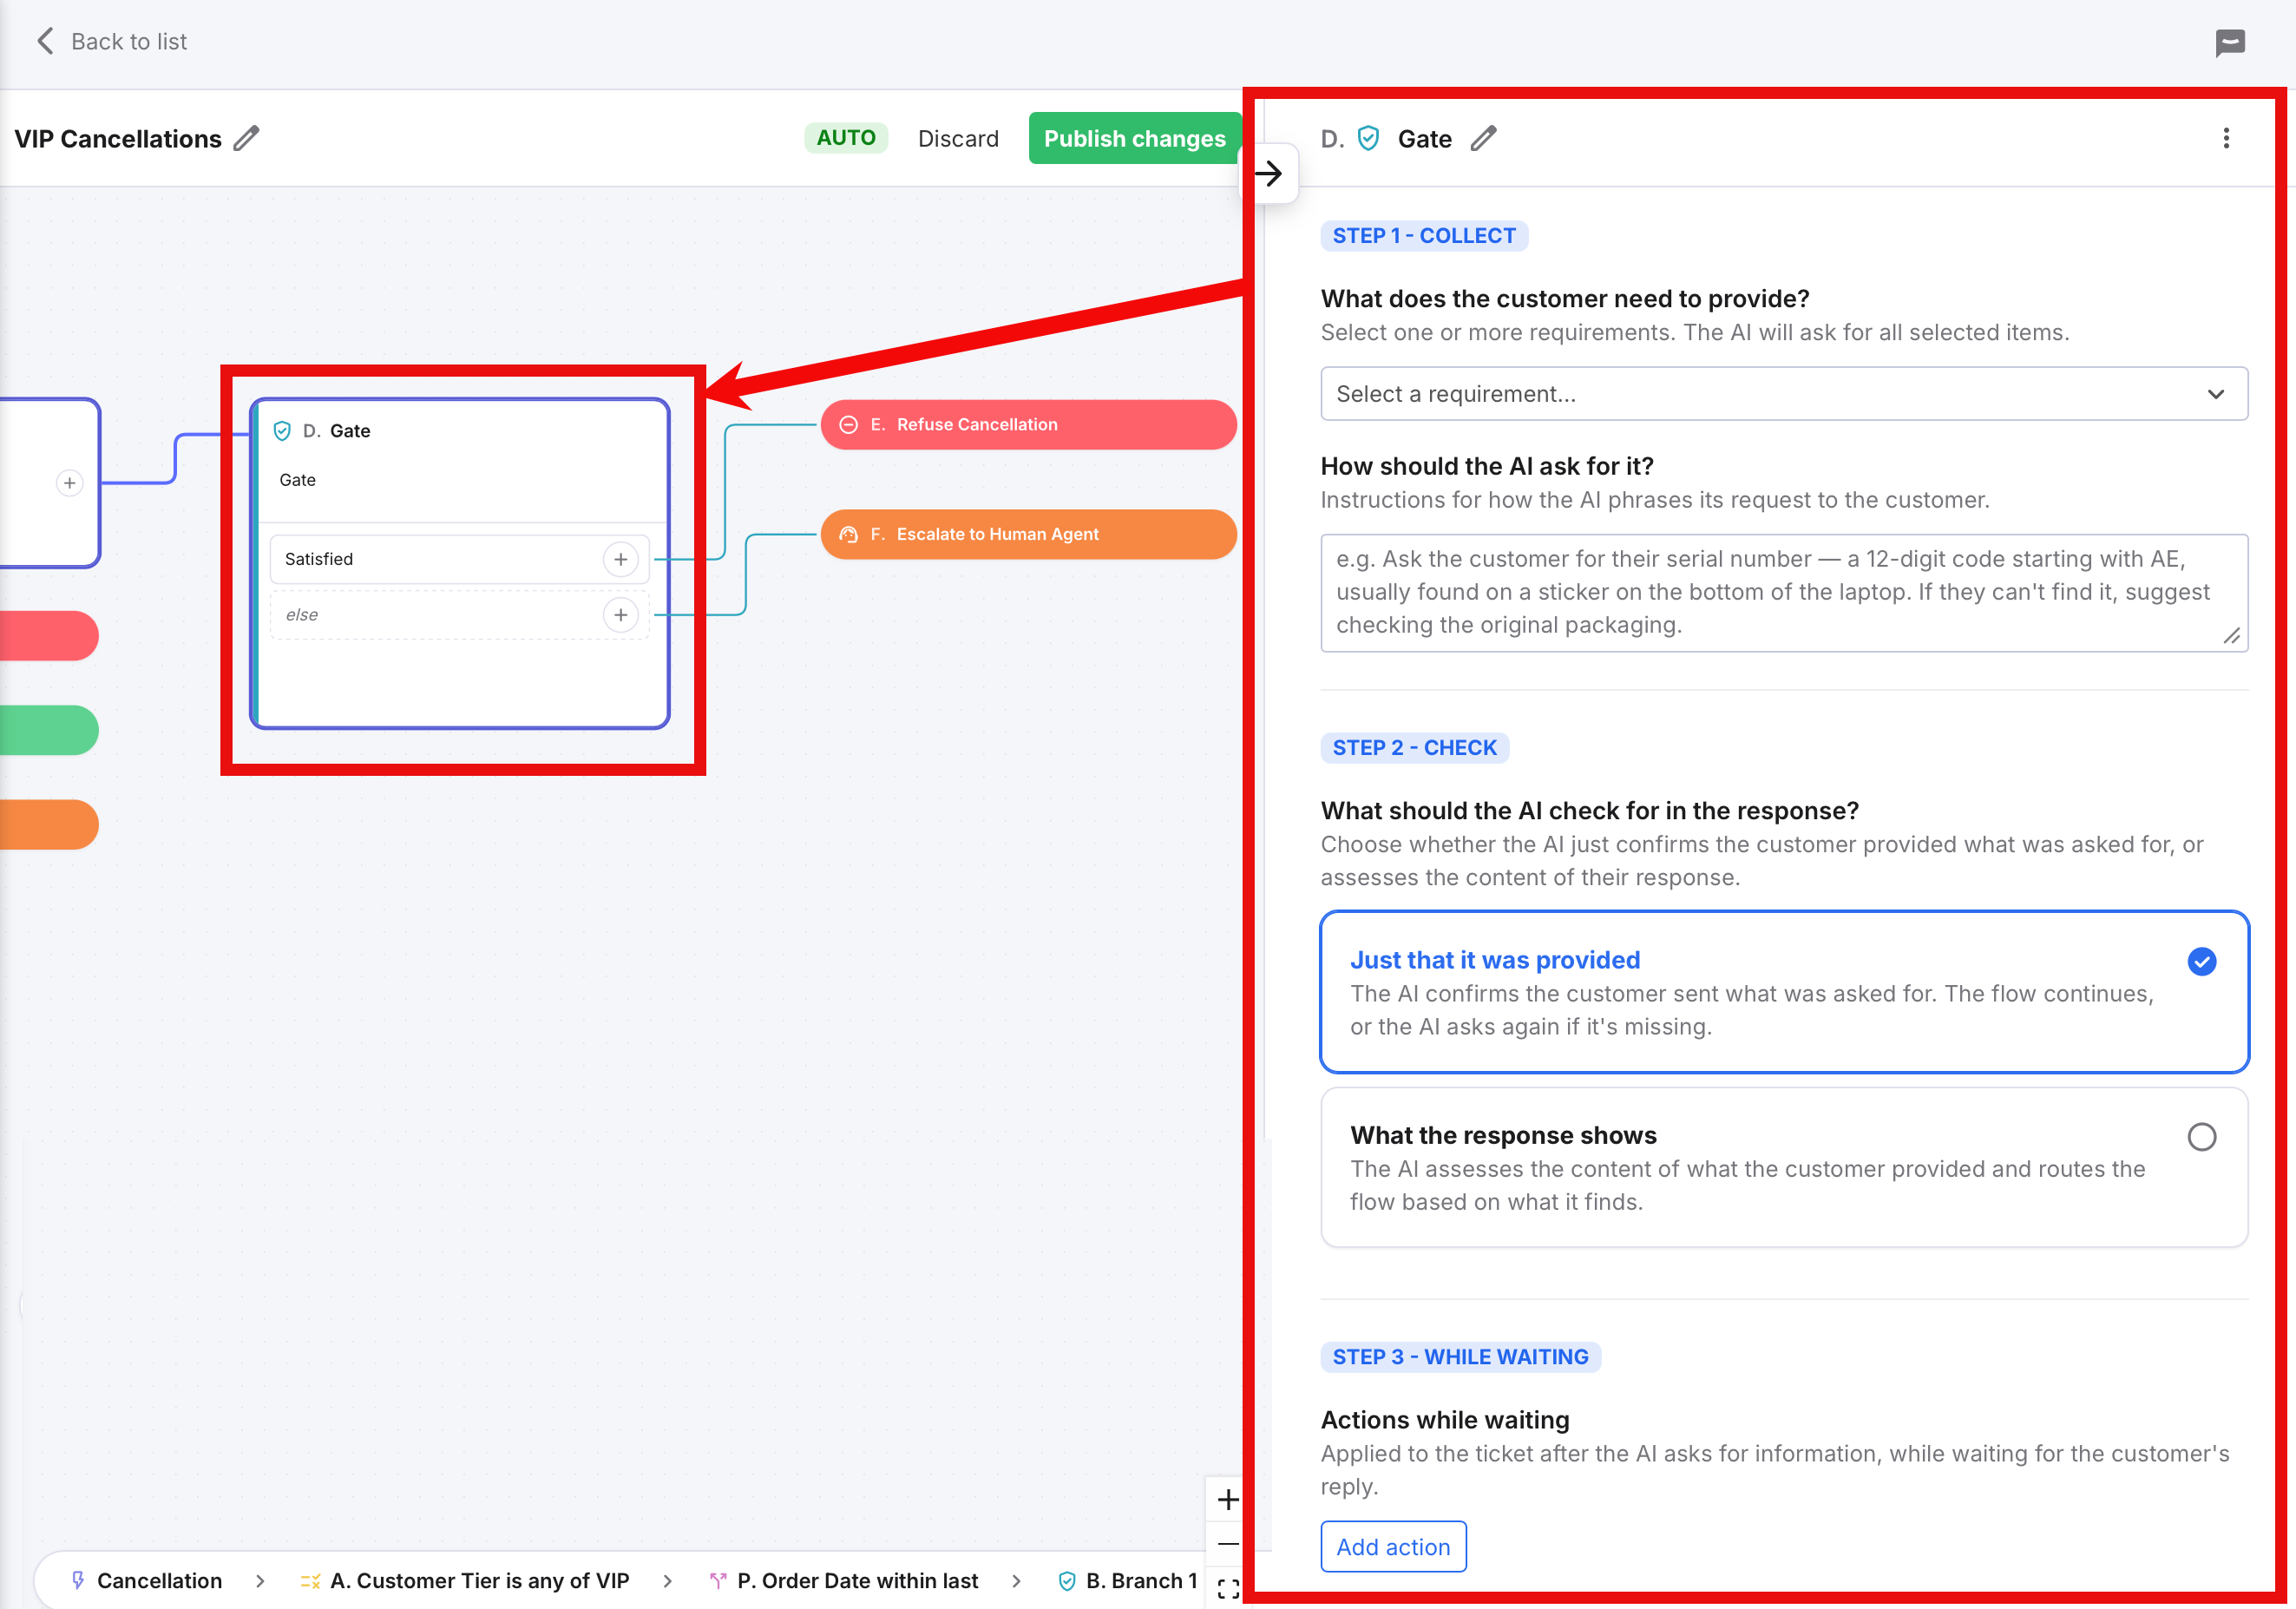
- A Gate step waits for a customer to provide something, e.g. a receipt. Once it receives it, it can check that the provided item is valid, and perform an action while waiting for the customer.
- A Gate has 2 branches - the AI Agent will take the top "satisfied" branch as soon as the customer provides a valid item, otherwise it will follow the "else" branch.
- To edit the name ("Gate" by default), select the pencil icon in the Edit panel.
- In STEP 1: COLLECT > What does the customer need to provide, select the item(s) from the menu, e.g., Order number, Proof photo.
- In the How should the AI ask for it? field, provide instructions to the AI Agent on how to ask for the item, for example: "Ask the customer for their 8 digit order number, which they'll find in the Subject line of the confirmation email they received immediately after placing the order. Ask the customer to take a photo of the item, showing any damage if visible."
- In STEP 2: CHECK > What should the AI check for in the response?
To instruct the AI Agent to simply be satisfied when it has received an item from the customer without checking it is valid, select Just check that it was provided. Then as soon as the customer returns something in the ticket, the AI Agent will proceed down the top "satisfied" branch.
Alternatively, you can instruct the AI Agent to perform some checks to ensure the customer has provided the right item by selecting What the response shows. This will prompt display of an Add branch button.
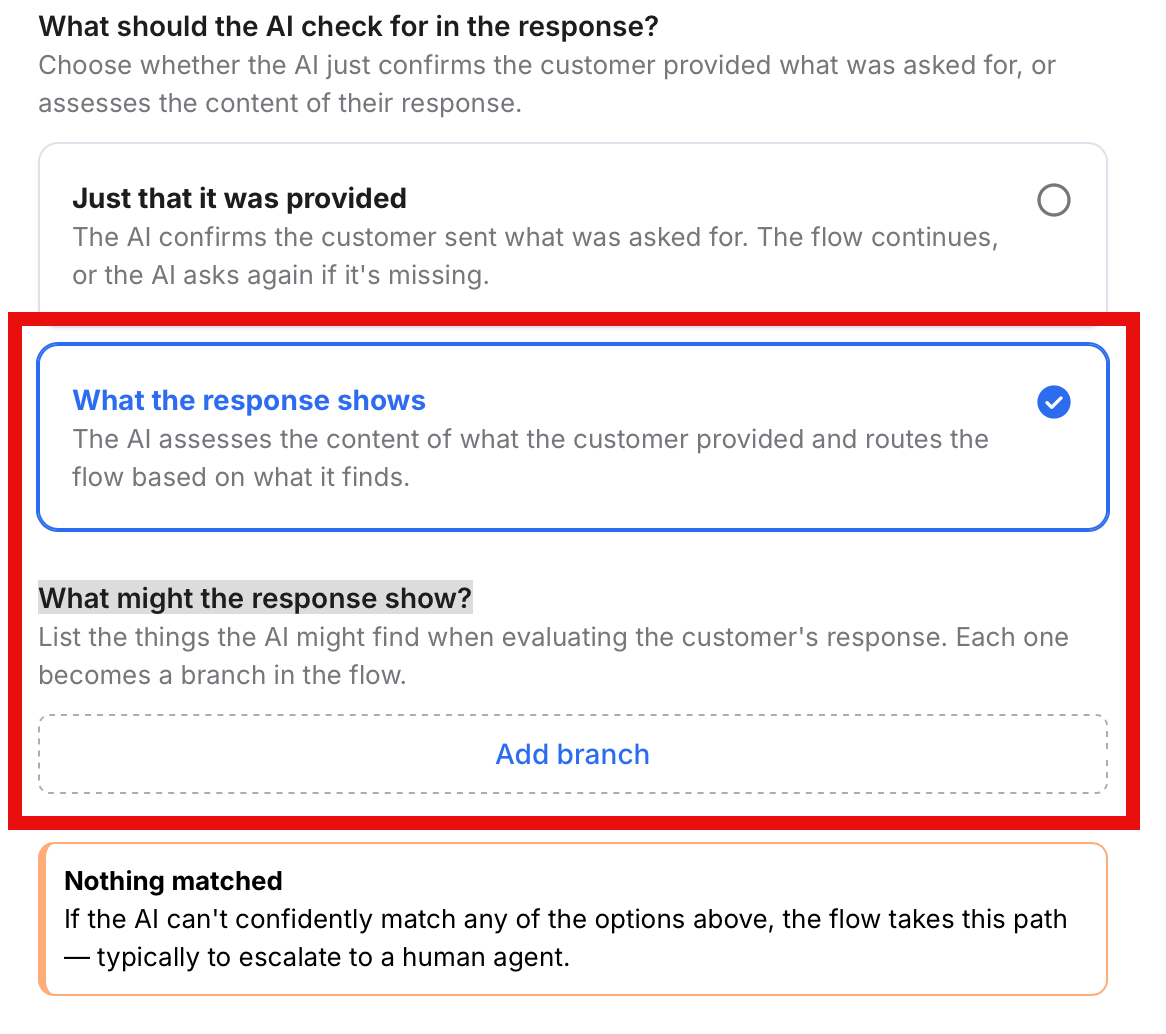
Select the Add Branch button and enter a check that if true, will drive the AI Agent down that branch, for example, "Visible damage to product", "Defect not visible" etc.
Repeat for every check you want the AI Agent to check in the item provided by the customer. A fallback "else" branch is added automatically and is called "Nothing matched". - In STEP 3: WHILE WAITING > Actions while waiting, you can instruct the AI Agent to perform an action while waiting for the customer to respond to the request.
Select the Action Type from the menu and complete any dynamic fields that are then displayed. The available actions range from updating the ticket with a new tag or owner, to sending a templated response to the customer (based on Instructions instead of letting the AI Agent word its response), or sending a message to an external system via a webhook. - Select Save to save the step.
- Select the arrow at the top of the Edit panel to close it.
Add Guidance
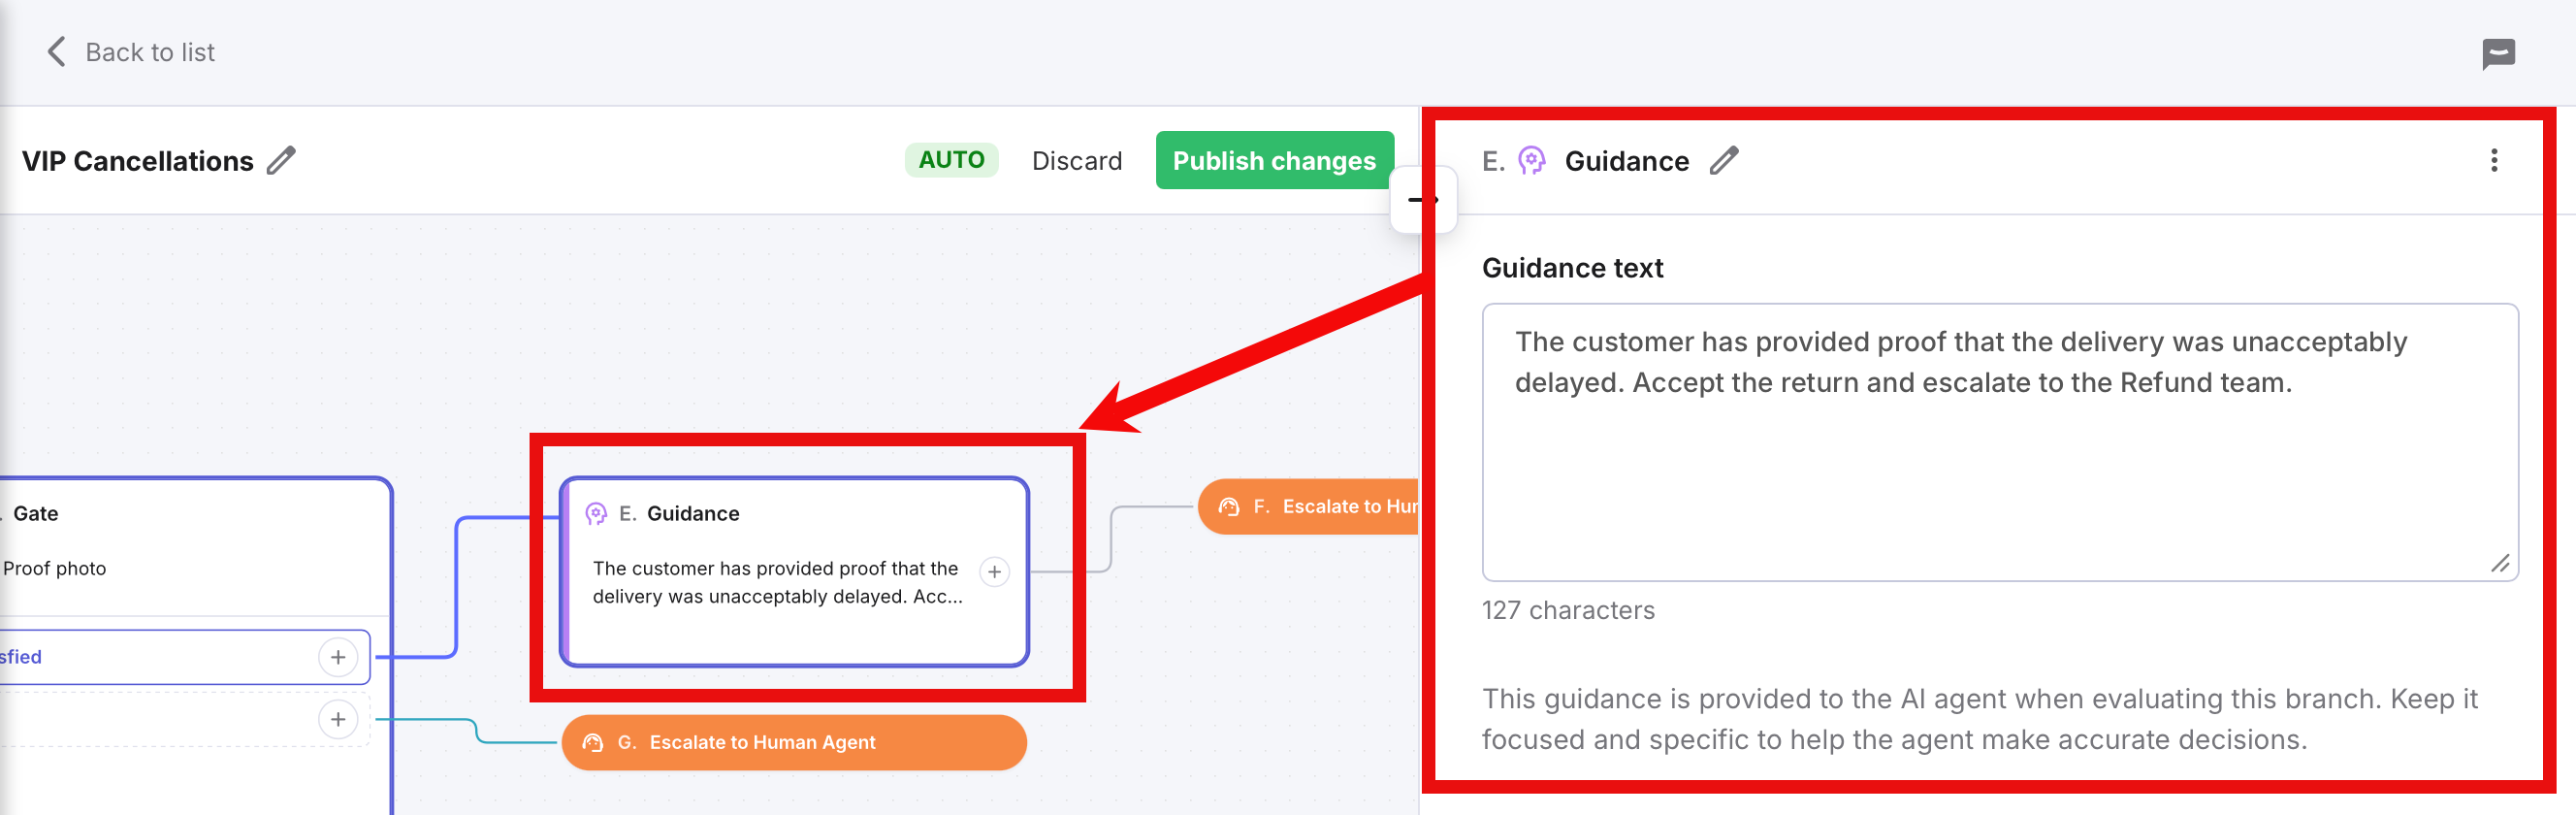
- A Guidance step provides the AI Agent with extra information that will help it to auto-rely or perform an action at this stage in the flow.
- A Guidance step doesn't branch the flow; only one path comes from a Guidance step.
- To edit the name ("Guidance" by default), select the pencil icon in the Edit panel.
- In Guidance text, enter helpful instructions for the AI Agent.
You'll see the step box update in the Flow Editor to include the text you have entered. - Select the arrow at the top of the Edit panel to close it.
To update the Outcomes
Every branch in the Procedure must finish with an Outcome. eDesk adds default Outcomes to the end of every branch, which you can then update if needed. The default Outcome is Escalate to Human Agent.1. Select an Outcome in the Flow Editor.
The Edit Panel opens.
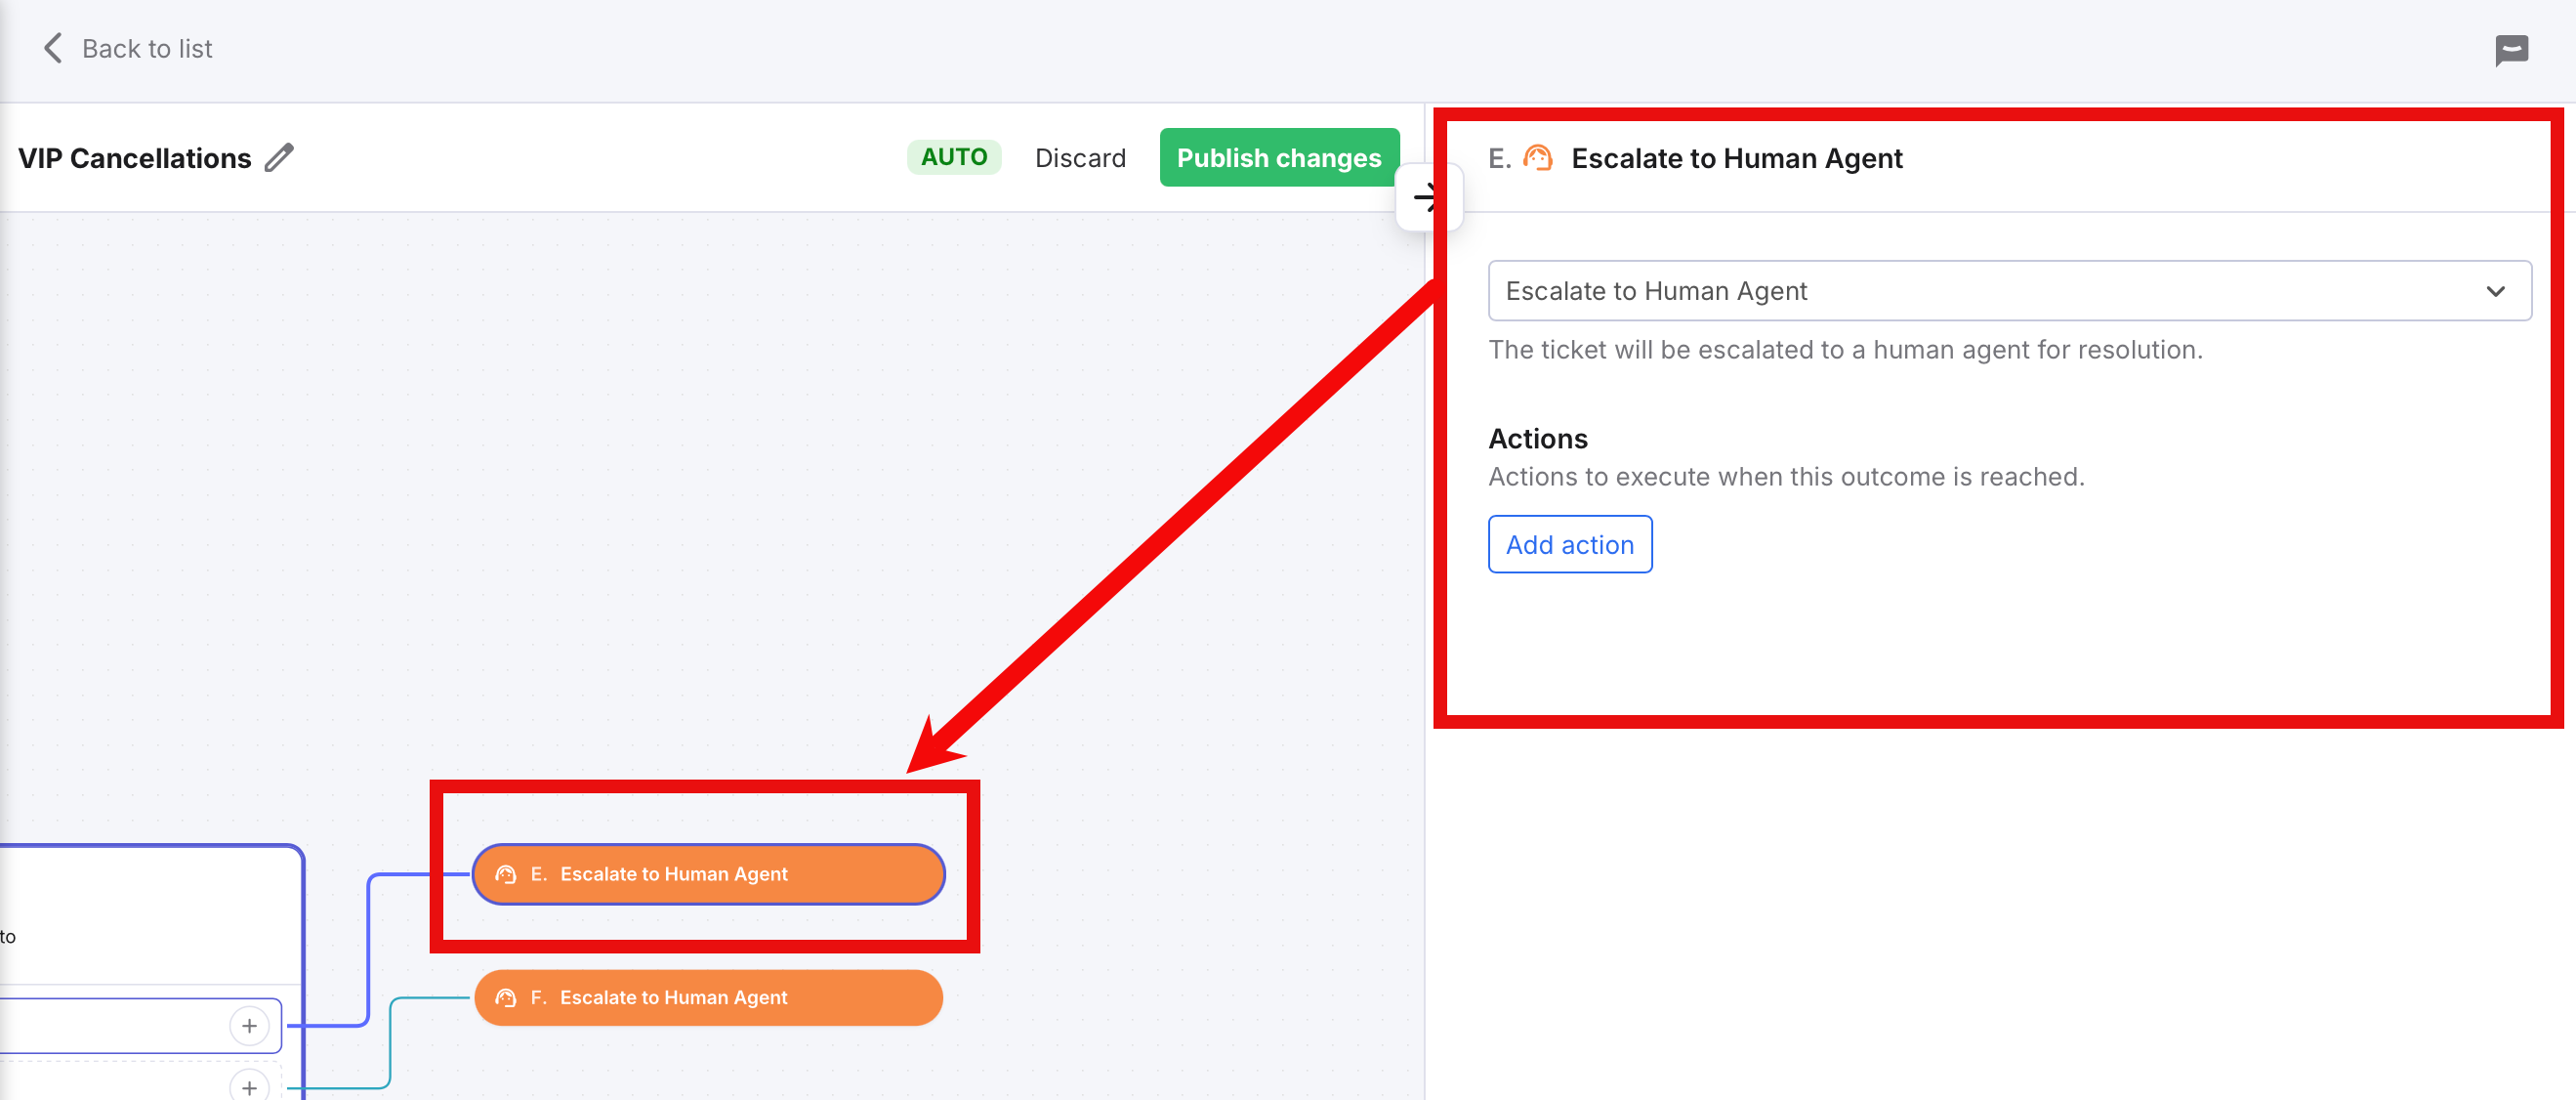
2. Select an Outcome from the menu.
If you select an outcome that is not Escalate to Human Agent, further dynamic fields will be displayed:
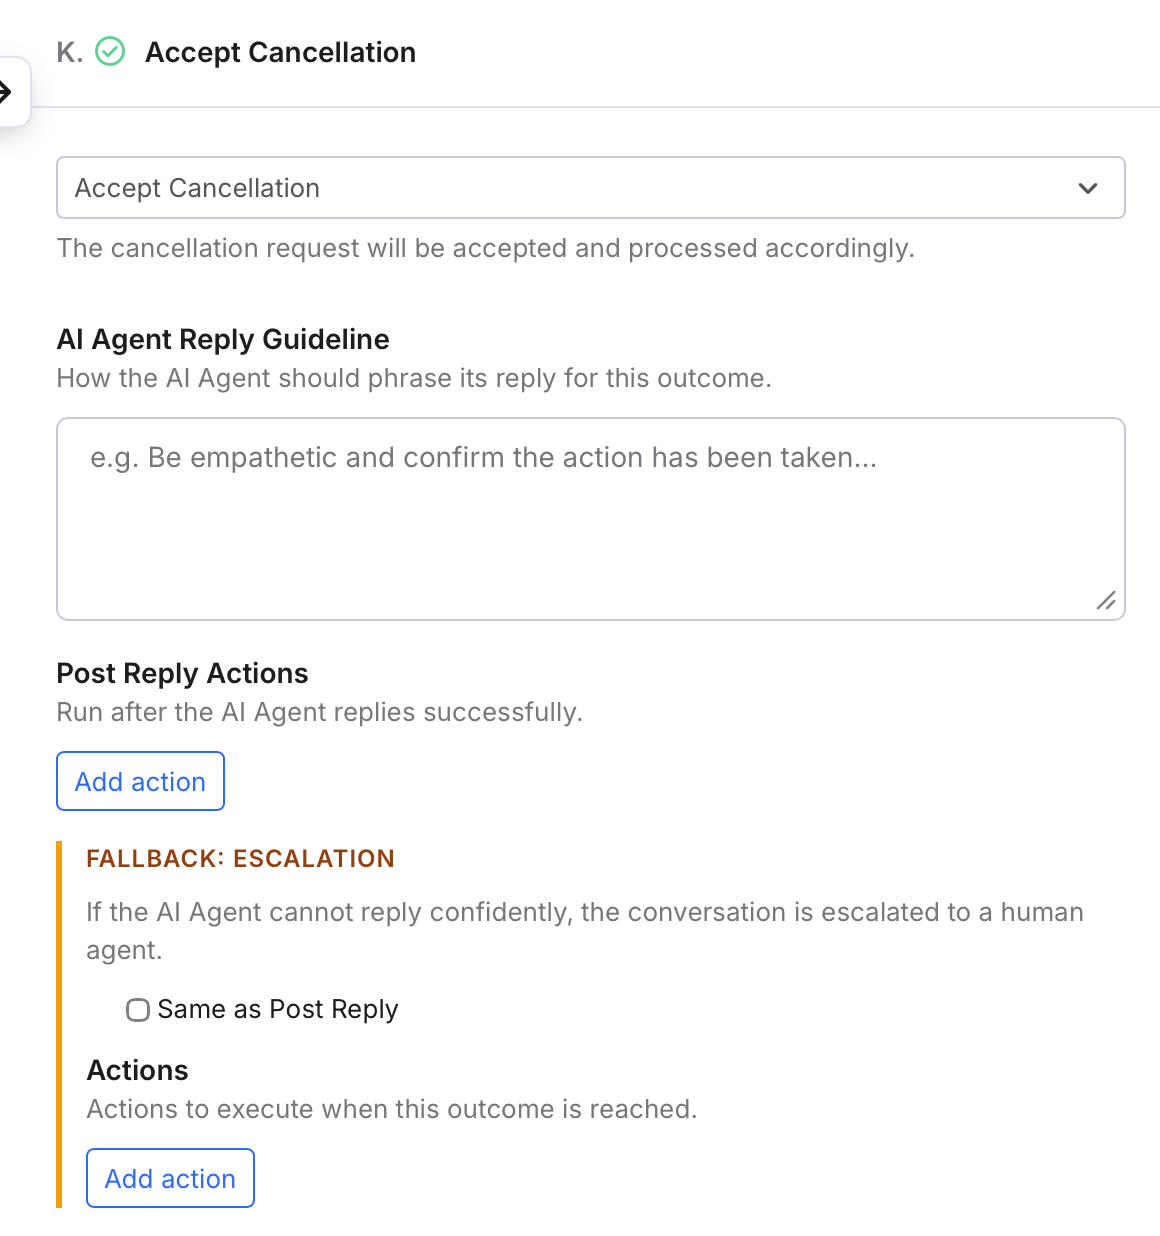
Complete the fields:
- AI Agent Reply Guideline
Optionally, provide the AI Agent with some instructions that help it auto-reply to the customer. - Post Reply Actions > Add Action
Optionally, select Add Action to instruct the AI Agent to perform an action after it has auto-replied, for example, tag the ticket. - Fallback Escalation > Same as Post Reply
If the Agent cannot auto-reply because it does not have enough information, it will default to the default Outcome but you can instruct it to perform an action if needed even if there's no auto-reply.
If the Same as Post Reply checkbox is ticked, the AI Agent perform the same actions that were set in Post Reply Actions section.
Otherwise, untick the checkbox, and select Add Action to add a different action.
5. Select the arrow at the top of the Edit panel to close it.
To delete a step
- Deleting Guidance steps has no impact on the flow, however deleting Condition, Routing Condition, and Gate steps will remove Branches from the flow. In these cases, you must choose which Branch you want to keep.
- You can't delete an Outcome, since every Branch must end with an Outcome. However you can change the Outcome easily.
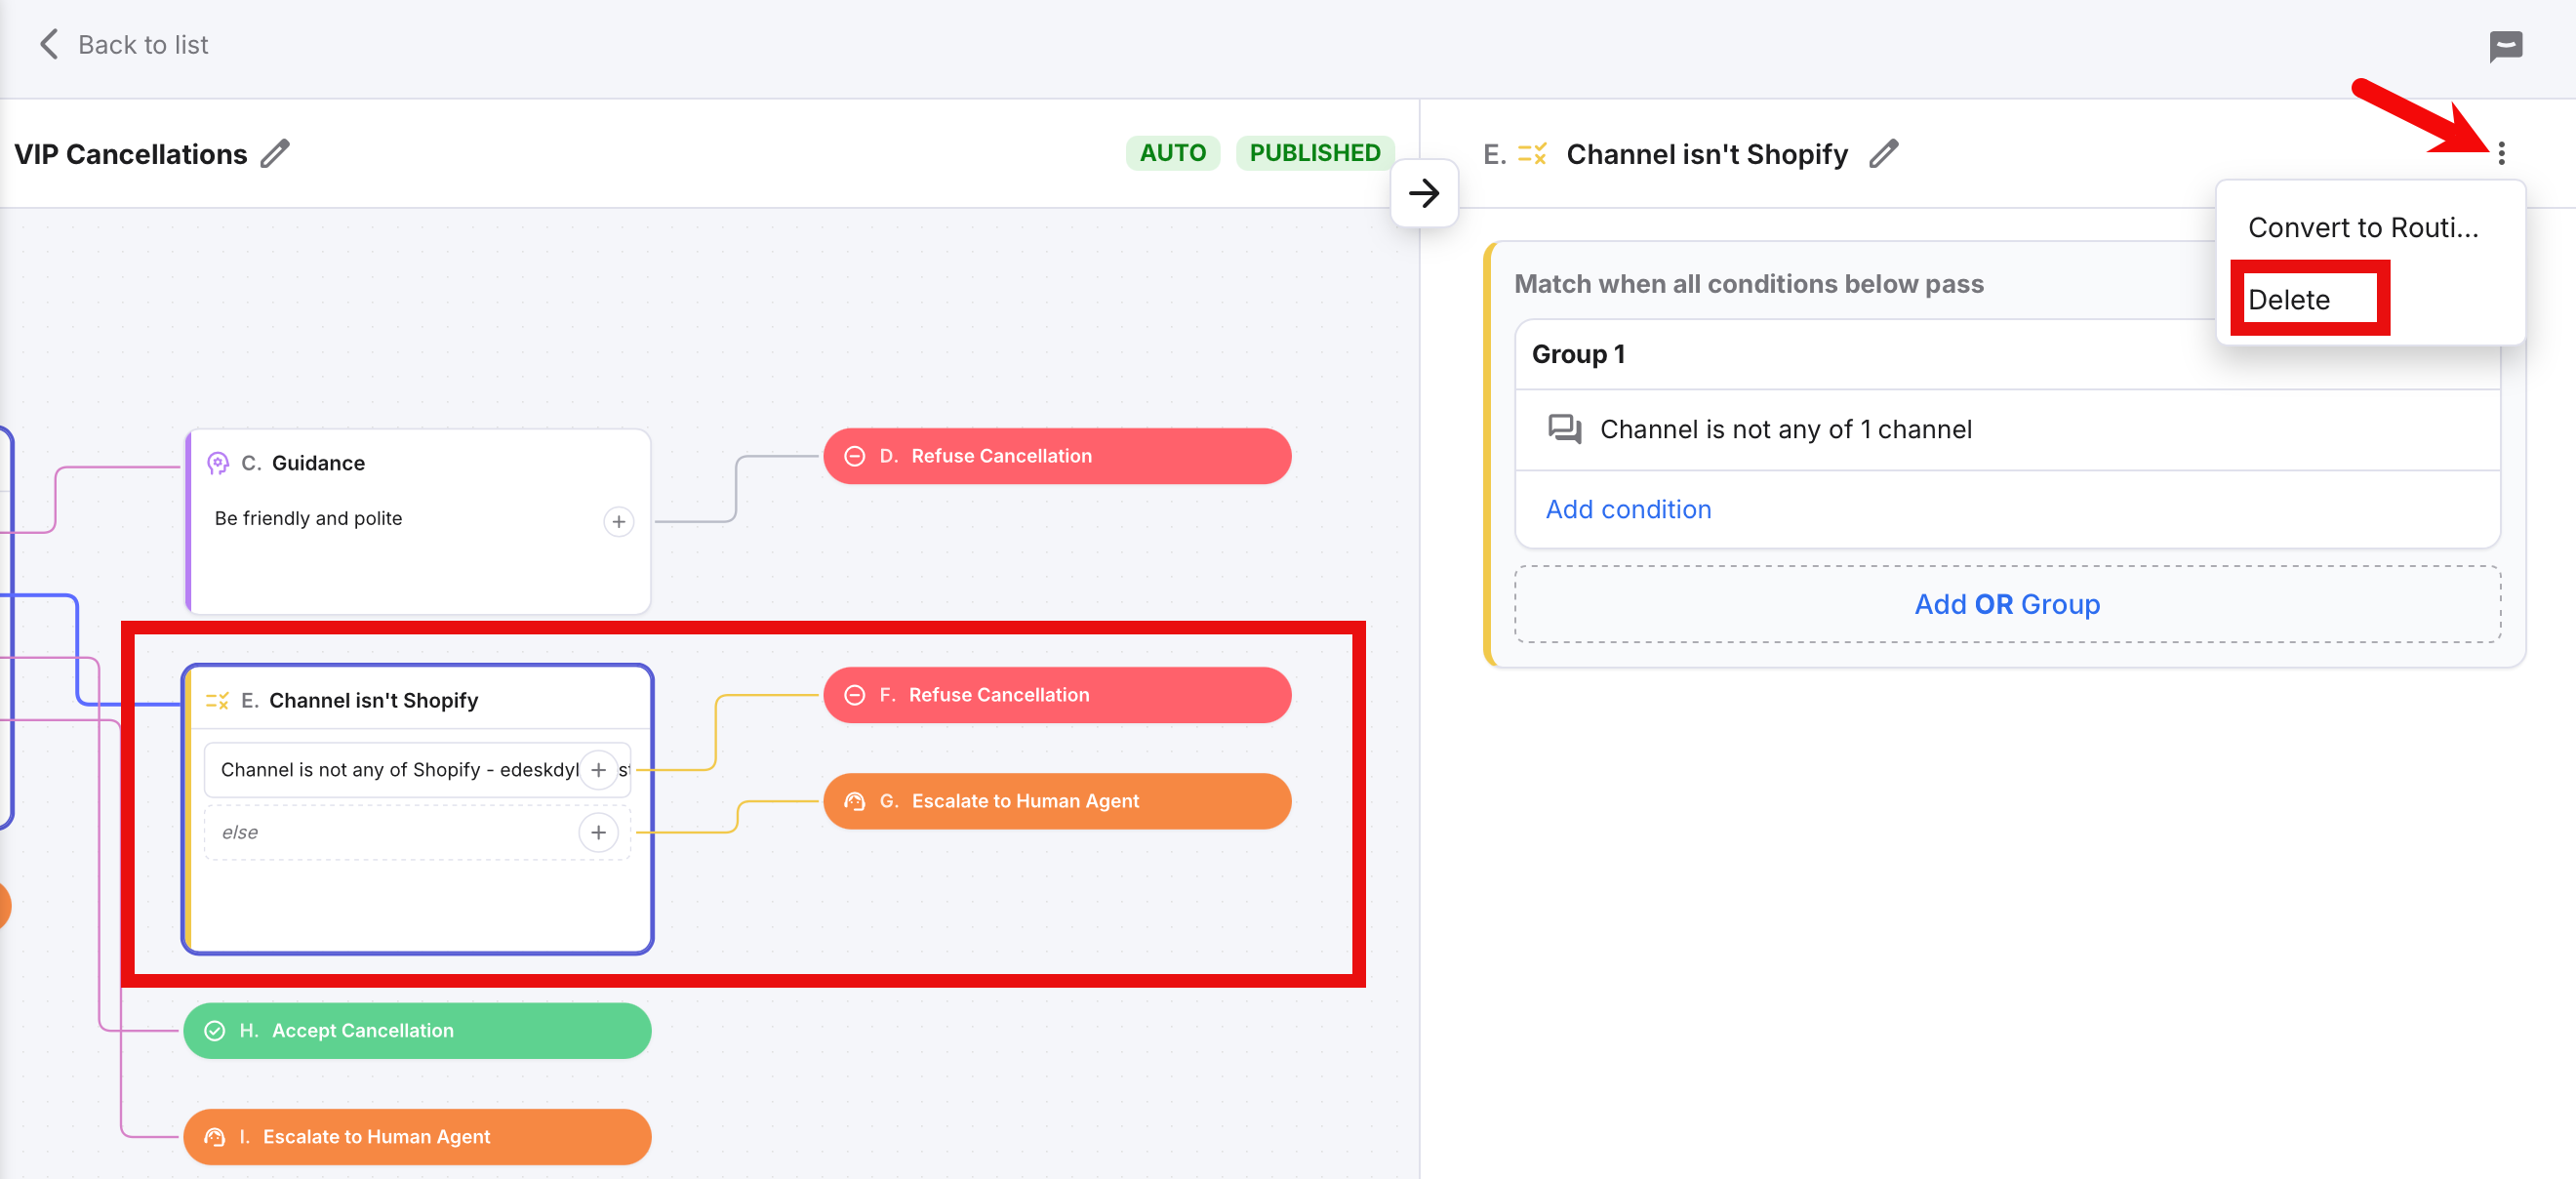
2. In the Edit Panel, select the More Actions (three dots) icon to open the More Actions menu.
3. Select Delete.
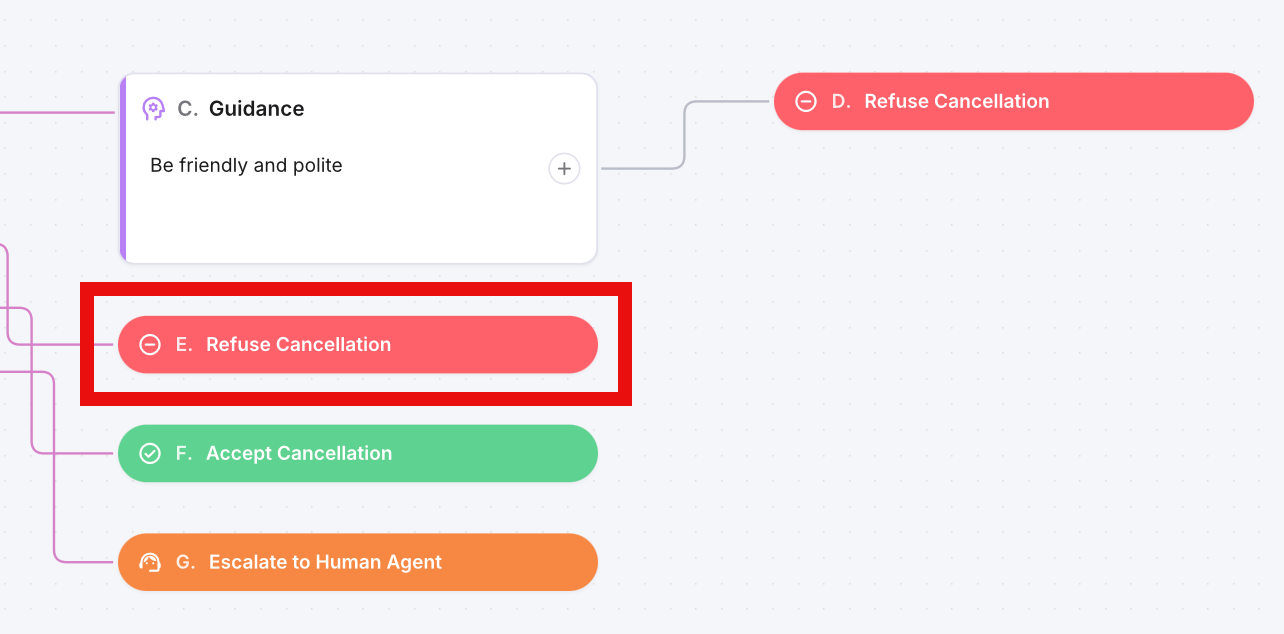
In the example below, we will delete a Condition step called "Channel isn't Shopify", which has 2 branches that lead to Outcomes called Refuse Cancellation and Escalate to Human Agent respectively.
4. If the step has branches, choose the branch you want to keep:
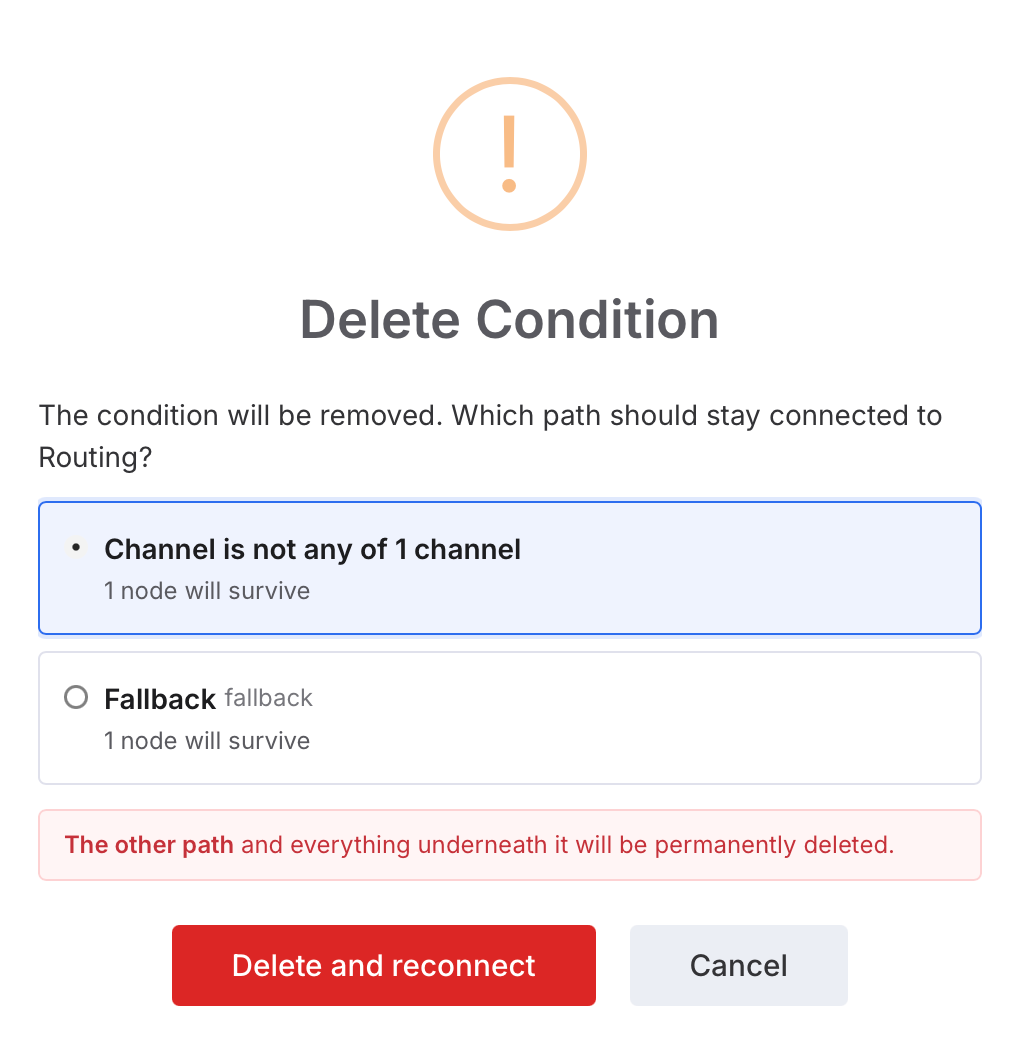
In our example, we can delete either the "true" path that leads to the Refuse Cancellation Outcome, or the Fallback "else" path that leads to the Escalate to Human Agent Outcome.
5. Select Delete and reconnect to remove the step from the flow and reconnect the remaining path to the previous step in the sequence.
The step is removed, and any subsequent steps and Outcome on the branch you have not saved are deleted too. In the example below, the Fallback "else" branch was deleted and so the Escalate to Human Agent Outcome has also gone. Only the Refuse Cancellation Outcome remains.
To edit the flow, clone, edit settings, or delete a Procedure
1. Select AI in the main menu and then Procedures.
2. In the My Procedures tab, locate your Procedure and select the More Actions (three dots) icon at the end of the row to display the More Actions menu.
- To edit the steps in the Procedure, select Edit flow.
- The flowchart page opens to show the steps.
- To edit the Name, Type, Descriptions, Agents, and Channels, select Procedure Settings. The Edit Procedure window opens.
- To clone the Procedure, select Clone.
A copy of the Procedure will be added to the listing. - To delete the Procedure, select Delete.
Select Delete in the confirmation window to complete the deletion.
Tips
- Reaching an Outcome doesn't always mean a reply gets sent, sometimes the right result is to quietly tag a ticket, escalate it, or close it without a response.
- Actions attached to an Outcome (like a refund) will only actually happen if your AI Agent auto-sends the reply. If it steps back and a team member sends a reply instead, the action won't fire, nothing happens automatically without your team member choosing to do it manually.
- That last point is worth building into your procedures: Always think about what should happen when the AI Agent successfully replies through an Outcome, and what should happen if it doesn't.
06 Setting your Procedure to Auto
Finished the Procedure? Now, set the Procedure status to Auto to enable the AI Agents to use the Procedure to auto-reply to customer messages and perform actions as directed by its steps.1. In the main menu, select AI and choose Procedures to view the list of Procedures.
2. In the row for the Procedure you want to make available to AI Agents, select the toggle in the Status column to set it to green, which is Auto.
The Procedure Status in the Flow Editor will be set to Auto and the AI Agents that you permissioned to use this Procedure will now use it to auto-reply to customer tickets whose classification matches the Type of this Procedure.
If you need to stop the AI Agents from using a Procedure, simply select the toggle again, which will set it to grey and change the Procedure status to Disabled.
07 Enabling the "Extended Coverage" behaviour
This step is optional.If the AI Agent can't auto-reply because it does not have access to a Procedure that's appropriate to the customer message, then you can instruct the AI Agent to try to auto-reply using Instructions/Training Content/Policies only.
- If the AI Agent resorts to the extended coverage behaviour, it will NOT be able to perform actions and the auto-reply will likely not be as precise as it would have been if the AI Agent could have used a Procedure.
- If it tries to auto-reply but isn't confident that it has enough information, it will not auto-reply and will leave the ticket for a human Agent to handle.
- If the extended coverage behaviour is disabled for that AI Agent, then it will not auto-reply and will leave the ticket for a human Agent to handle.
1. In the main menu, select AI and choose Procedures to view the list of Procedures.
2. At the bottom of the list, there is an Extended Coverage section, which is displayed only when there are Procedures with Auto status, i.e. they have been made available for AI Agents to use. If all Procedures have a status of Disabled or Simulation, then this section isn't shown.

Note that this behaviour is enabled by default, as denoted by the toggle set to green. By default, the fallback behaviour is assigned to all AI Agents.
3. To disable extended coverage, select the toggle so its colour changes to grey. Select it again to re-enable it.
4. To remove the extended coverage behaviour from specific AI Agents, select Manage Agents.
A Turn on extended coverage window opens:
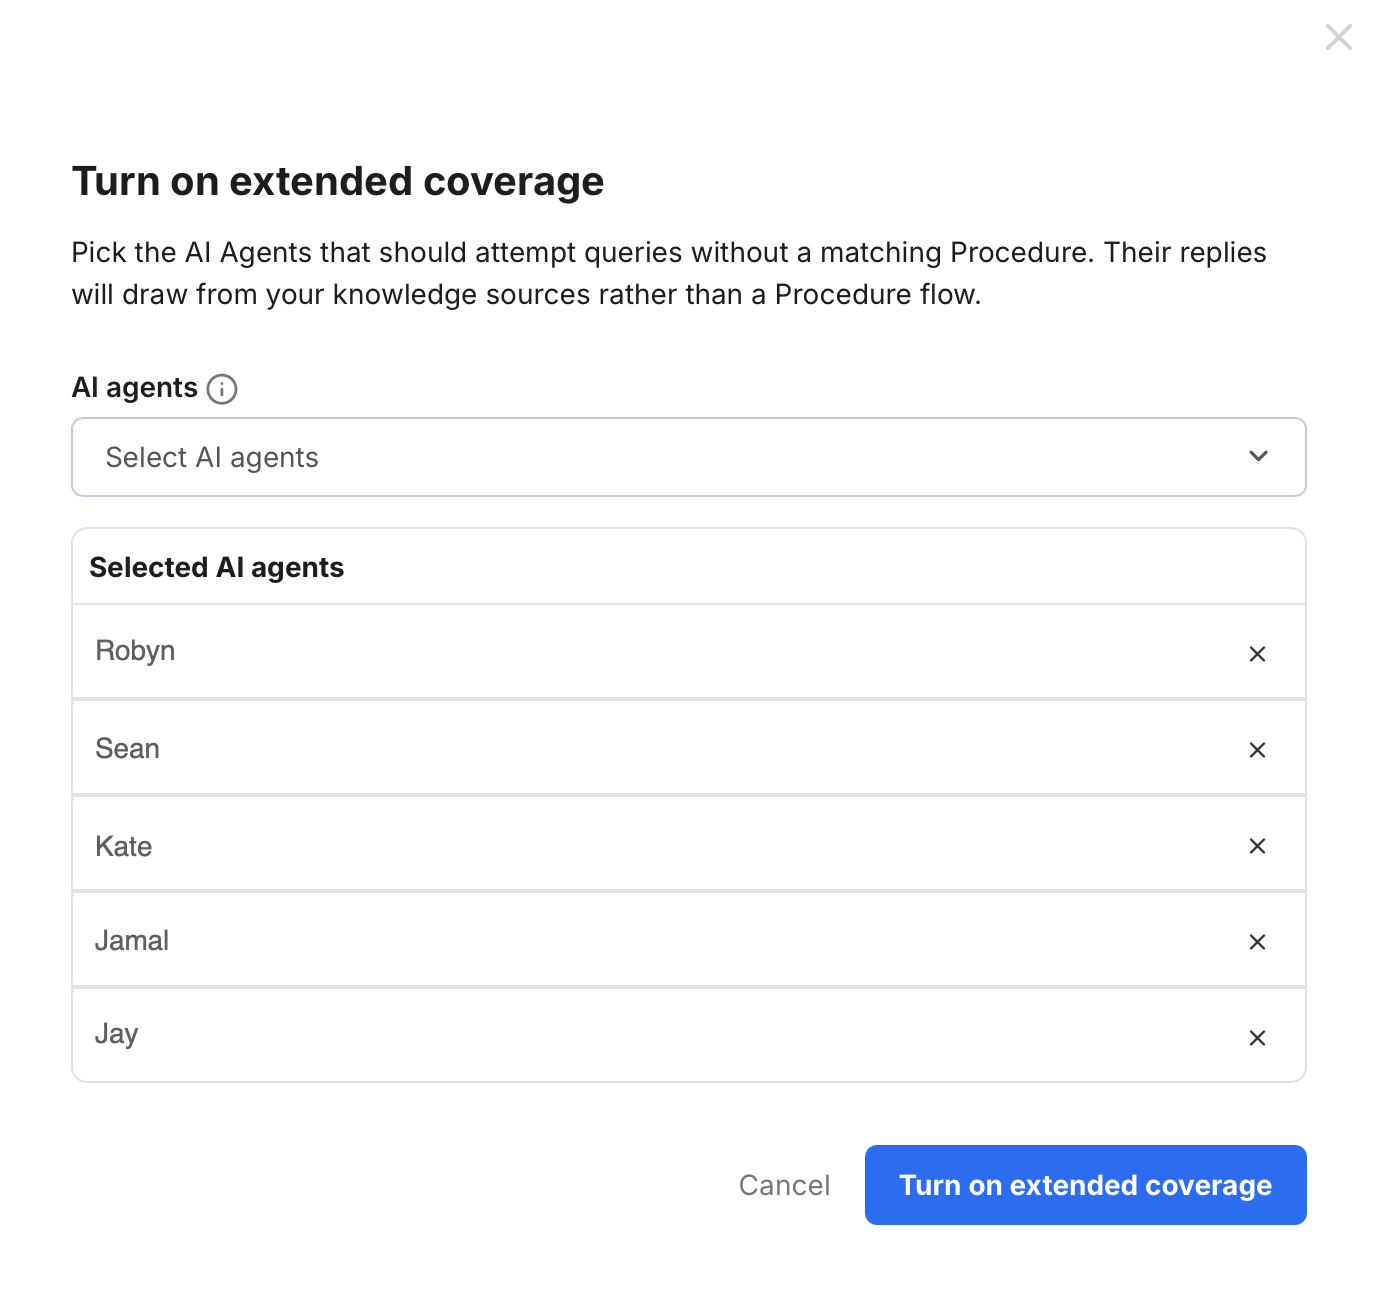
- To disable it for an AI Agent, select the X in the row for that AI Agent.
- To re-enable it for an AI Agent, select the Agent from the AI agents menu.
Further Reading
To learn how to create Instructions for your AI helpers, see here.
To learn how to create Policies for your AI helpers, see here.